to test it and write this article.
.
For any update for the content of this article, i suggest to visit the link avobe.
First of all, i must mention that i get many troubles on testing this device, because the sample i get to test have some issues that, as i understand after talking with the reseller Belchine, is particular to this and is not general issues to all the devices.
I will comment about these problems on the First Impression section.
The content of this article will focuss on technical data gathered from the device, and i will avoid do comments based on the experience with this.
I figure all this technical data will be enough for people that read this article, can get a general idea about what can offer this device.
This article will not be in deep as usual than another devices, but i will do my best for generating useful info for people that are interested on this device.
There are some little history about this device, and why all their names for the same product.
iReadyGo is the manufacturer of this device, but they manufactured this for another society: 78dian.
By some commercial agreements, iReadyGo cannot sell this device, because is an exclusive product from 78dian.
In some moment, there are a new agreement between iReadyGo and 78dian, and iReadygo can sell the device with their product line name "Much", and named this model as "Much W1"
Then, the new SoC MTK6595 will enter on the future production line, and the new future device get a provisional name of "Much WOne 3D, or their short Much W3D, and their variant non 3D, Much W1 (for Much W One). For this reason, Much decided to rename their current W1, for the new name Much 78P01.
Finally, Snail bought iReadyGo in 2014, and the device get their final name: Much Snail 78P01
Summarizing: Snail iReadyGo and 78Dian points to the same device (the hardware is the same), and there are some minor aesthetic differences.
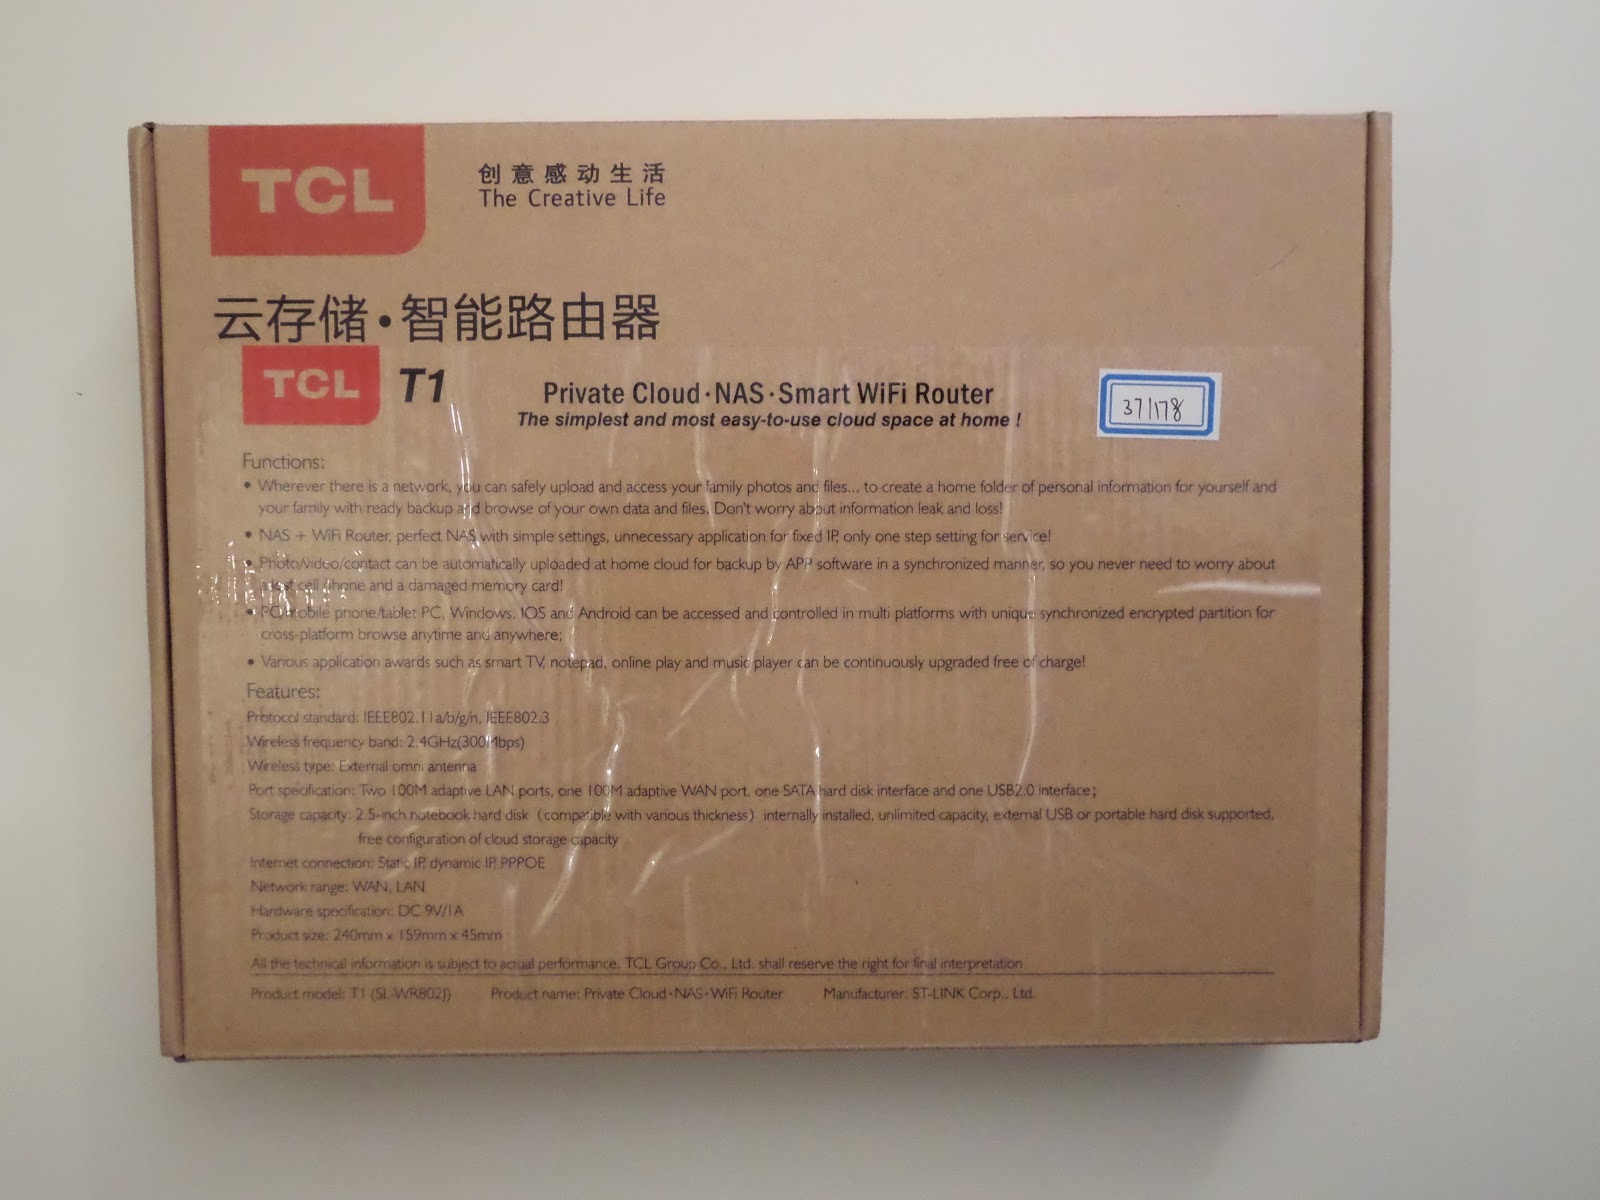
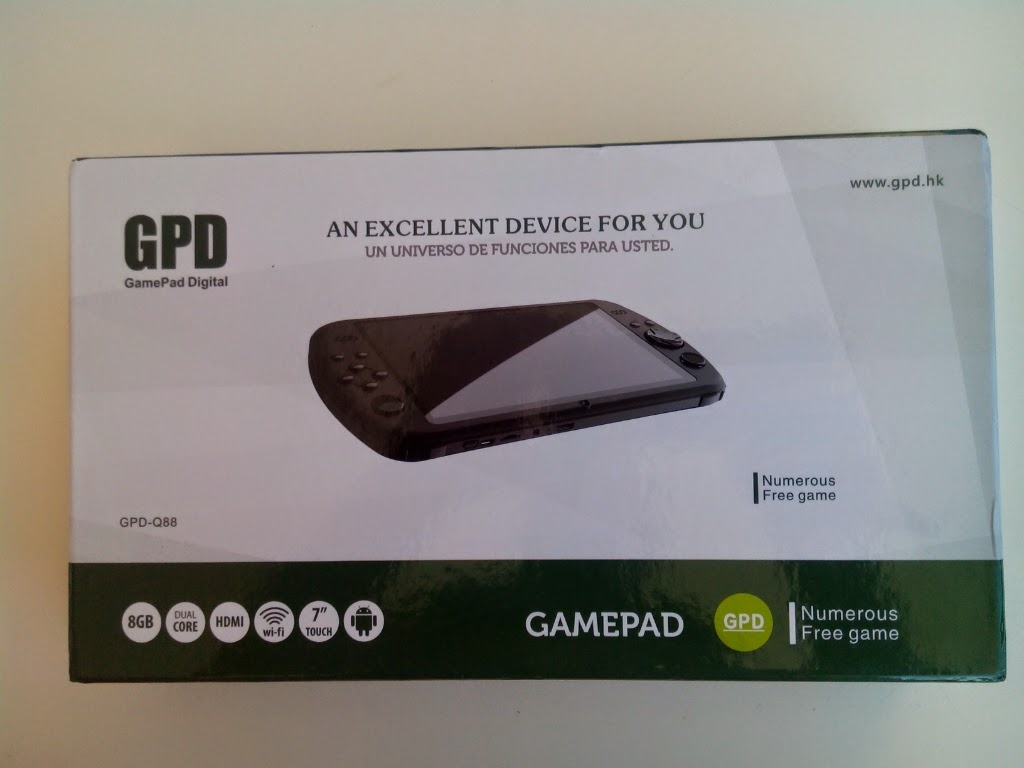
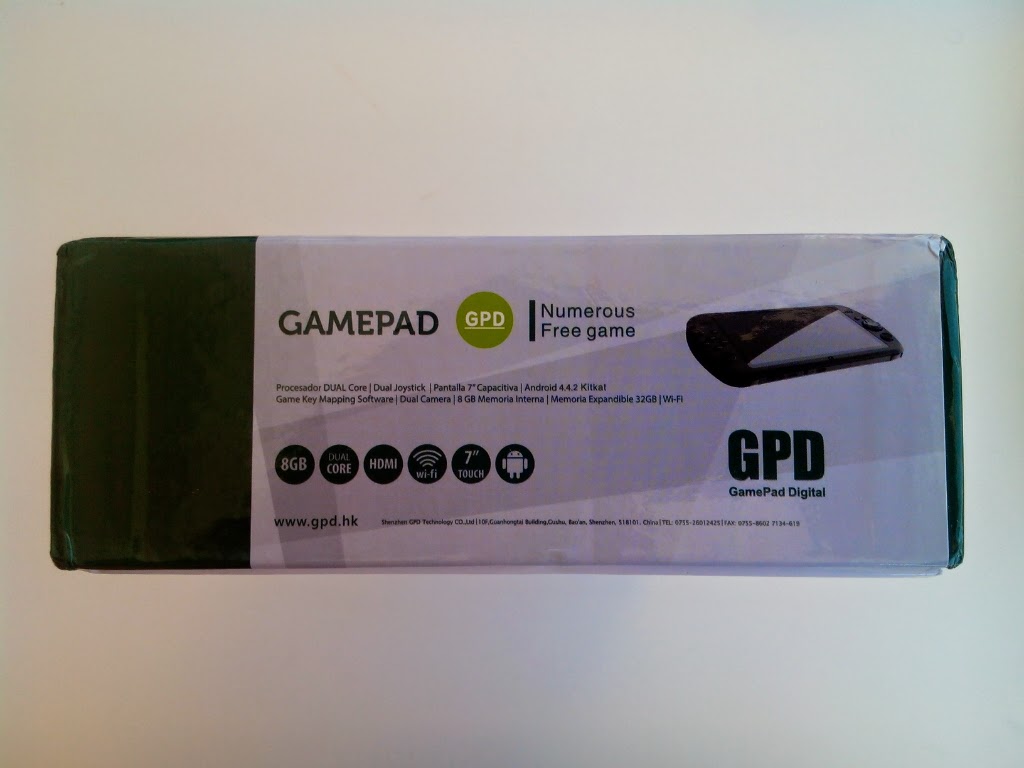
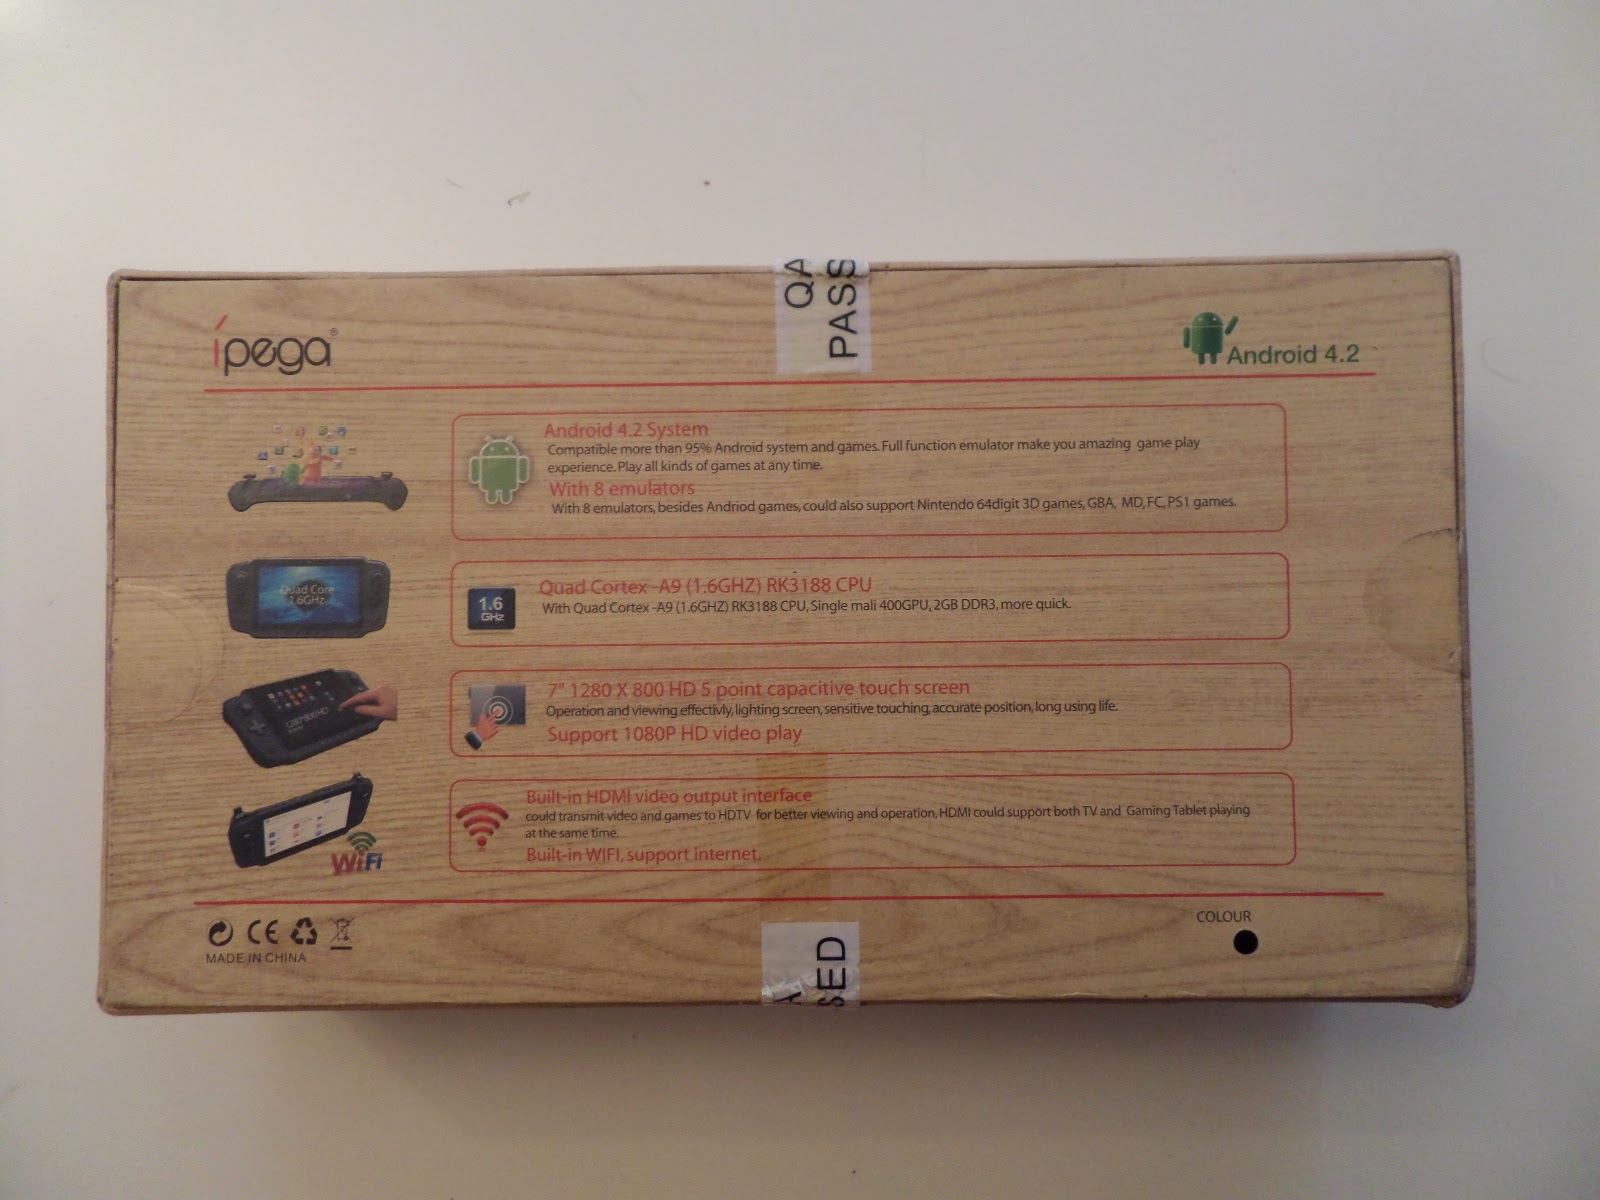
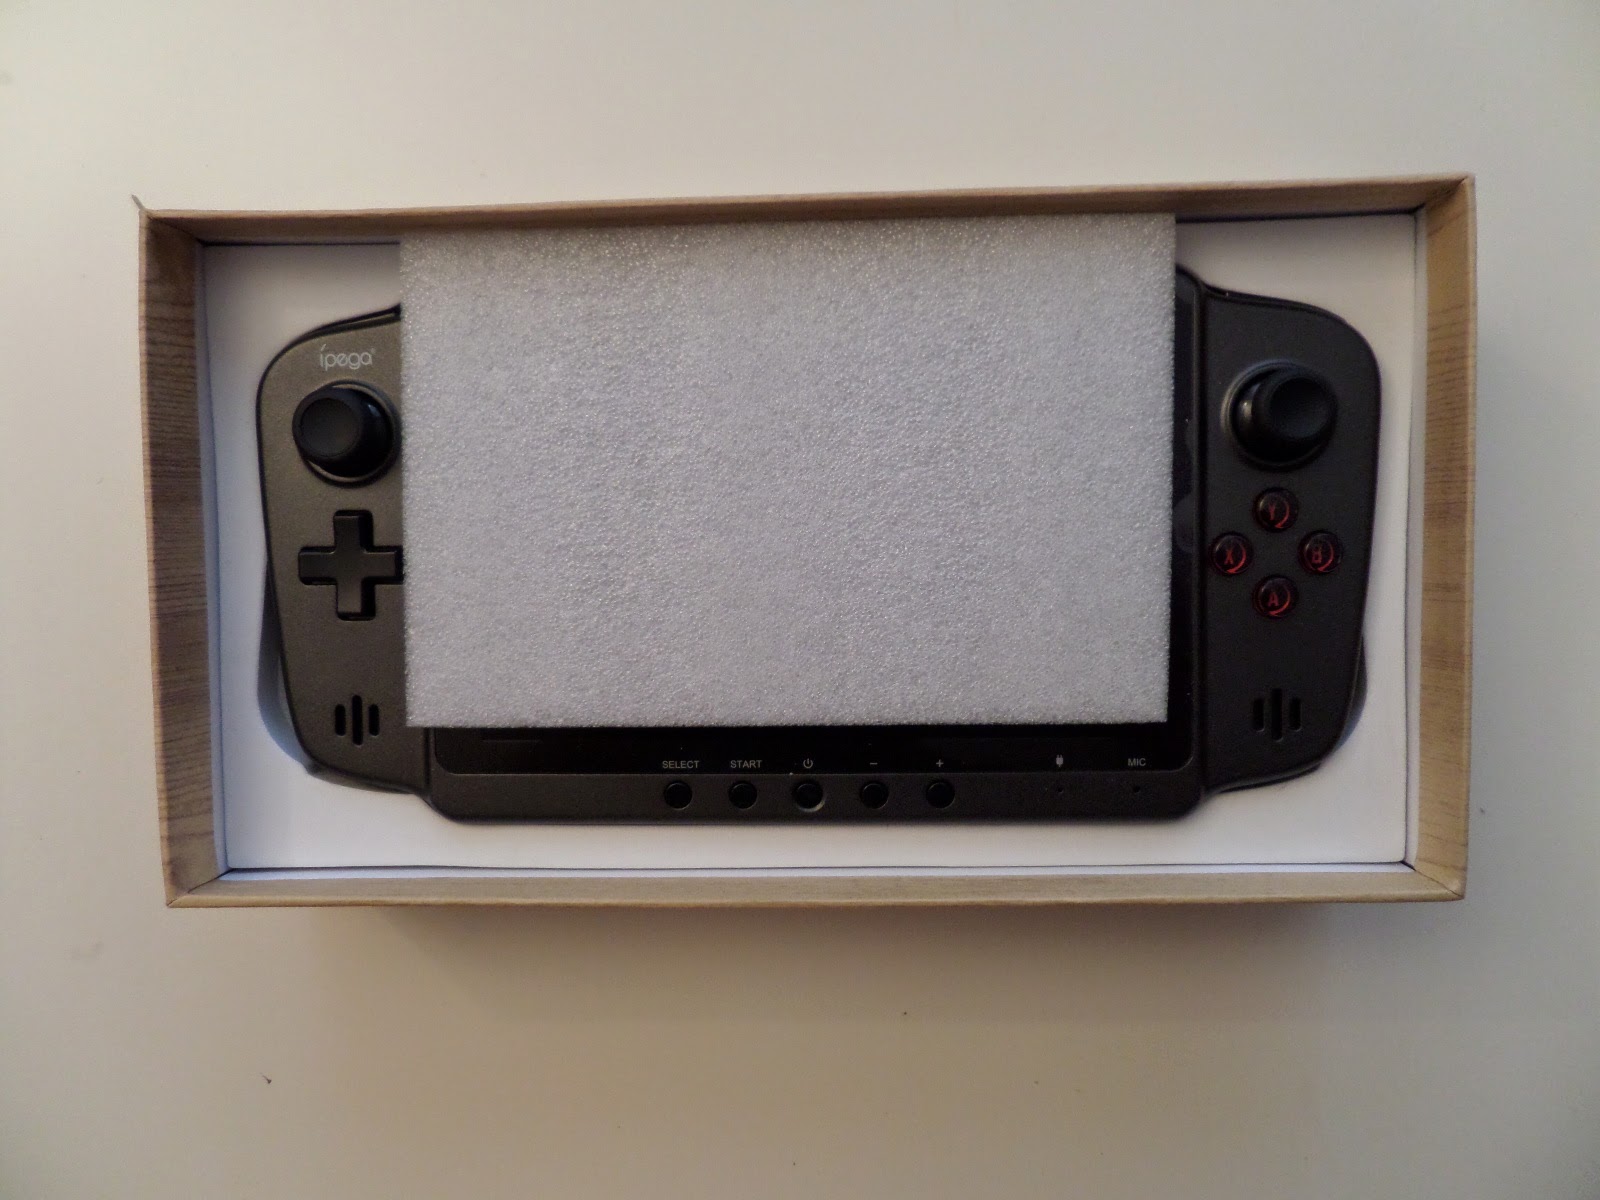
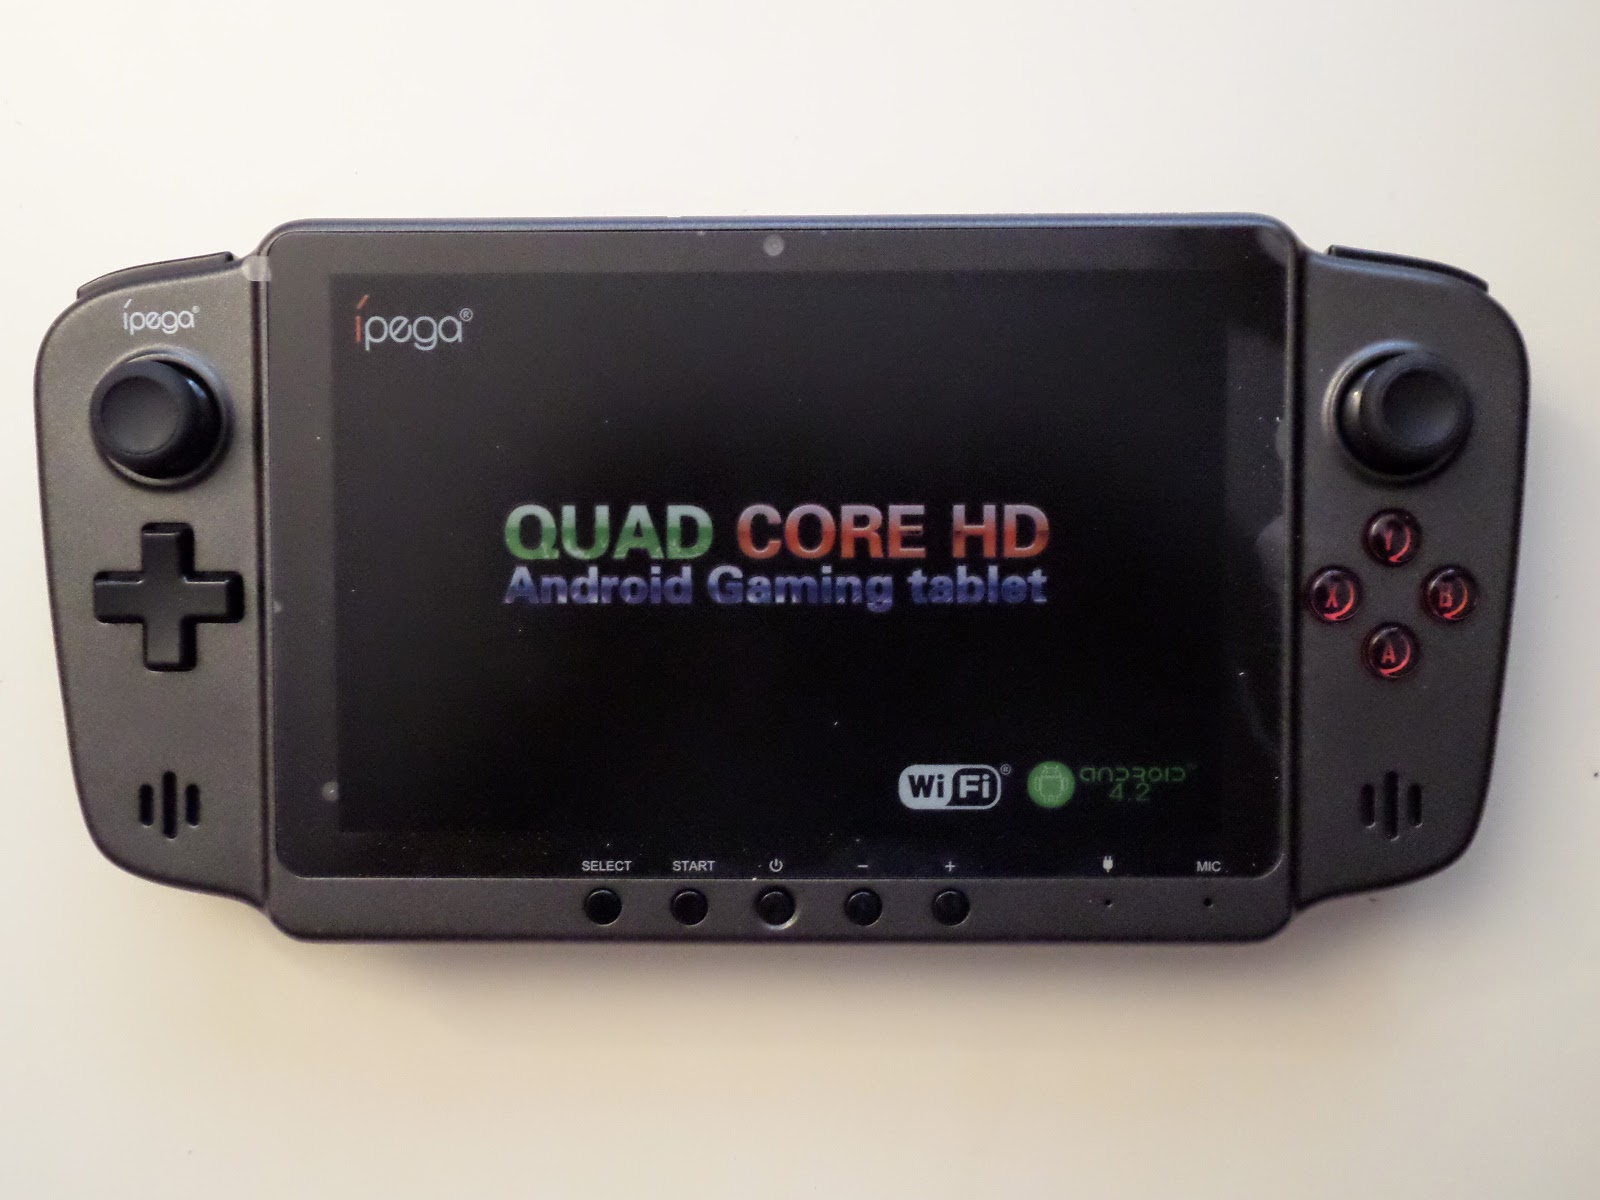
As you can see on the previous images, the package is very simple and minimalist, and bring a general feeling about a serious product.
The package don´t contain any info about the content (ram, cpu, etc). is much similar to other devices from iReadyGo such Much i5.
First Impression and general comments of the device
(What i feel in my first impression with the device)
I realize on few problems once i inspect the device, but some of them are specific of the device i received, then i will comment now about this, but please read the description of each problem for getting a general view about the device itself, considering that some of the problems are not generic.
Back cover
The first thing i notice when get the device on my hands, is that the back cover have a problem that doesn't fix correctly on the device.
Asking to the reseller, they told to me that this is a design problem of the device, almost, the first devices that come to the market.
This problem bring a low-quality feeling of the product.
Checking the back-cover, i realize that there are small pieces that must help to keep the battery fixed on their place. Probably, extending these pieces a milimeter will solve this problem
For fixing in my case, i used a piece of paper folded to generate a bit of pression on the interior.
Take note on the back speaker to avoid blocking with the paper (if you want to do the same "fix")
Now, put the back cover and, with the paper pressure, the cover fit better and all the plastic lash (sorry, i don´t know the correct word in english) will close without problems, and the back-cover will fit 100% on the device.
Now, the device feeling is much better on the hand. Now appear to be a robust device, that you can handle with safety, without the fear that the back cover will go away in any moment.
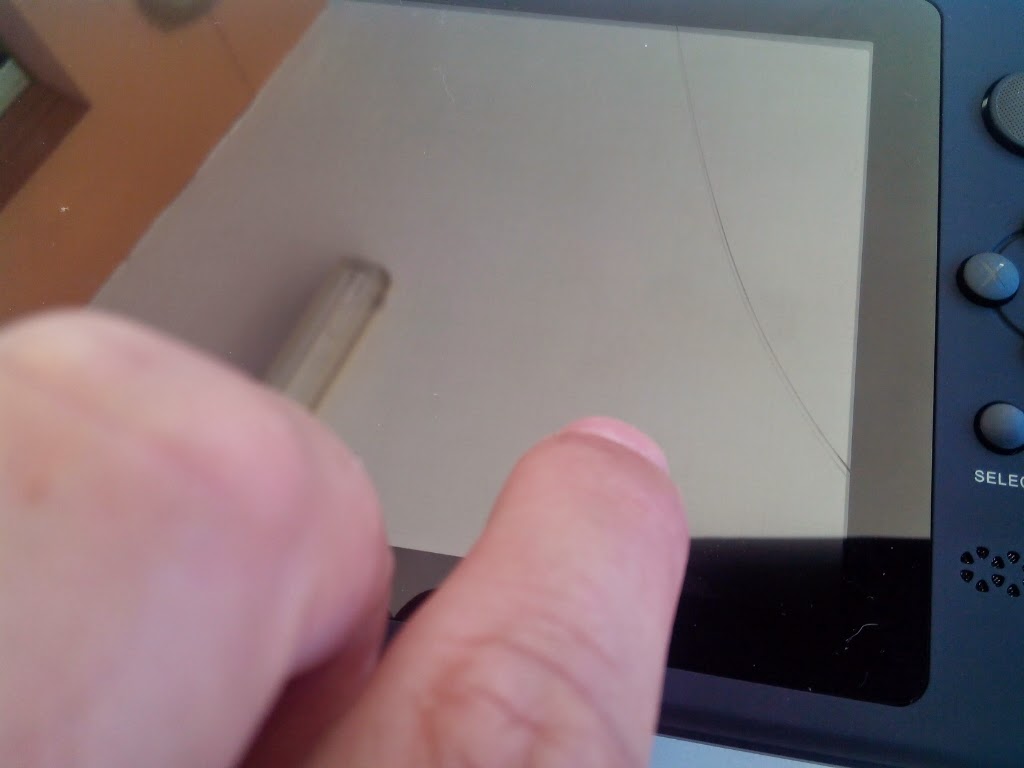
Screen get out
I get another problem on the device i tested, but the seller indicated to me that this is a problem specific on the device i received, then with this i figure there is no other with the same problem
The screen of the device get out constantly, and is impossible to use normally.
For this resason was a little bit hard to do a testing of this device, because is complicated to capture a cmoplete sequence of gampelay, without getting this problem. In the same way, this problem bring to me a bad feeling on the usage of the device, and i don´t want to write about this based on a very bad experience. For this reason i mentioned on the beginning of this article, i will post tech data, and avoid on commenting personal experience, for let to users get their own conclussions about the device itself, avoiding to think the problems i have are generic for this product.
I must say that Belchine store offered to send to me another device without the problems i found, but i consider was not necessary and keep testing with the device i have, because the technical data will be the same, and can write a useful article with this.
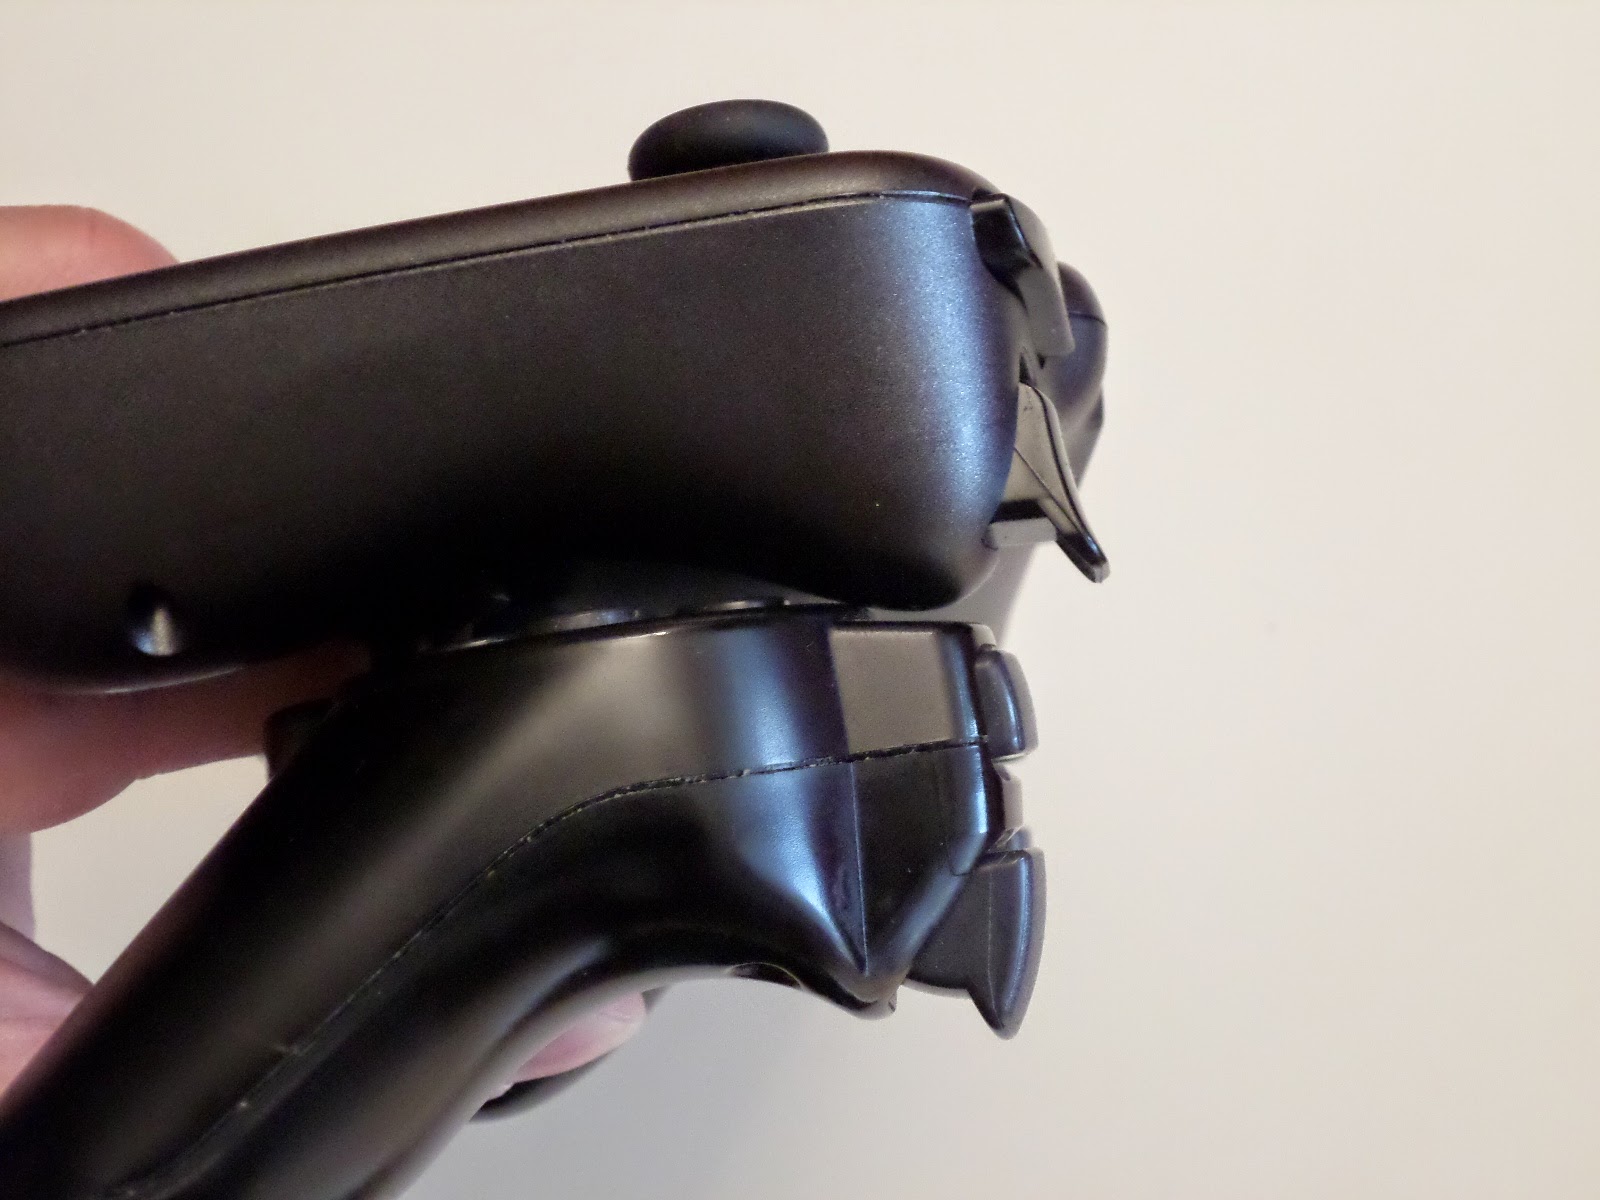
Button R get stucked
This is a generic problem of the device, but
the reseller (Belchine) confirm to me that they are fixing this on each device they are selling.
I can´t confirm if another stores are doing the same.
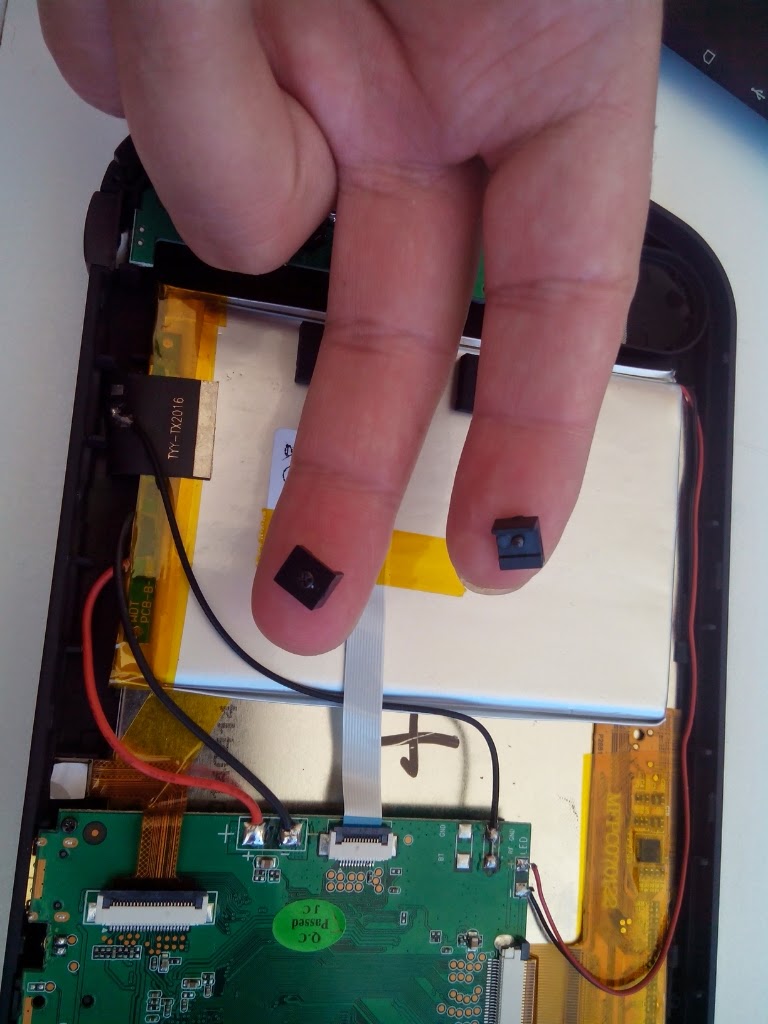
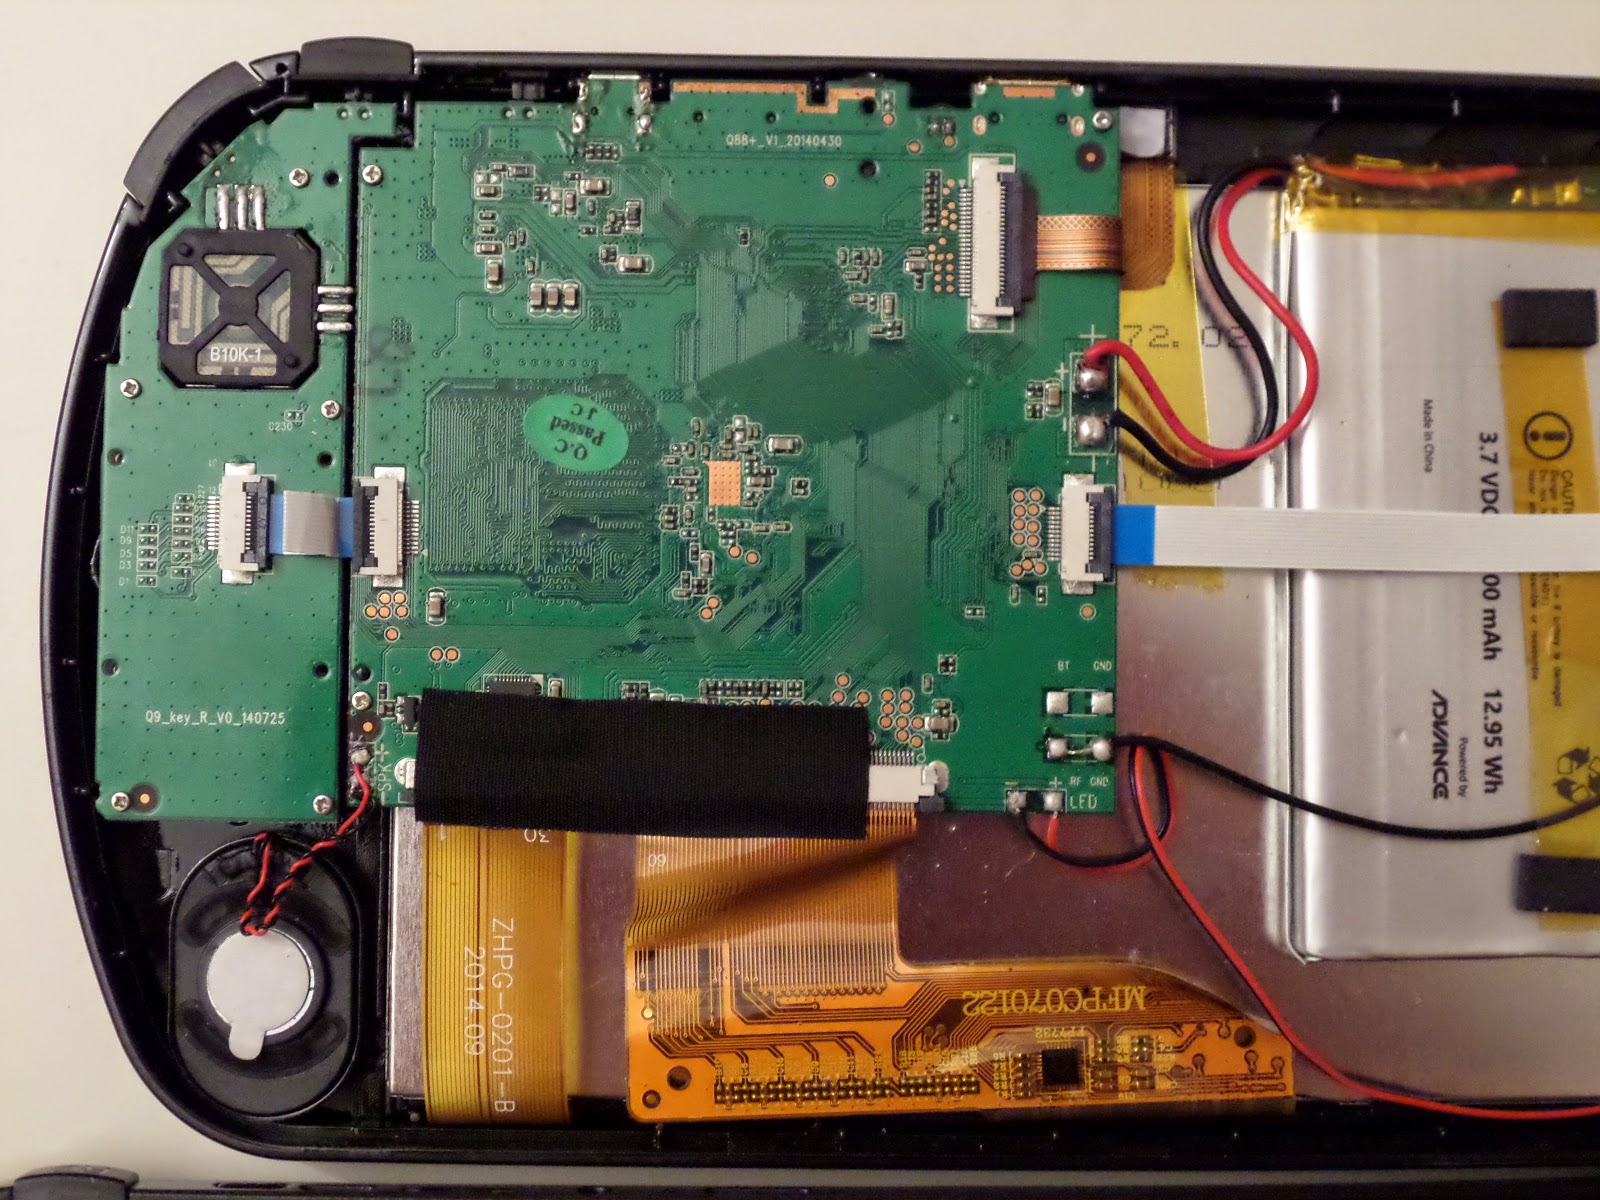
I figure for solving this, may be necessary to open the device completely, but for now i will avoid doing this operation, because i prefer to keep testing the device (reducing the probability to get the device not usable, because i´m not so skilled ensambling phone components)
Design problem
Well, this is not really a "problem", instead a trend of design on other devices that their back cover is curved.
For handling the device, is more comfortable on the hands, but when you put on a table, and you want to use the device for chatting, or any other operation with the screen, the curve back sharp may be boring and frustrating because the device swing, spinning, etc. when you interact with the screen.
Again, this is not really a problem of the device, but this trend of design may cause these kind of irritating and unexpected behaviors.
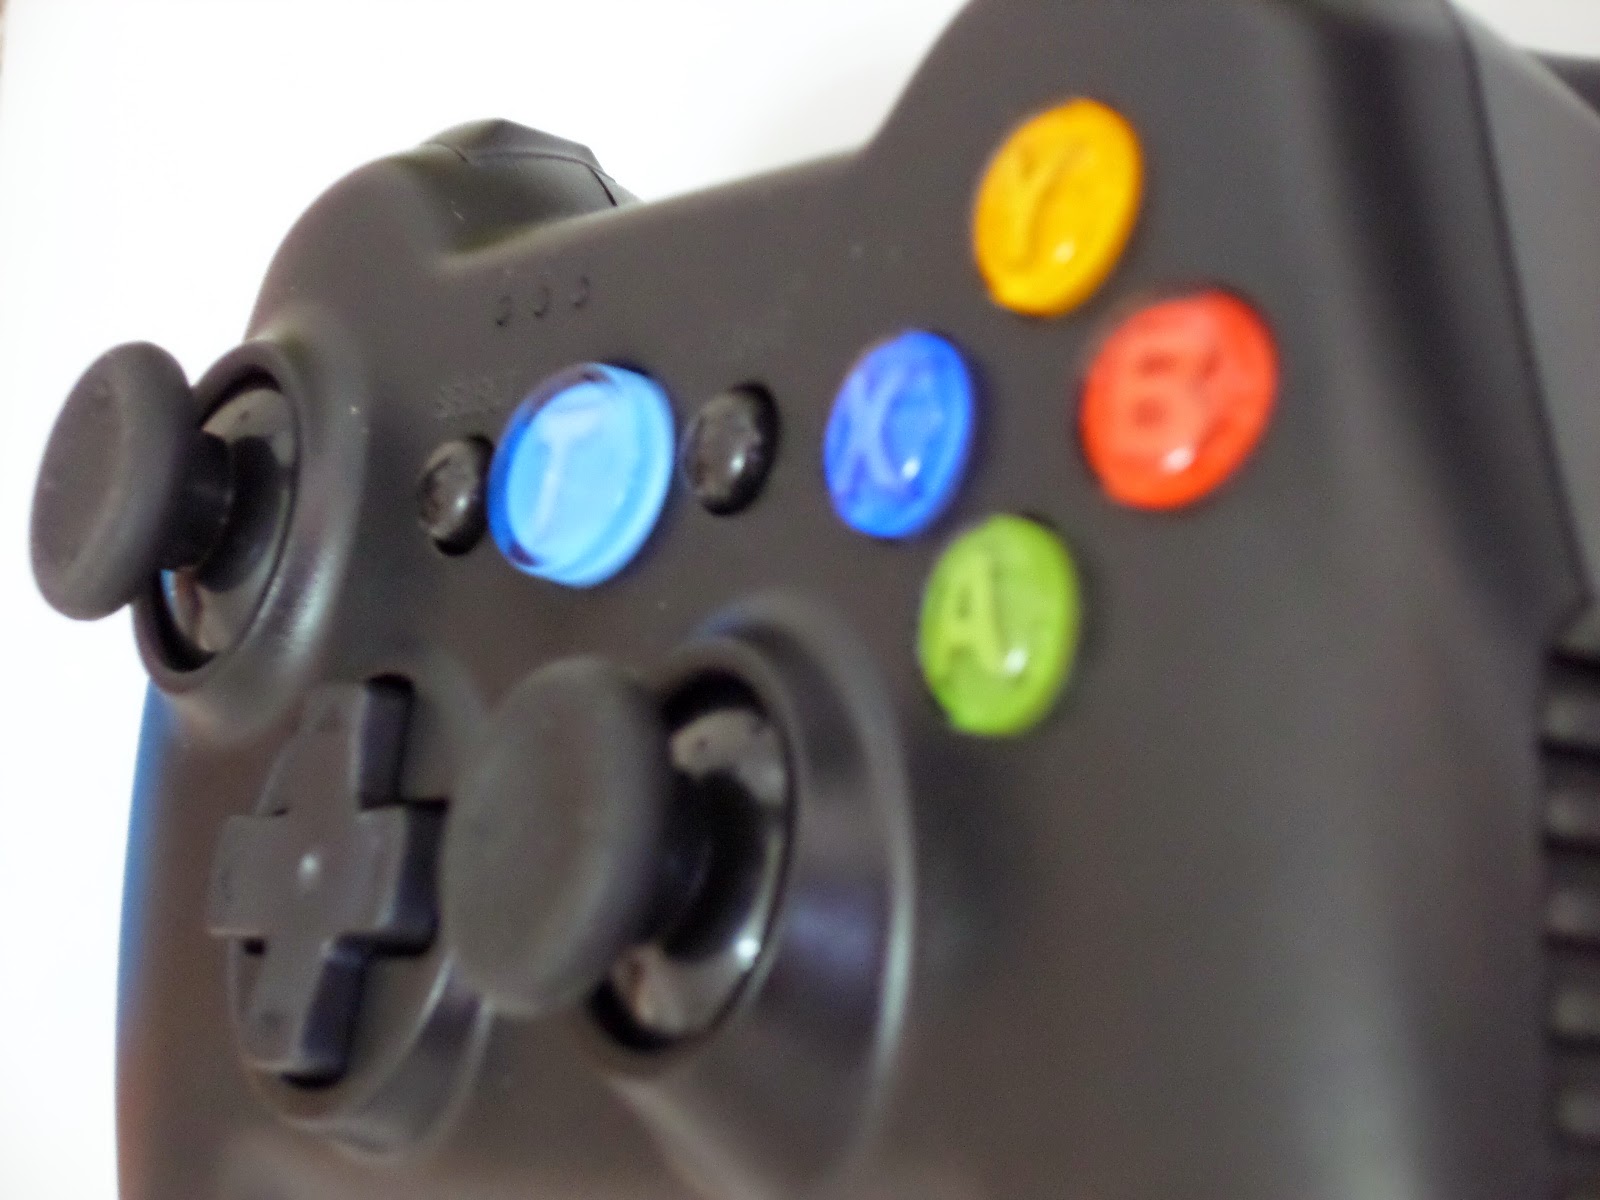
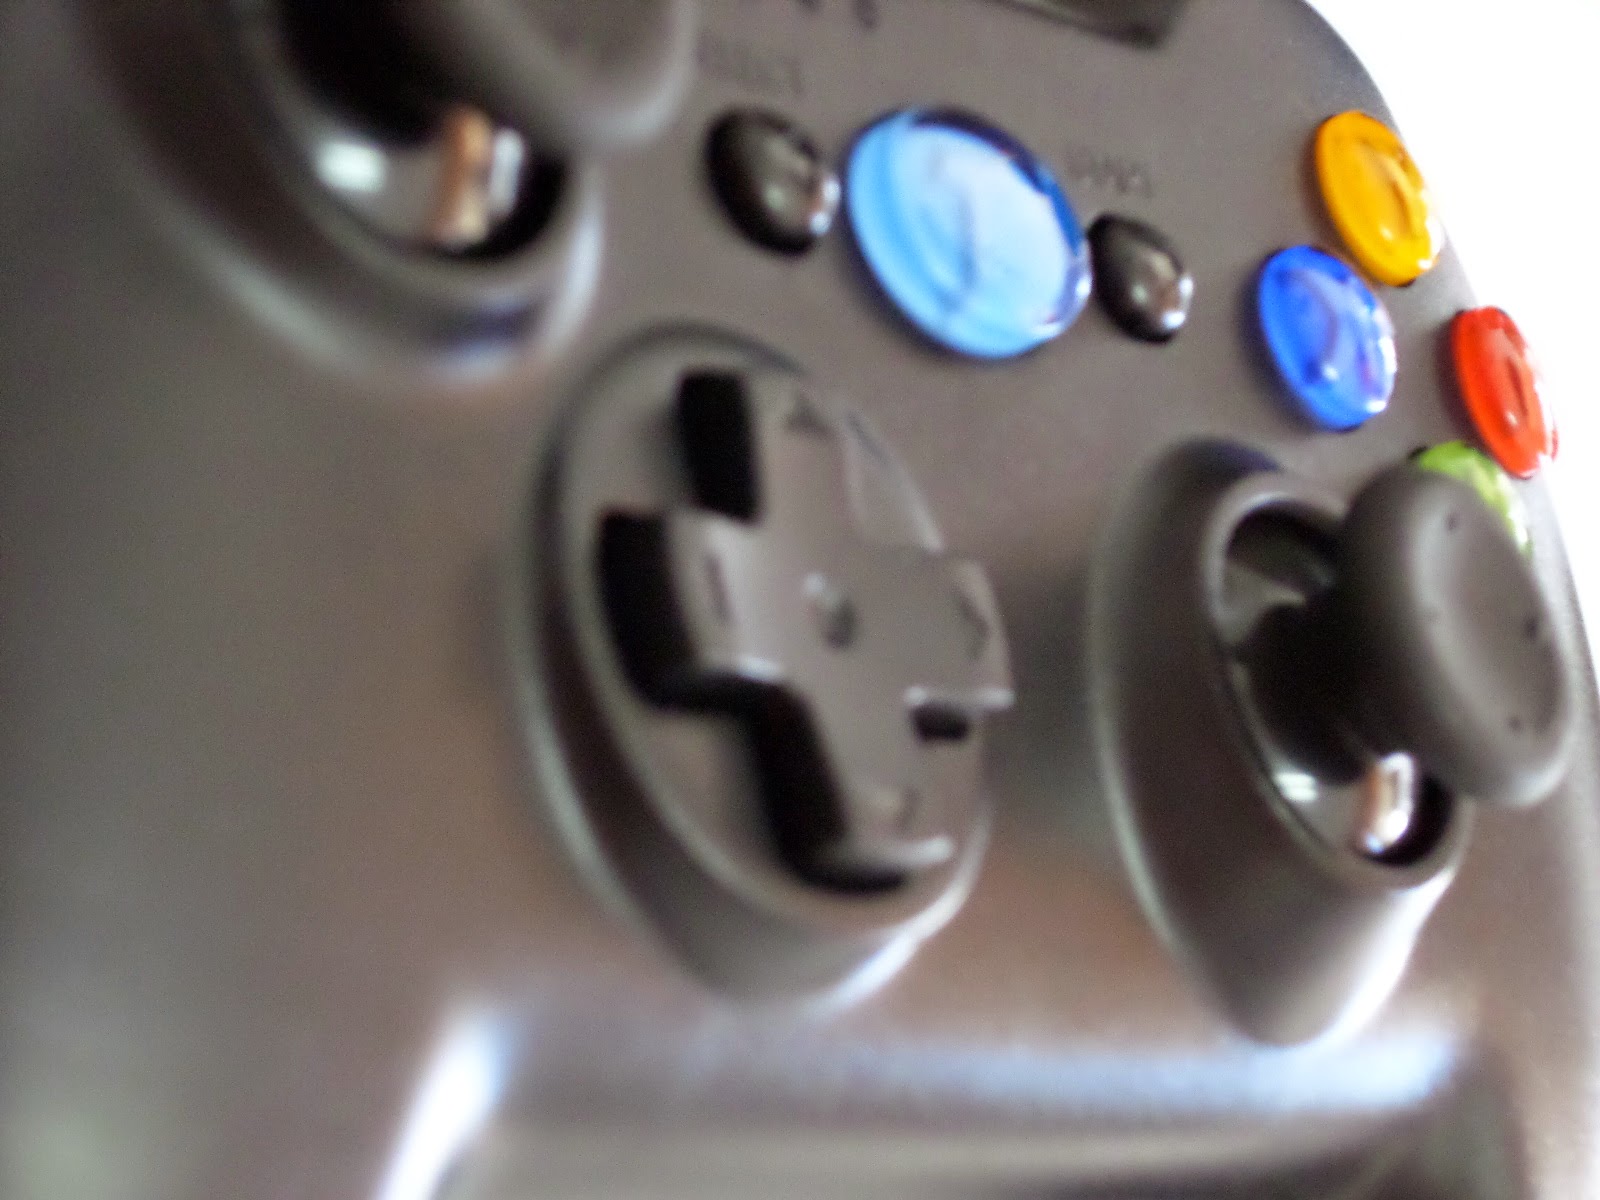
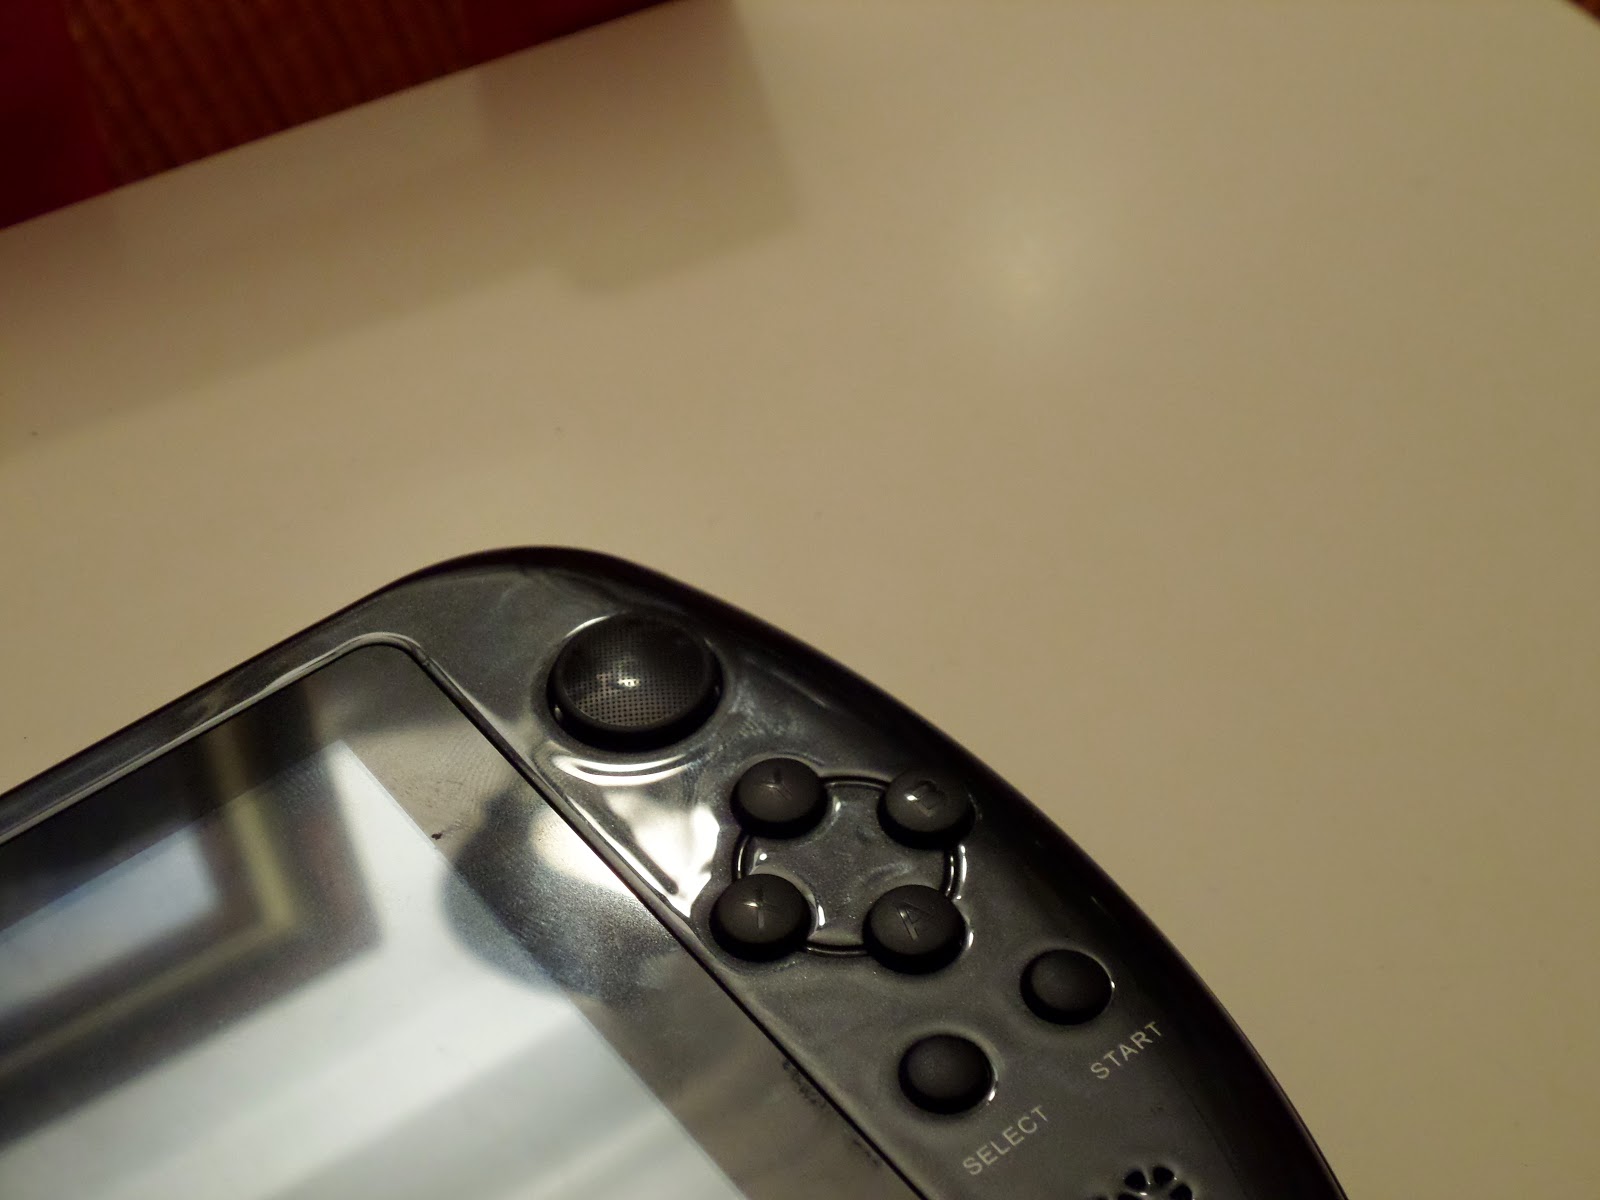
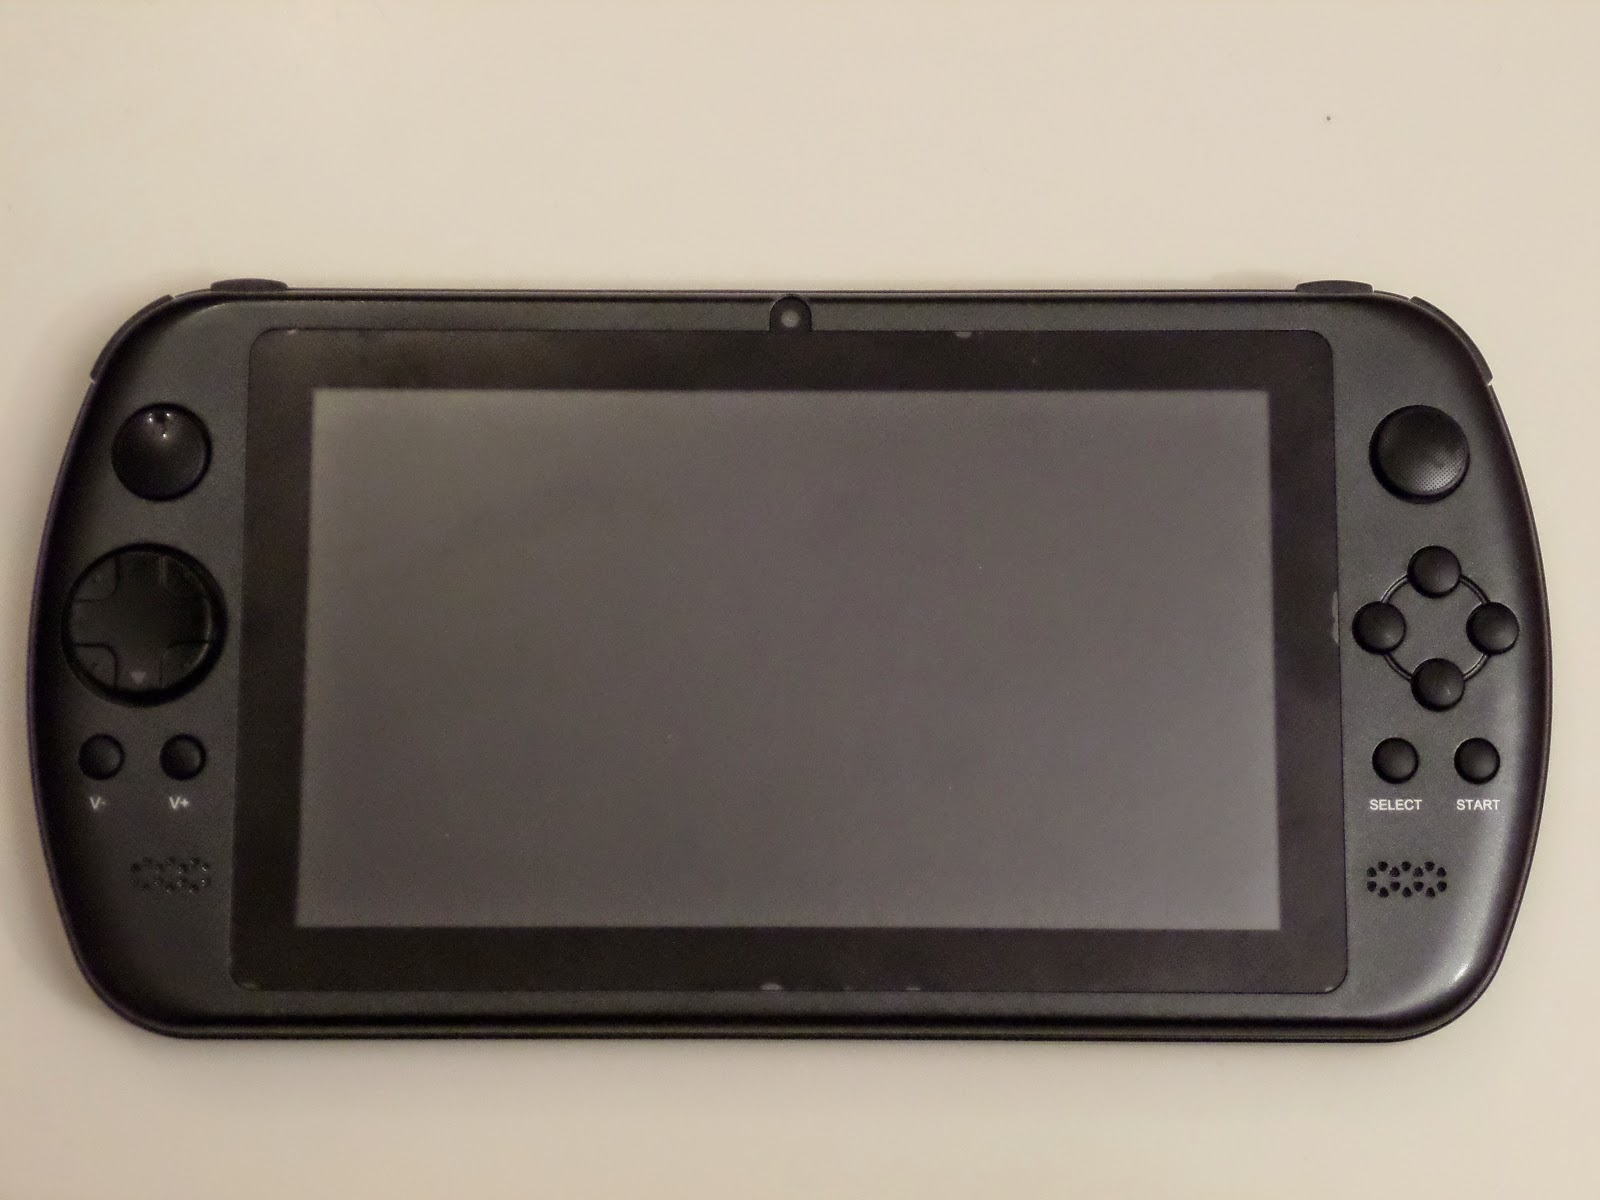
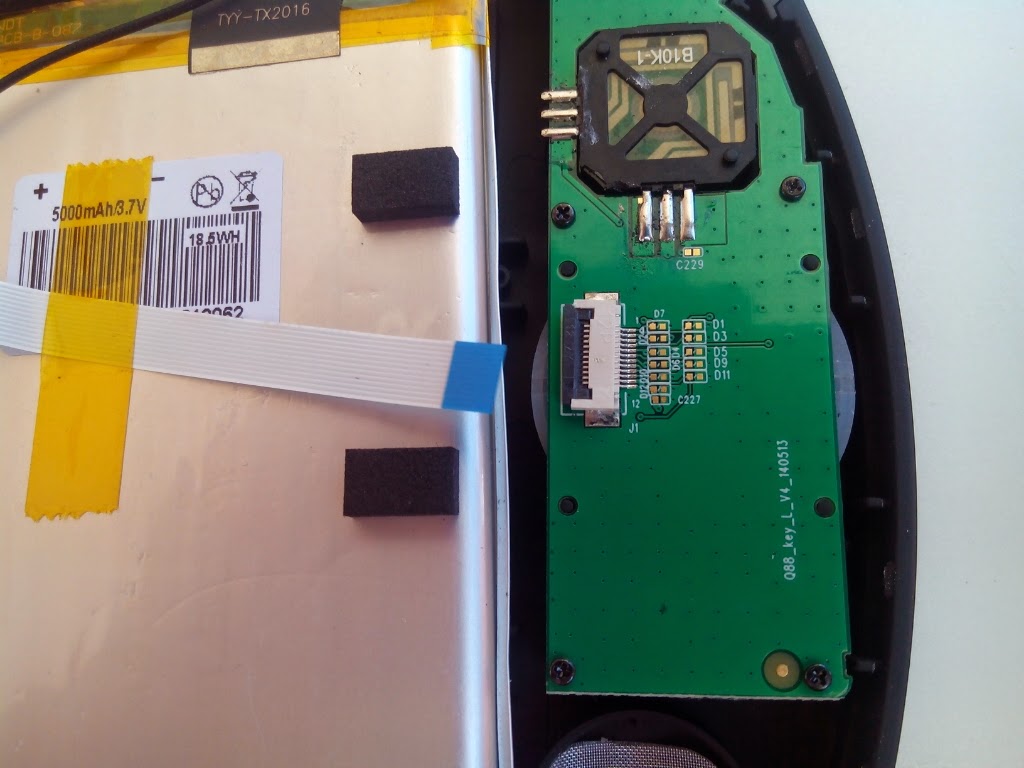
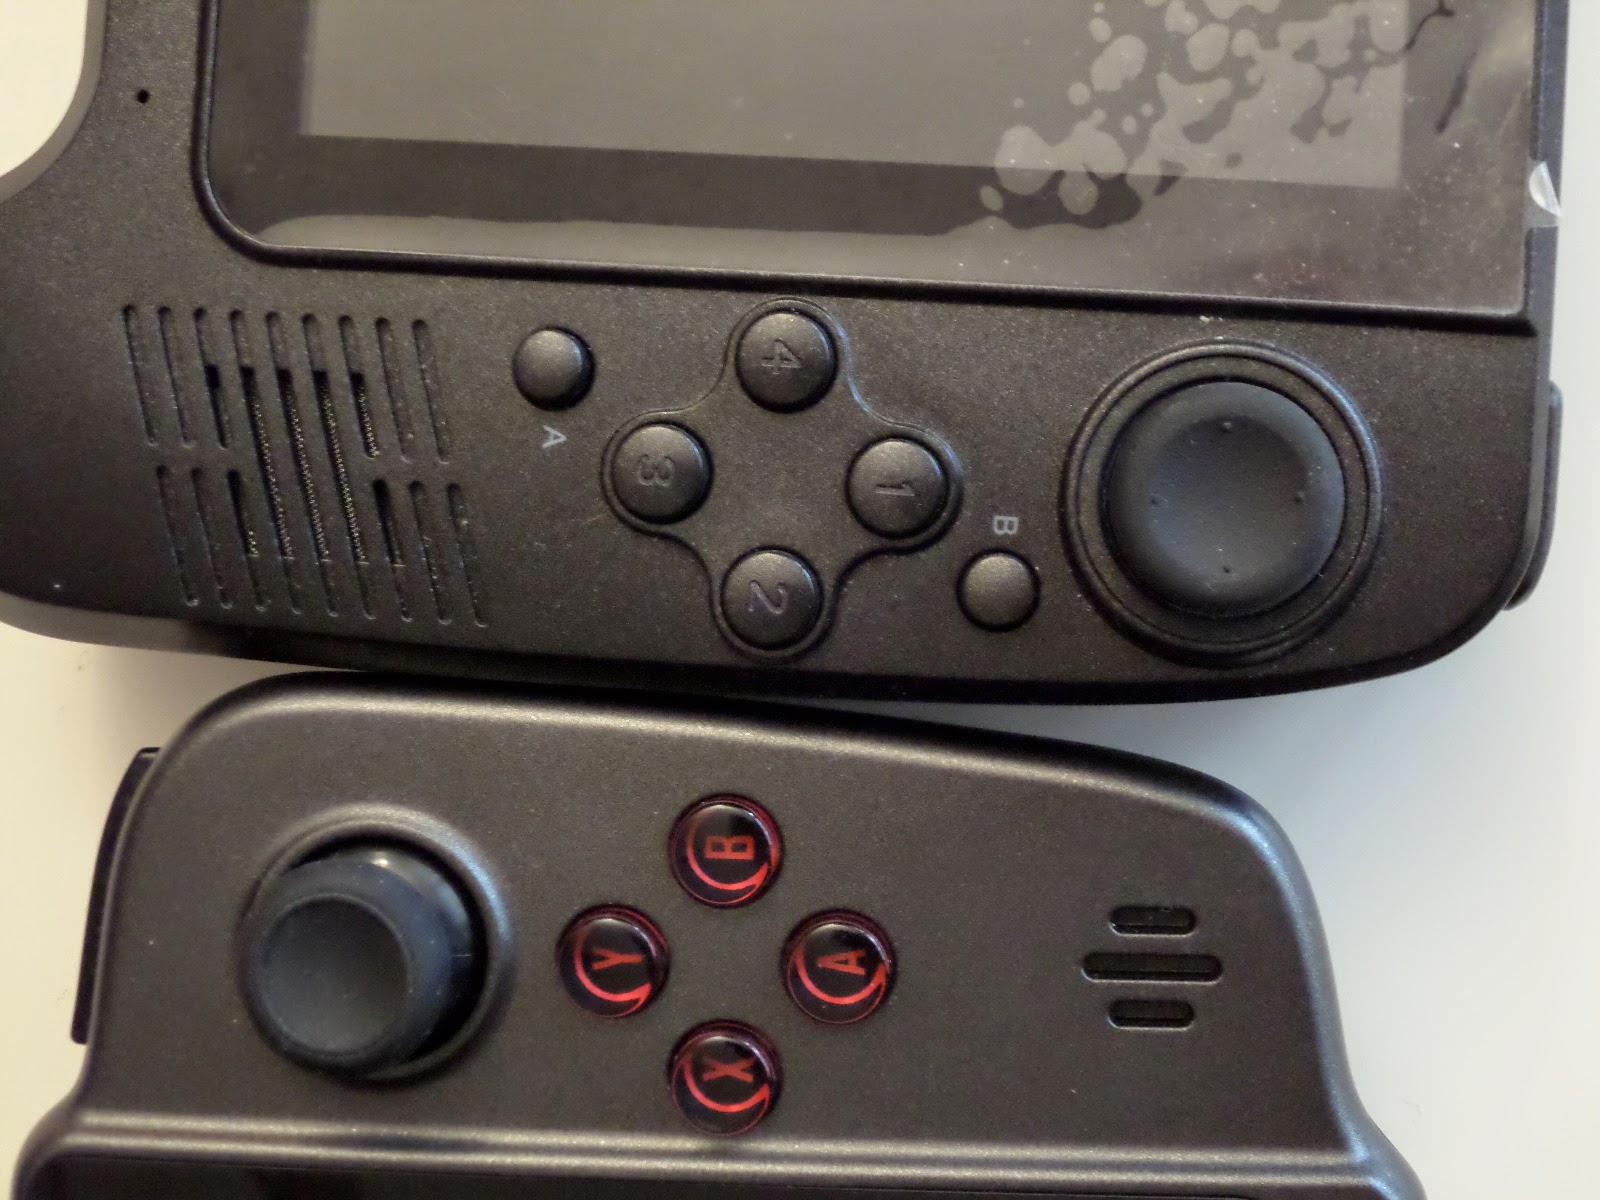
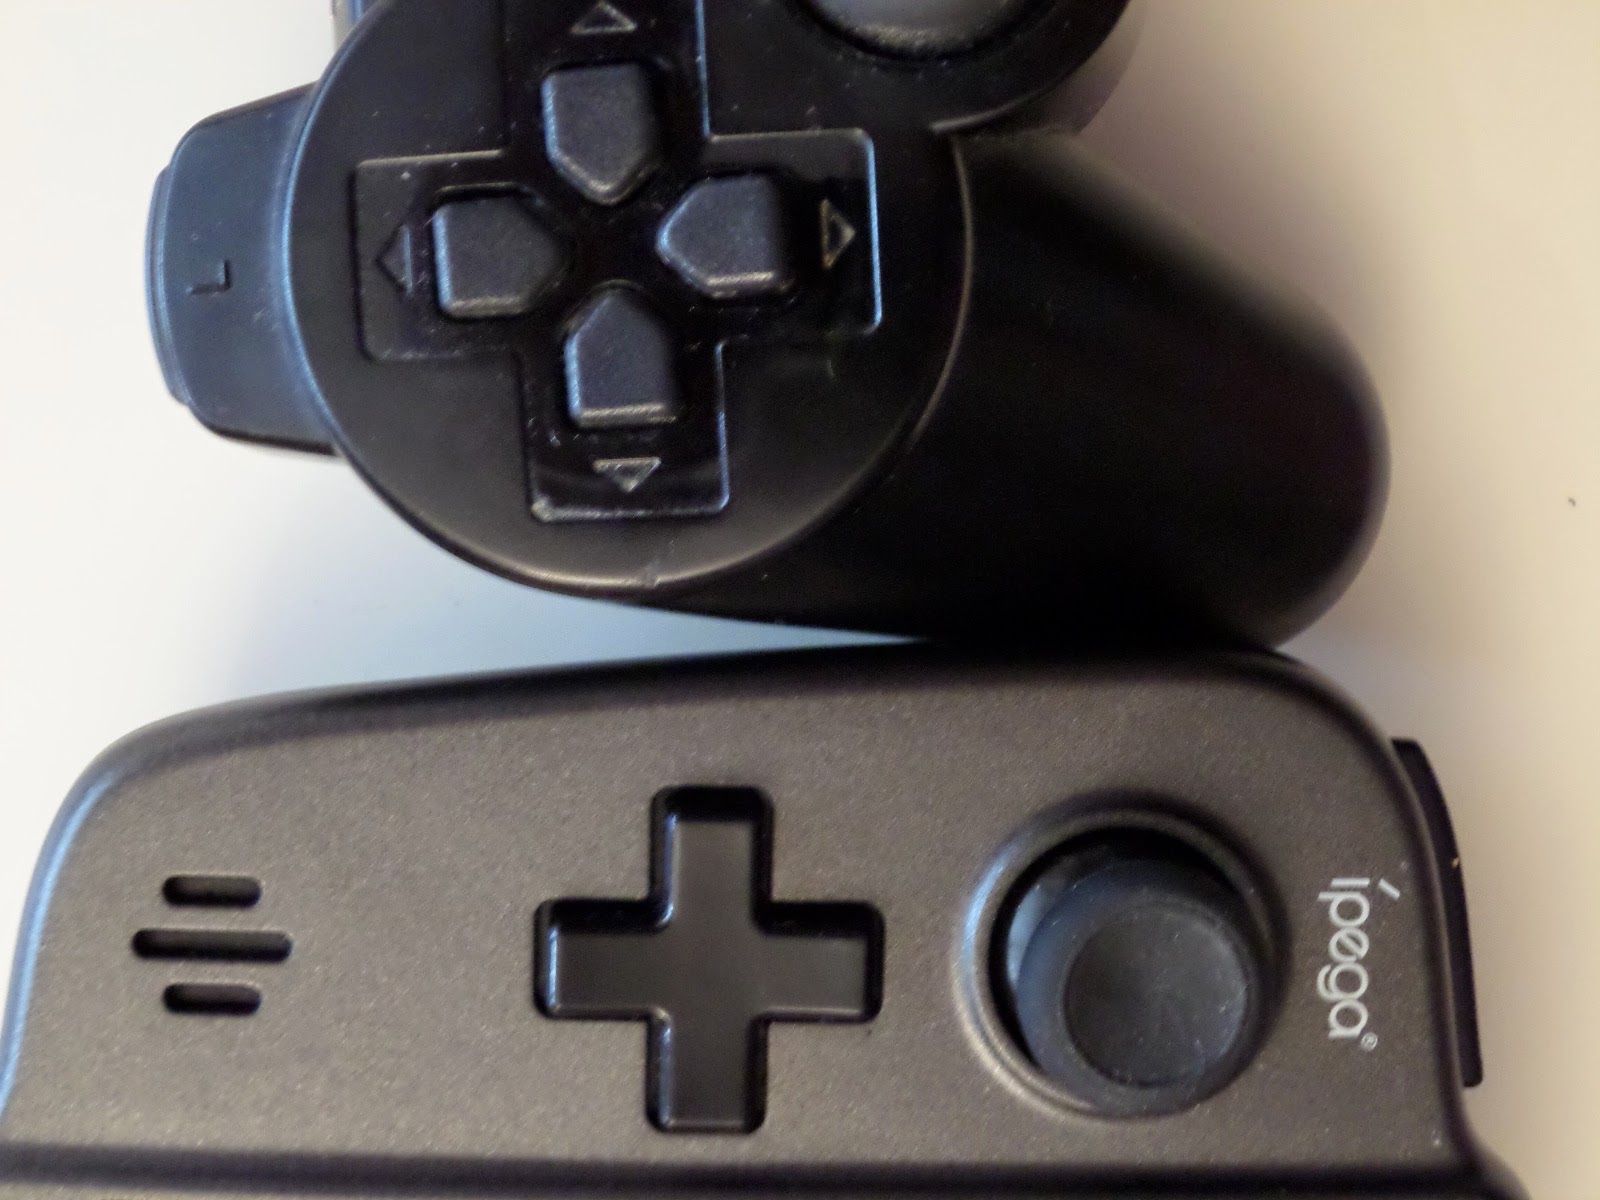
DPAD
One of the most important component on any gaming device is the DPAD. Is critical that this component is well designed,for play most games and specially fighting games.
My first impression before testing this DPAD was not really good, because i have so many doubts about this.
The border of he chassis may be annoying on normal gameplay, because the thumb get this border and may stuck the movement.
Well, after playing with this DPAD, i can say that is a good DPAD for fighting games. May be a little bit weird at beginning, and you must be usual with this for playing in confortable way, but typical moves of H-circle, Q-circle, Dragon Punch, etc, can be performed with easy.
Take note that on the video i´m playing with a camera between me and the device, with the harms extended, and in general i´m not comfortable playing, but you can figure that the DPAD is good enough for playing this kind of games (i´m trying to do many Shoryukens for testing the control. Note that my portable console gampelay usually is best from left to right)
Buttons
Similar to DPAD, the action buttons are surrounded by a chassis part of the device, and borders of this may be annoying for playing, but with some practice, is able to play with this wihtout problems.
The touch feeling is not as traditional gamepads. Buttos are a little bit hard to be pressed and do a little "clack", but have a good response.
Is easy to press more than one button at the same time, event the 4. Games that requires multi input sequences such Multi-throws of Tekken, can be played wihtout problems.
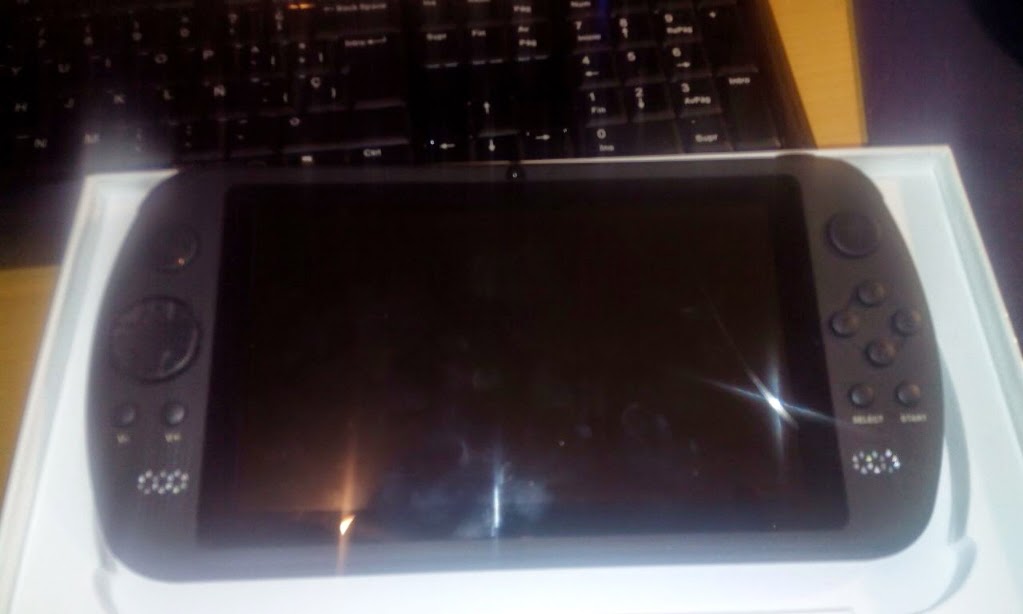
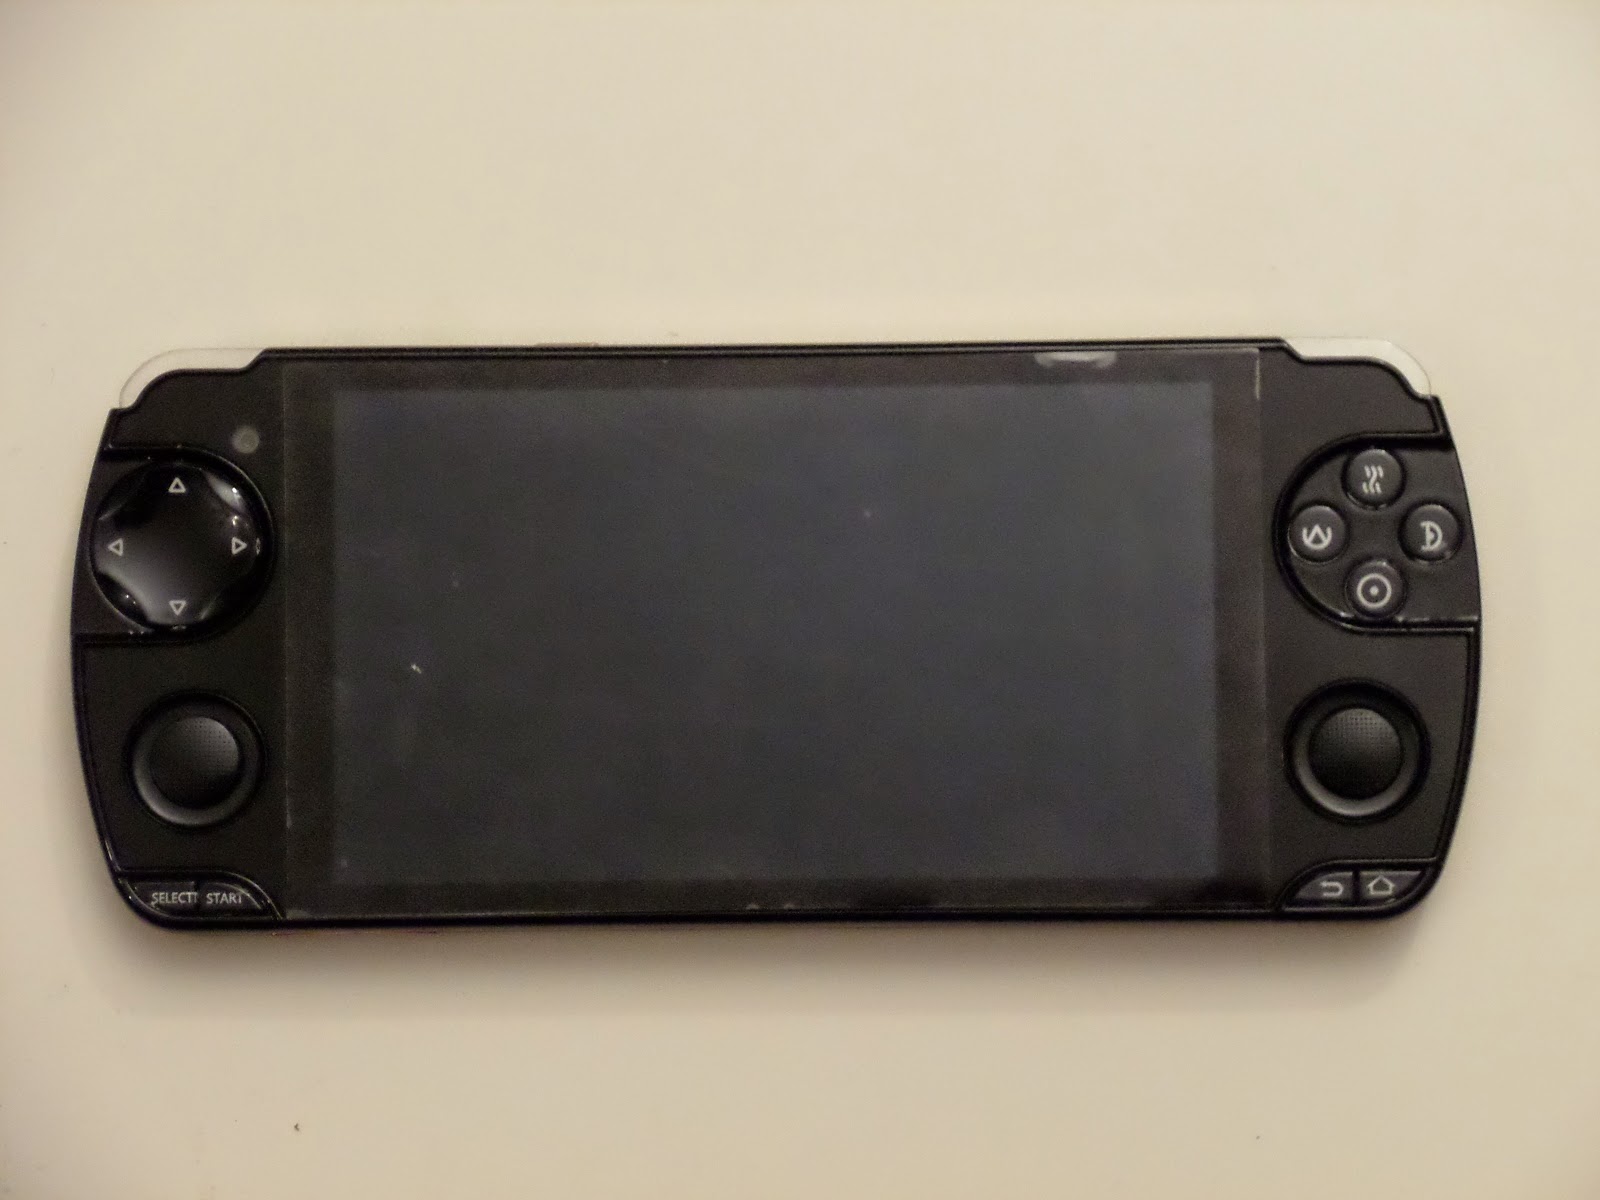
Shape Form and Size
The device shape form is very discrete in general therms. If you put the device face down, is not evident that this is a gaming device.
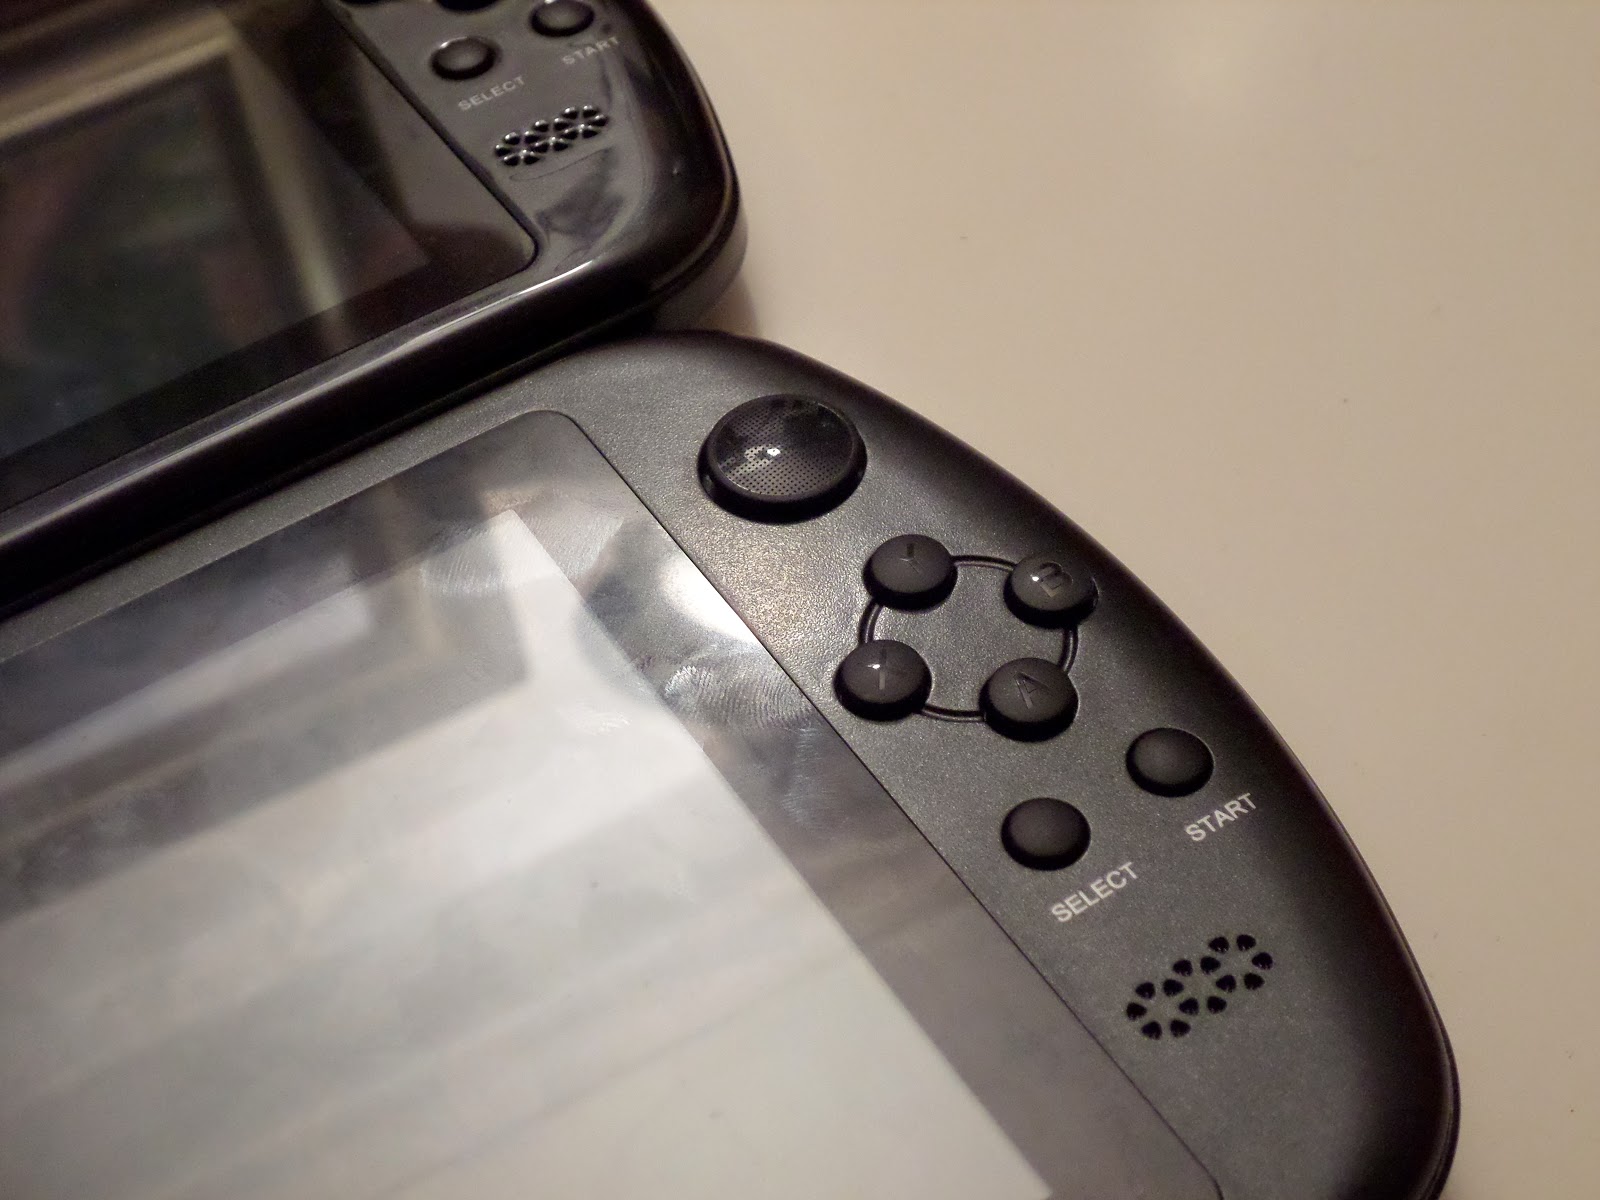
One of my concerns with this device was the size. For my daily usage, i have a Much G2 device, that is biggest than normal 5" phone, basically because there is space for controls on the surface of the device.
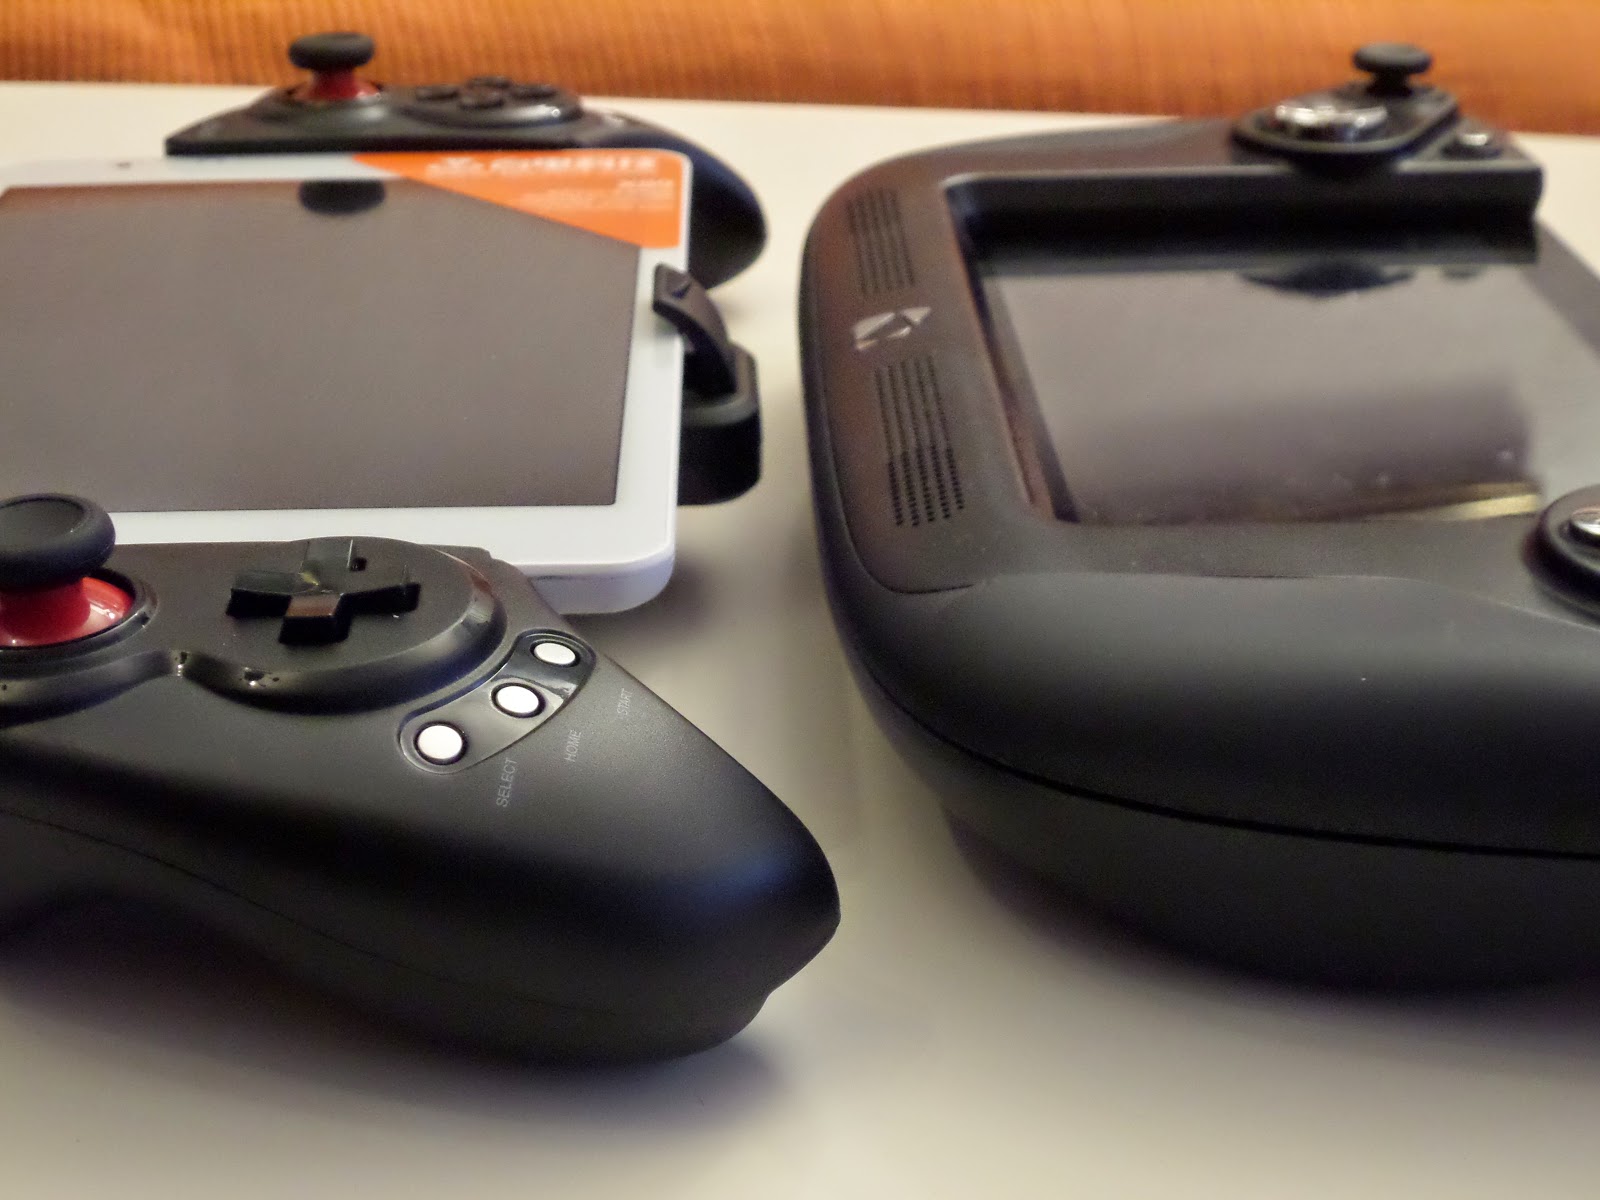
Now, considering that Much W01 have a more complete control layout, i figure the size will be biggest for allow enough room space for put all these controls on it, but as you can see on the previous image, the device really keep most of the same size than Much G2, may be 1cm larger, but keeps on the margins for a portable device and phone, in the same way as Much G2 is.
In fact, the previous image shows three Much devices, from small to large:
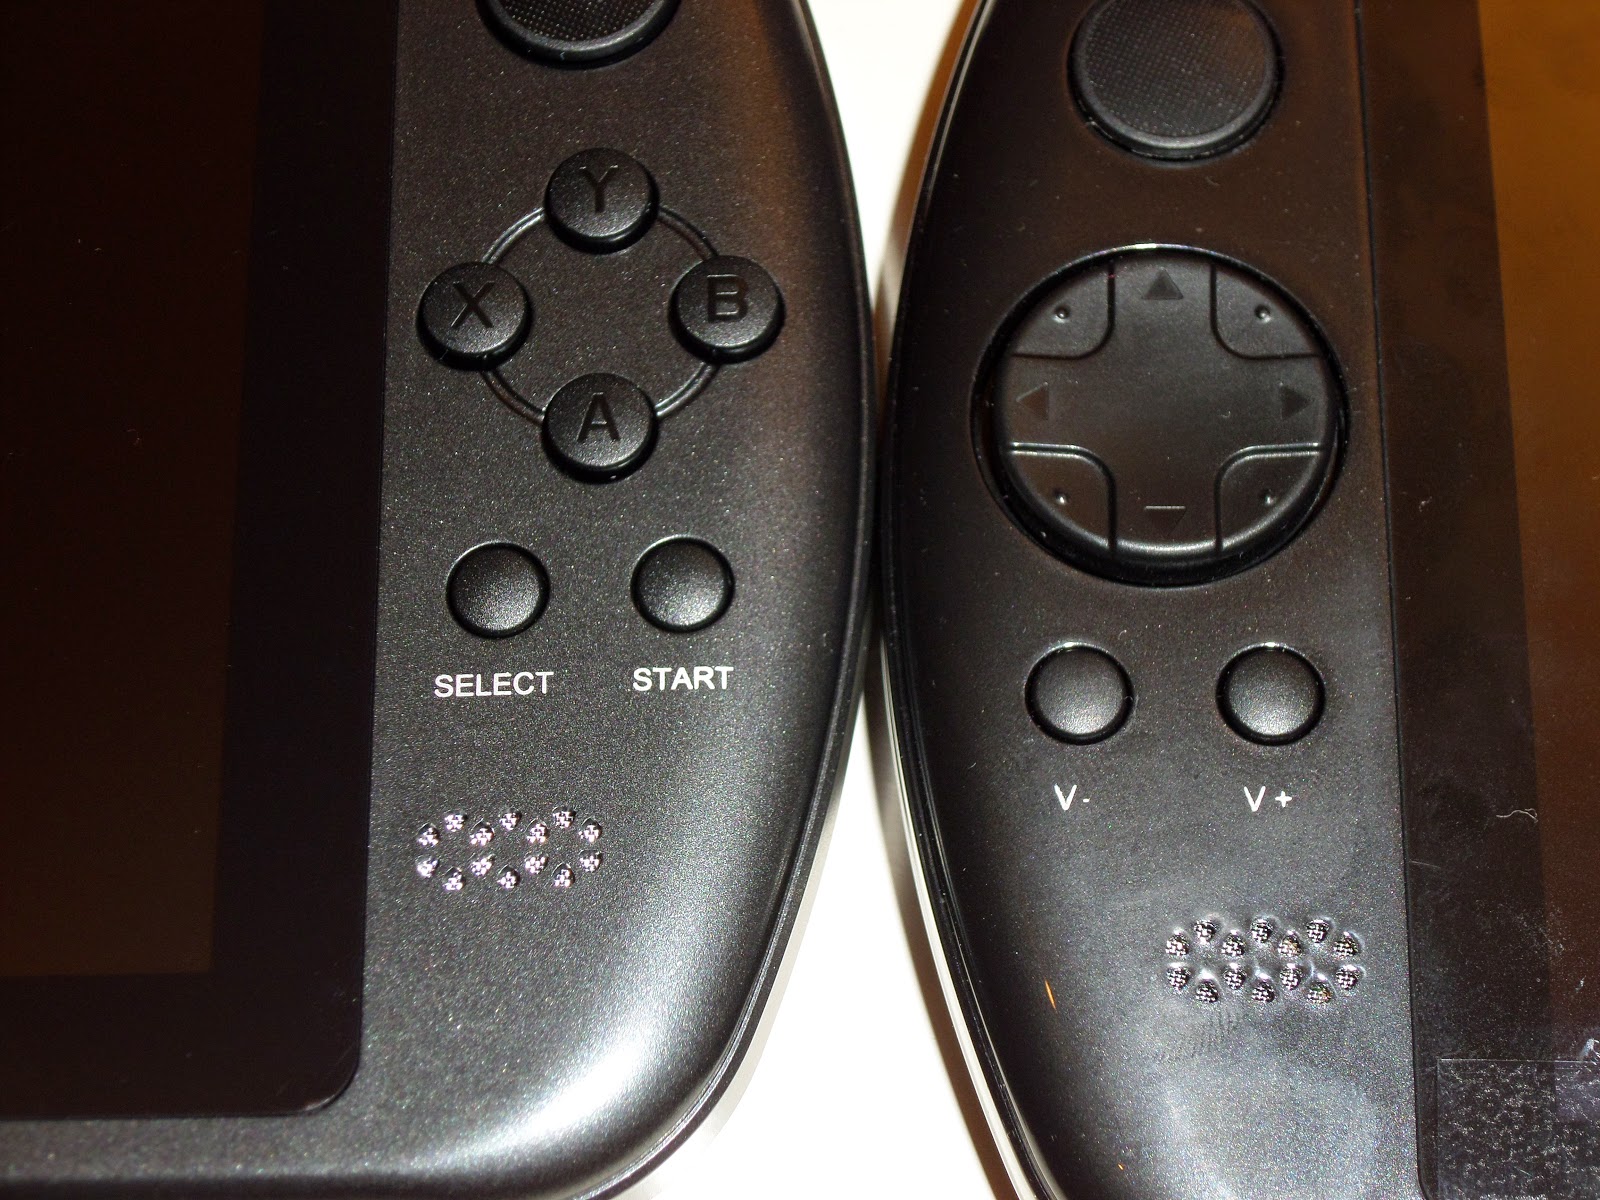
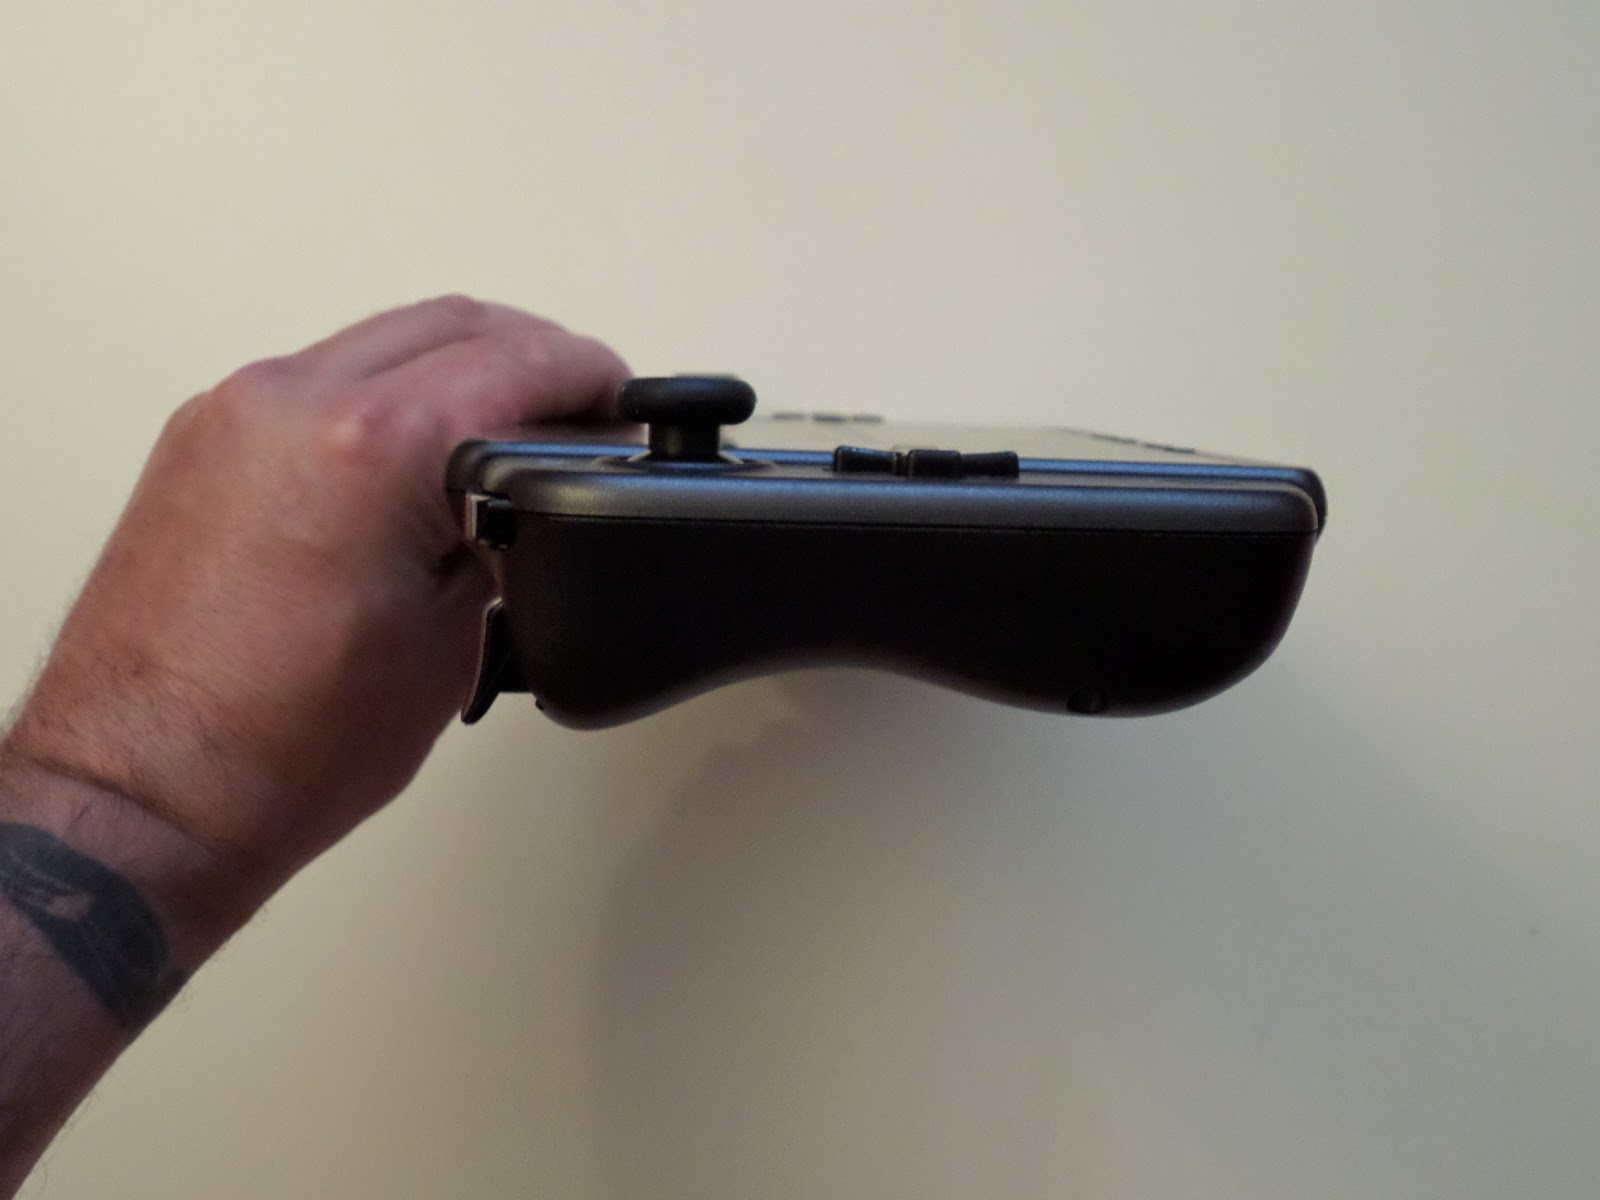
The good point of W01, compared with i5 (in control layout speaking), is their analog sticks, that are fully flat (similar to PSP stick). This allow to put the device face down, without problems (Much i5 is not able to put fully faced down, because their analog nubs don´t allow this)
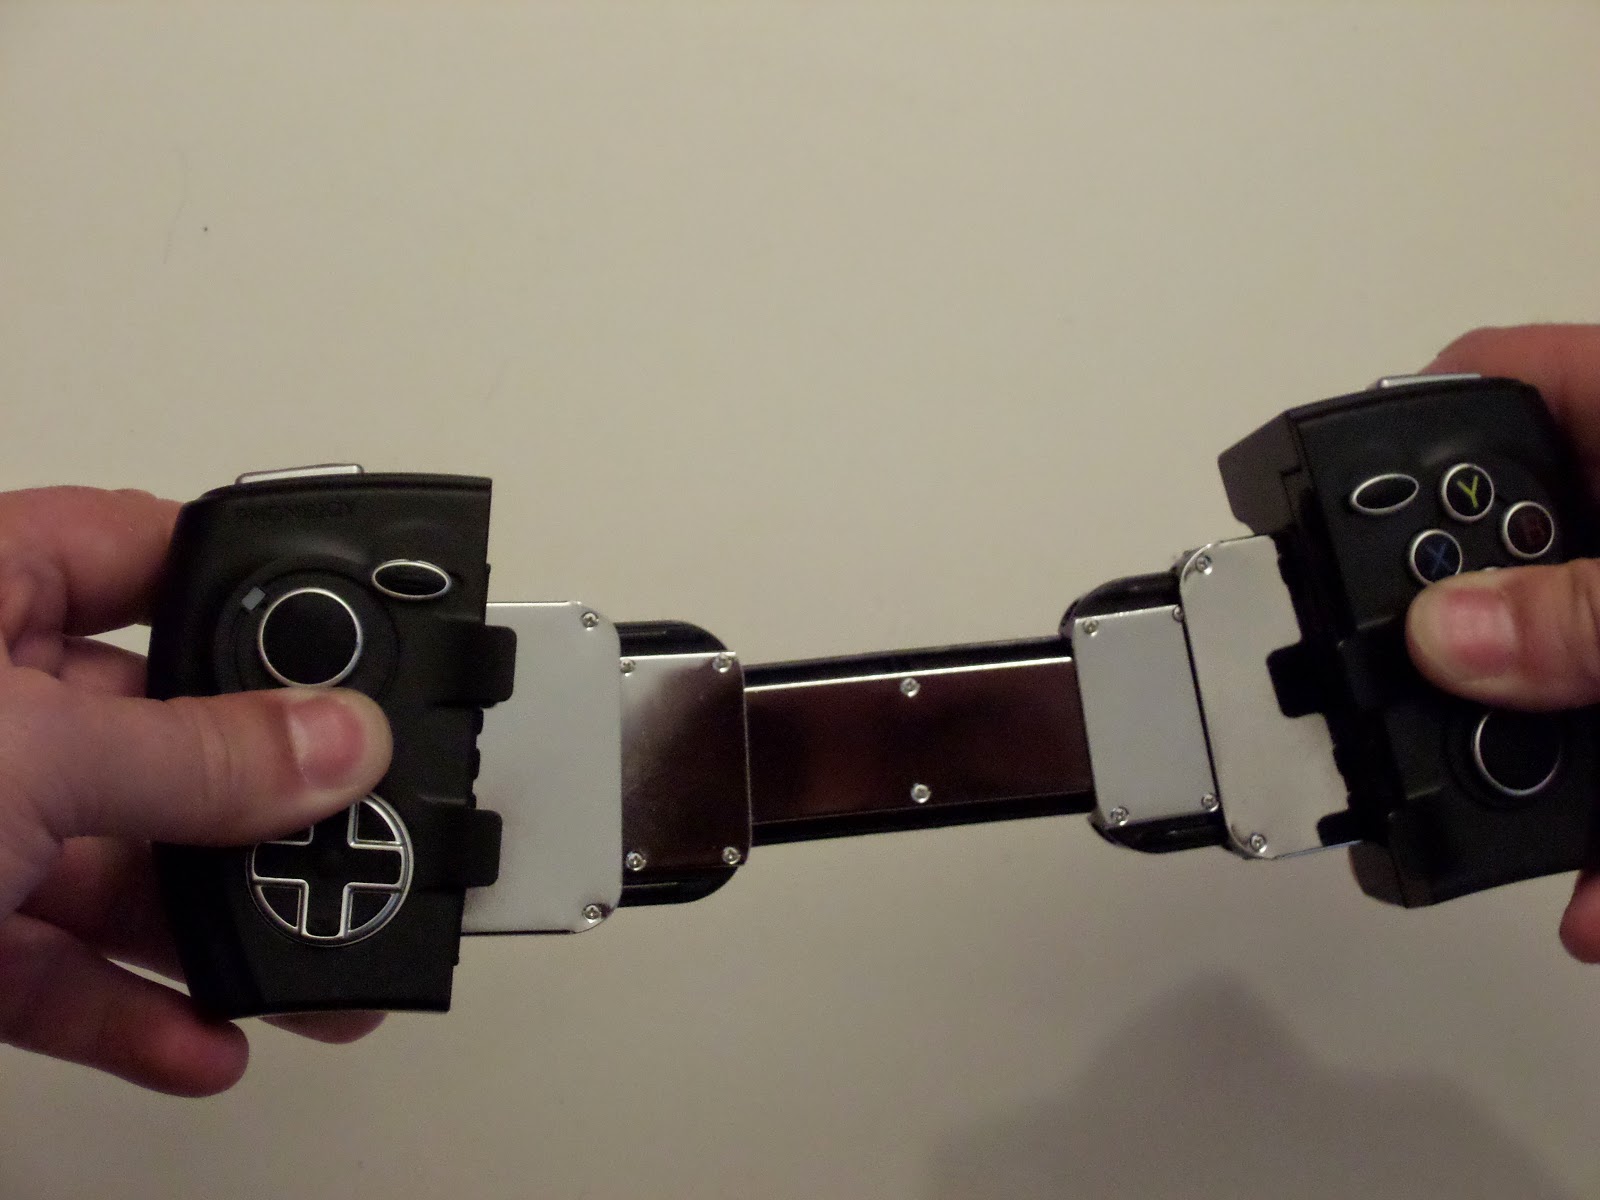
The size of the device allow to use most PSP soft covers for protect the device. In fact, i created this belt cover originaly for Much i5, based on a belt cover for PSP
Original PSP cover
Custom belt cover
And currently i´m using for Much G2, and now for Much W01 too, and fits perfect, and is so comfortable for daily usage (in my case almost)
This is only a suggestion for transport and protect the device. There are a lot of soft covers for PSP or PSVita that can be suitable for this device too.
Another good point is where are located the DPAD and controls. Because they are embebed on the device chassis, are protected from accidental press if you put the device down. In fact, there is no single control that get pressed or do contact when you put the device down.
Usually i don´t like to compare devices that are not in the market yet (or i did not tested), but i will put a sample to show the opposite of this design.
Much WOne and WOne 3D
This image is about the (soon release) Much WOne/3D device. If you take note about the controls, you can figure that if we put this device faced down, most probably the DPAD and front buttons will get pressed/activated accidentally with easy, and the device is not able to fully faced down on a table.
For some people this may be not important, but i consider this is a point to mention.
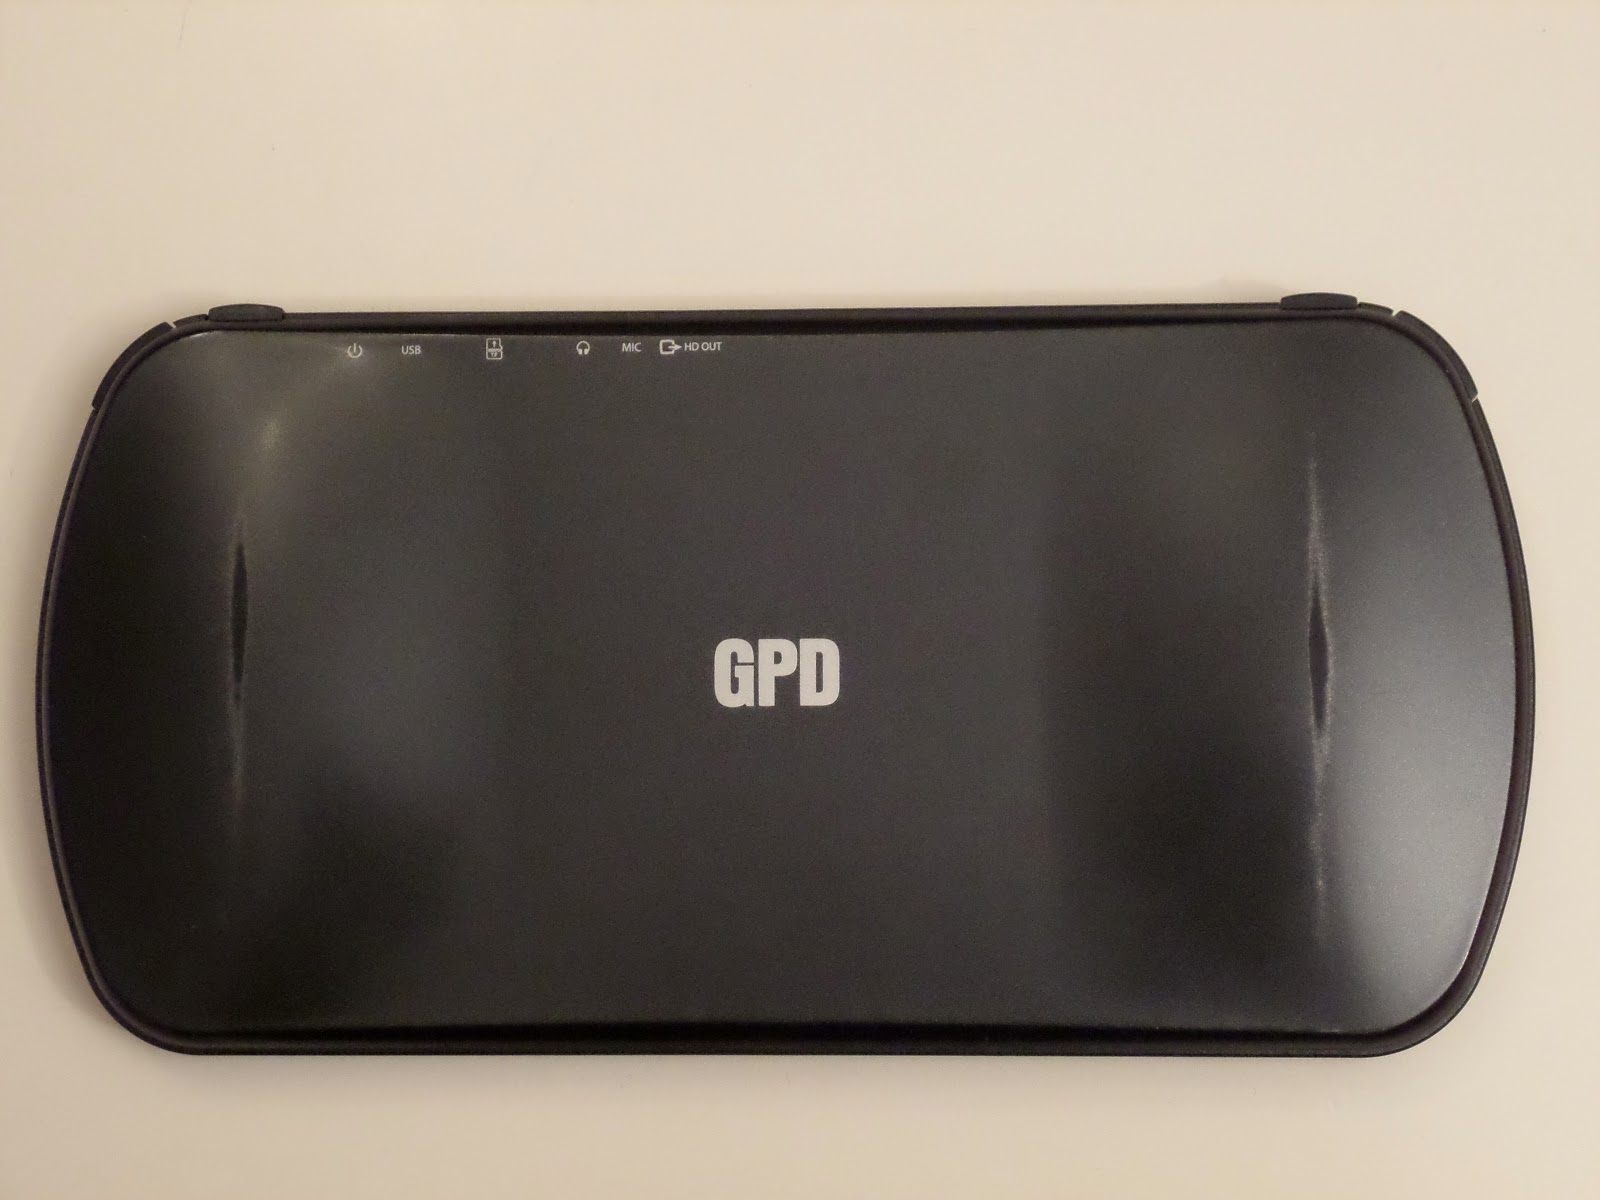
About the speaker
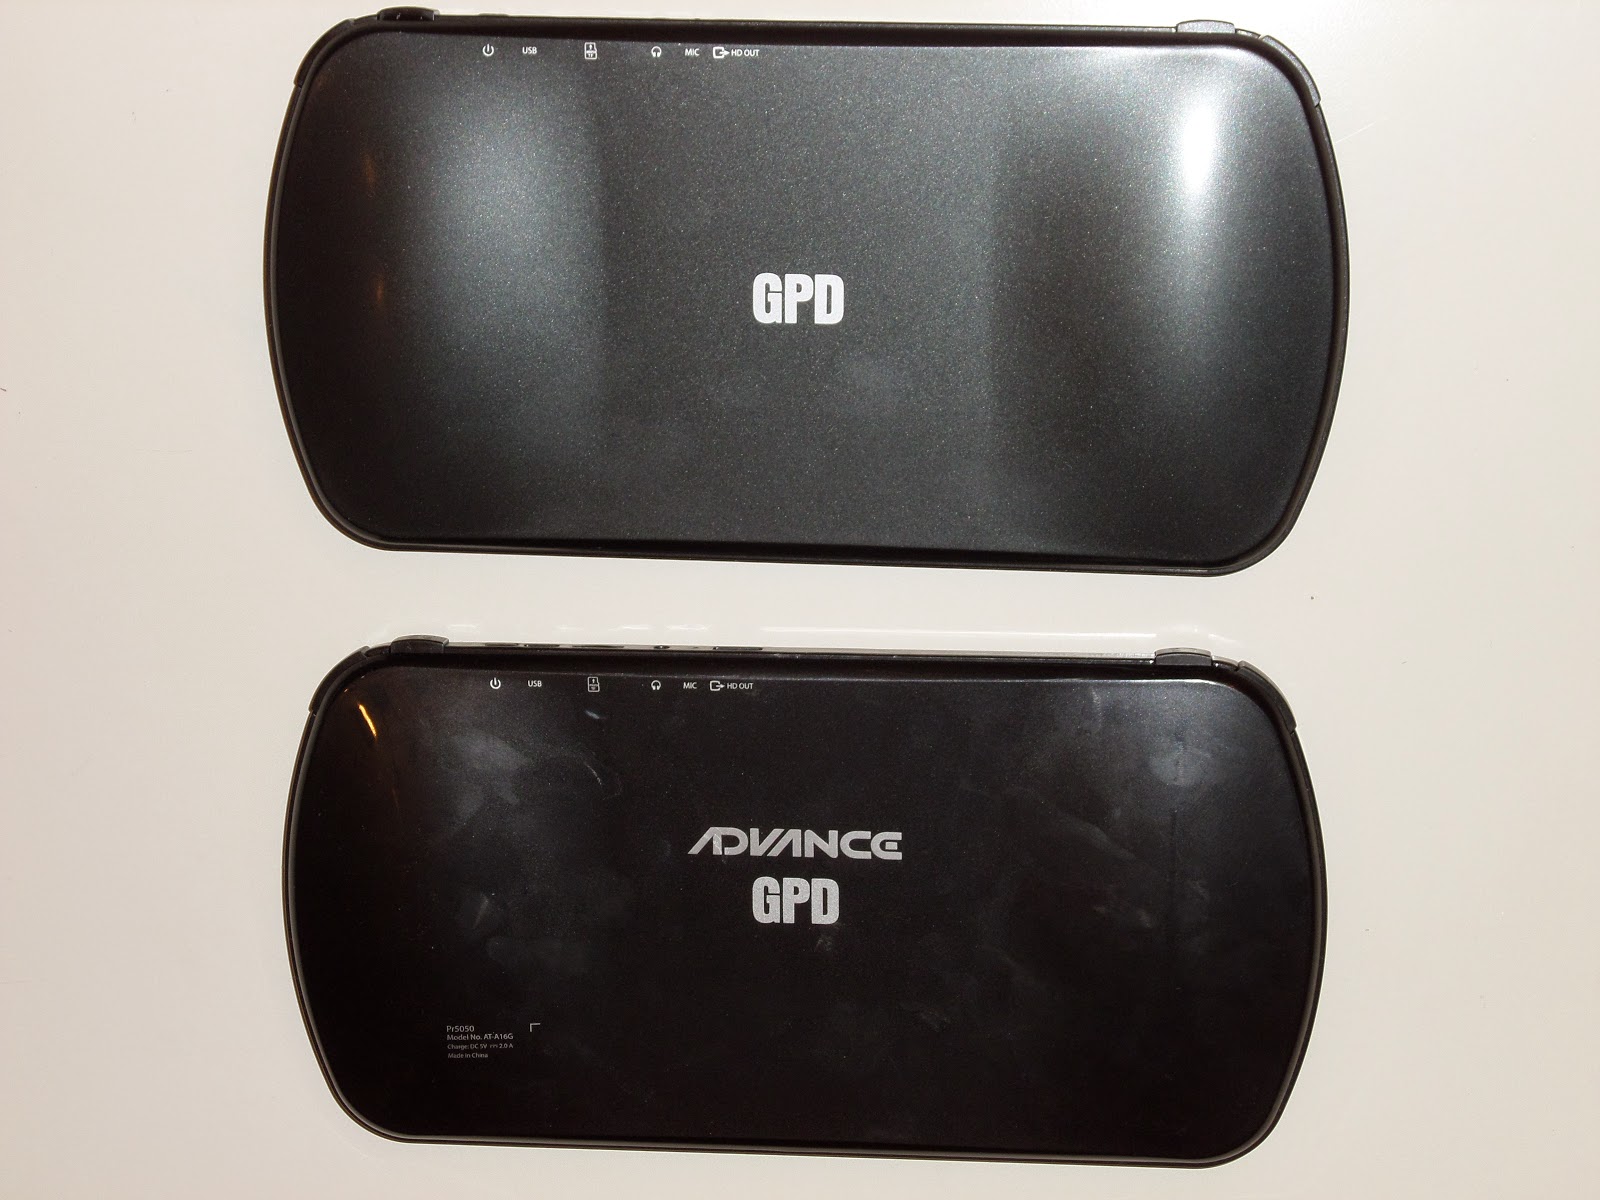
The speaker is located on the back side of the device. This location is the mos obvious for the device design, because there is no room space on the front side of the device where to locate the speakers.
The curved shape form of the device, allow to hear the speaker when you put this on any table or flat surface.
Now, when playing, is so easy to block accidentally this speaker with the fingers that we used to support the device.
This really may not affect if you usually hear sounds with headphones, but may be annoying for people that prefer to play, listening directly from the speakers of the device.
About volume and power buttons
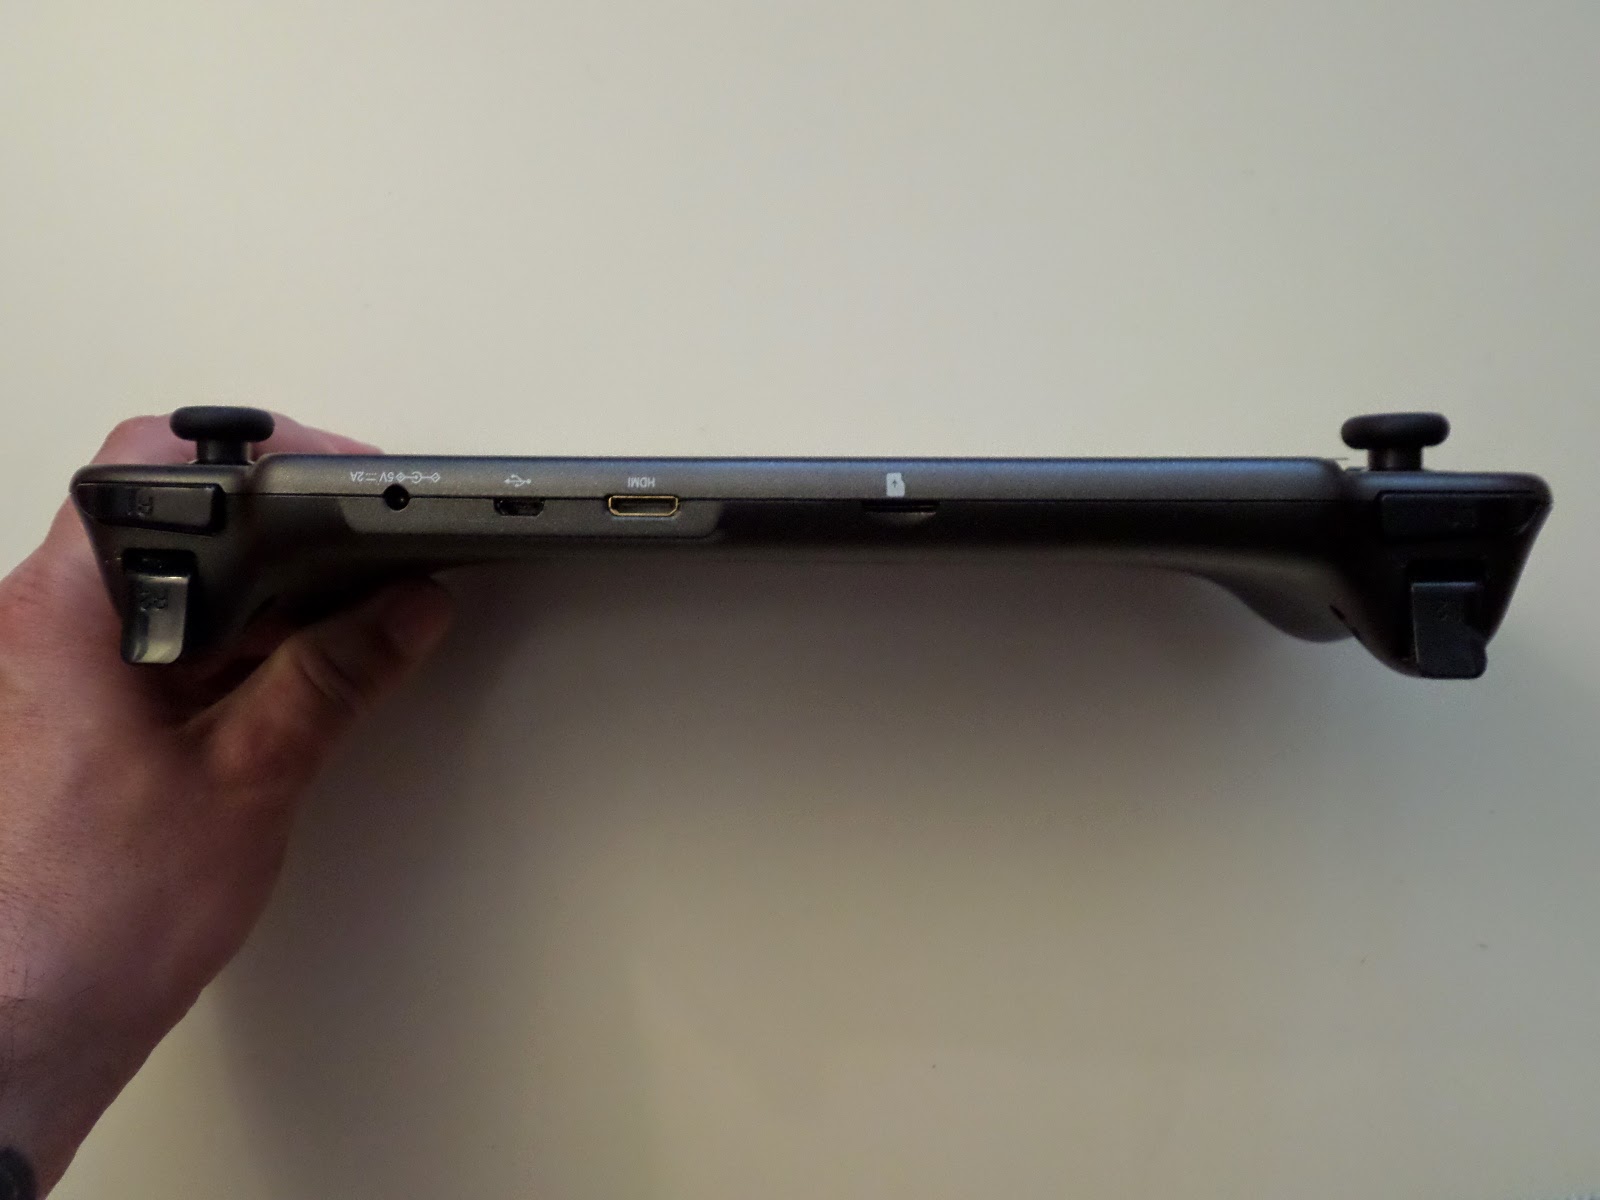
The volume buttons are located on the bottom side of the device (left side on vertical), and power button is located on the opposite side.
When you press the VOL- button, is usual that accidentally press power button too (when using the device in vertical). i thnk power button may be on the same side than volume buttons, or displaced to center of the device, for avoiding this behavior.
About special buttons
There are some special buttons:
The size of these buttons are so small. Playing, may be ok for Select and Start, but for normal usage of android interface, Back and Home buttons may be so small for normal usage, and hard to be pressed to.
One of my basic tools for android usage in general, is
GMD Gesture Control, that provide some gestures for common android buttons/actions, such Back, Home, Task List, etc.
I strong suggest to use some solution such the GMD app or similar, for providing a comfortable way to use android interface on the device, because the Home and Back buttons generate a bad experience due their size and hard to be pressed feeling
About Much interface
Well, this section will be interesting for people that know previous Much devices.
The much interface come with some particular elements that make their experience "unique", in good or bad way.
One of these elements are the screenshot floating tool, that allow to you to open a pie menu with more functions, that is present on the firmware of this device.
With this "tool", we can enable or disable other floating button corresponding to the on screen keymapper.
Personally, i don´t like this annoying button on the screen. Instead of this, i really prefer a kind of combo-button for enabling or disabling tools, like the firsts firmware versions of Much i5
There is a point that Much improved
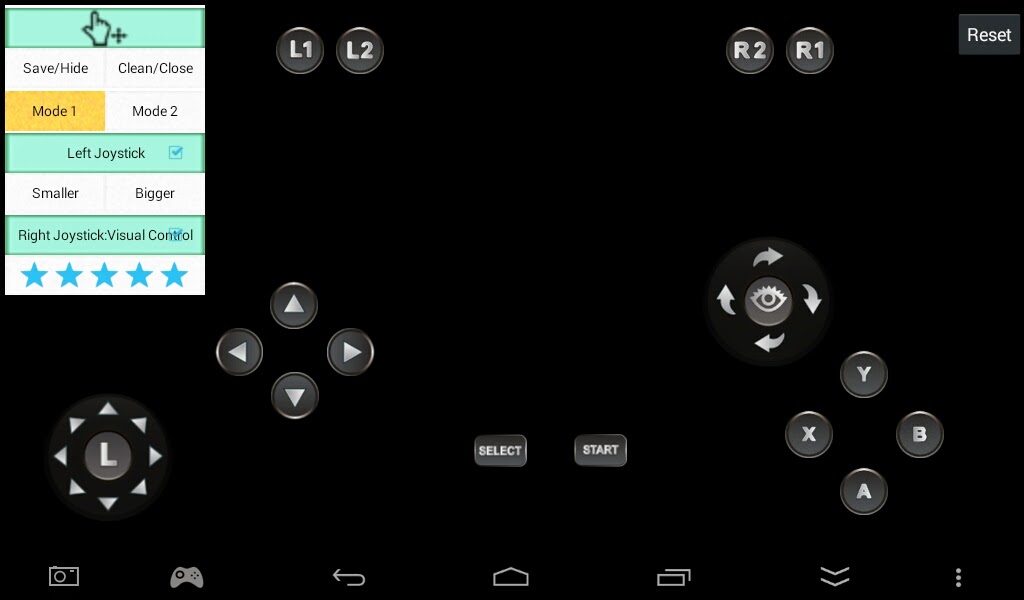
About the Touch-mapper
The touch mapper can be invoked by the floating tool, or with the swype menu.
The mapper include the following set of controls, in separated elements:
- DPAD UP
- DPAD DOWN
- DPAD LEFT
- DPAD RIGHT
- Analog Stick Left
- Analog Stick Right
- Button Mountain ( X / Square )
- Button River ( Y / Triangle )
- Button Sun (A / Cross )
- Button Moon ( B / Circle )
- Left Shoulder Button "L"
- Right Shoulder Button "R"
There is not included Select or Start
The size of camera mode, set the speed of the drag movement for FPS games.
For most cases, the mapper is enough for playing games with on screen controls (touch controls)
The keymapper, in most cases (with most popular titles) will autoload profiles for play games. At this point is good to know that there are lots of games that really have controller support, and is better to play with them, instead of on screen controls.
The mapper download and apply many profiles on games, even when these games have controller support. For this reason is good to check if the game have controller support, disabling the touch mapper (opening, select custom, and hit "X"), and test if the game react to the controls.
There are a few of games that requires special gamepad for playing. For these cases, i suggest to use
MCHelper tool, that will emulates a Moga controller, that enable controller on some games such Modern Combat 4.
About the Key-Mapper (Key DIY)
This mapper may get confused to some people, because the device show two mappers, a touch and key mapper.
Note: By default, you don´t need to config a game with this tool, because the default behavior of the mapper is as standard controller. Use this only when you need a specific mapping of the keys.
After understanding this tool, the user can get a better experience on many applications, not only games, because with this mapper you can set which function want to assign to each button, depending on your needs.
The functions you can assign are the following:
- HOME
- MENU
- BACK
- SEARCH
- UP
- DOWN
- LEFT
- RIGHT
- VOLUME +
- VOLUME -
- START
- SELECT
- L1
- R1
- CAMERA
- FOCUS
- NAVIGATION
- MEDIA STOP
- MEDIA NEXT
- MEDIA PLAY
- MEDIA PAUSE
- BUTTON A
- BUTTON B
- BUTTON C
- BUTTON X
- BUTTON Y
- BUTTON Z
The interface for map controls are a little bit confusing at beginning, but after some usage will be easy to understand.
An example of usage may be on camera, pressing a button do adjust the focus, or when in a media player, assign buttons for most common actions such play, stop, next, etc.
When you open the Key DIY app, is you´re on any app, will open the following screen:
Here, you can assign each of the buttons to some action (or controller assignment). Then you can hit "OK" for apply this mapping to this specific game, or can do a "Save" for saving the layout as a template, and you can assign to other games too.
If you open the app by their icon, will display this screen:
Here you can select any app, and map the controls for it, in the same way if you open the mapper when the game is running.
On the left, there are some options :
On Auto Load Manager, there are the Apps that we mapped the controls.
On Template Manager, we found the templates we saved prevously
Now, we can select any template (i only have a "default" template)
This is the definition for this template, now, we can select wich apps will get this template, with the option "Configure"
Here simply can select the games or apps that we want to apply this template, and select "OK" on the menu.
And that's all! with these steps we can configure with specific mapping the apps that requires another config than a standard gamepad.
After using the mapping tool, i think there may be another options such:
And may include other buttons such VOLUME+, VOLUME-, for assign another buttons such L2, R2, etc.
For general usage may be ok, but for specific usage (ex, playing some game like Modern Combat 5, that requires L2 & R2) may be not enough, because options for assignments are a little bit limited.
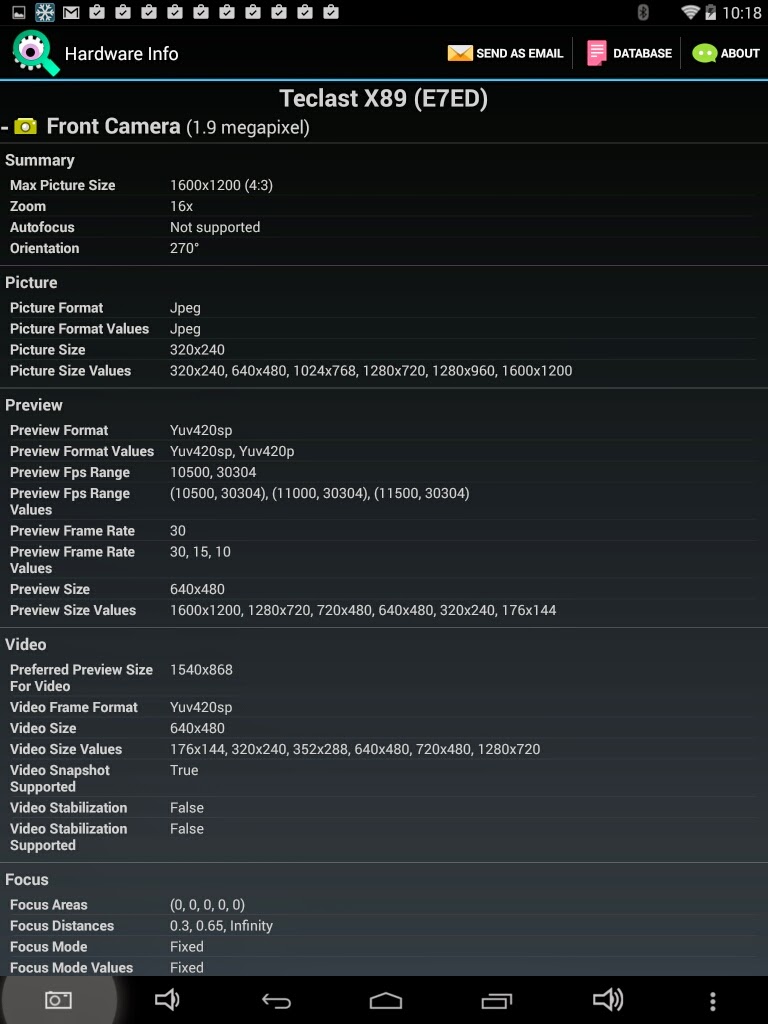
About Back Camera
The back camera is 8MPx sensor, with autofocus and flash led.
quality of this camera is normal. nothing remarkable, but that you can use for take some photos if you don´t have a proper camera near.
As usual, photos with good light will get better results than low light. I did taked many photos on some park, but i bricked the device before recover these photos. Now i take some photos for showing there their quality.
Normal
HDR
Normal
HDR
3 cm from target, using flash
3 cm from target, normal.
Normal
Normal
As you can see, results are not outstanding, but enough for general purpose.
Bluetooth audio
There is a problem with the bluetooth audio that i cannot confirm is about my device itself or is a general problem
After playing some minutes (near to 30 minutes), the audio stream start to stutter. I did not identify the main problem (testing enabling and disabling services, other connection such 3G, wifi, etc).
Fortunately, for fix this problem is so easy, simply, turn off and on the bluetooth and the sound come back normally.
I figure that the problem is based on software, due the solution is so simple than turn off and on the bluetooth module, then i hope in some software update will be fixed (if this is a general problem)
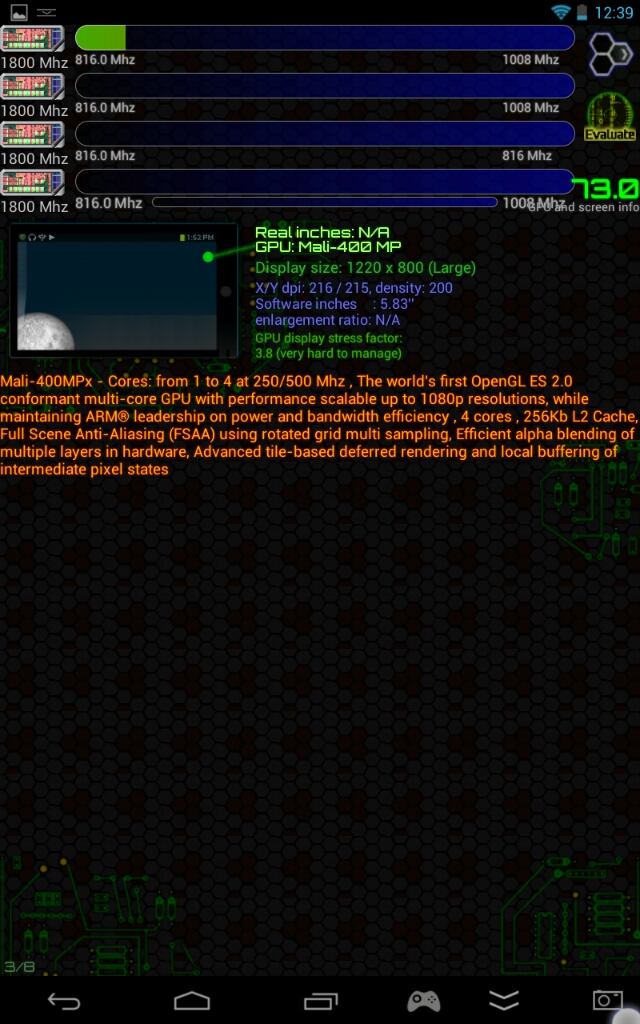
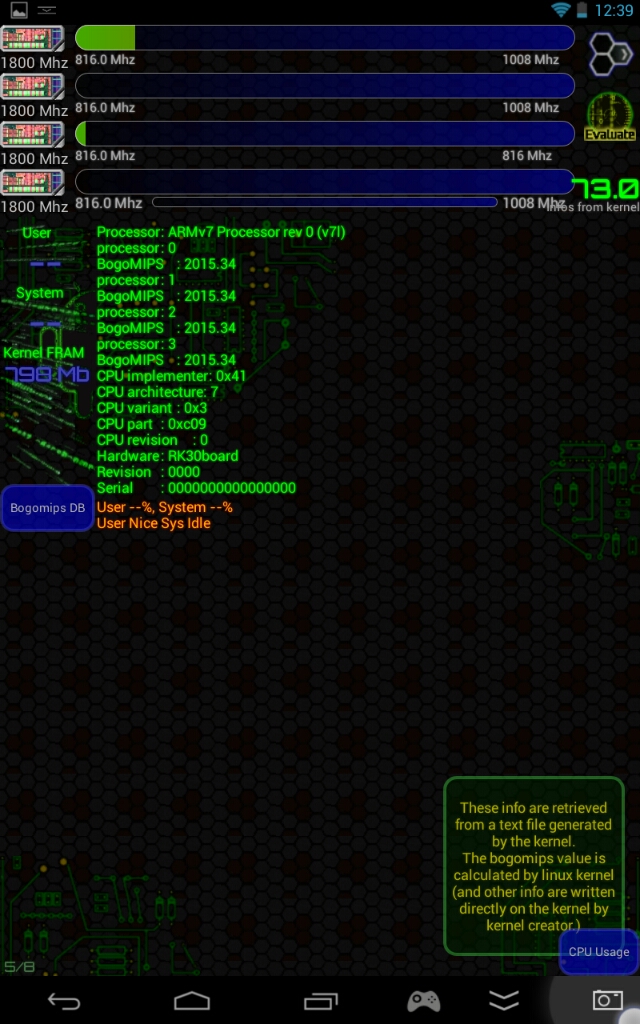
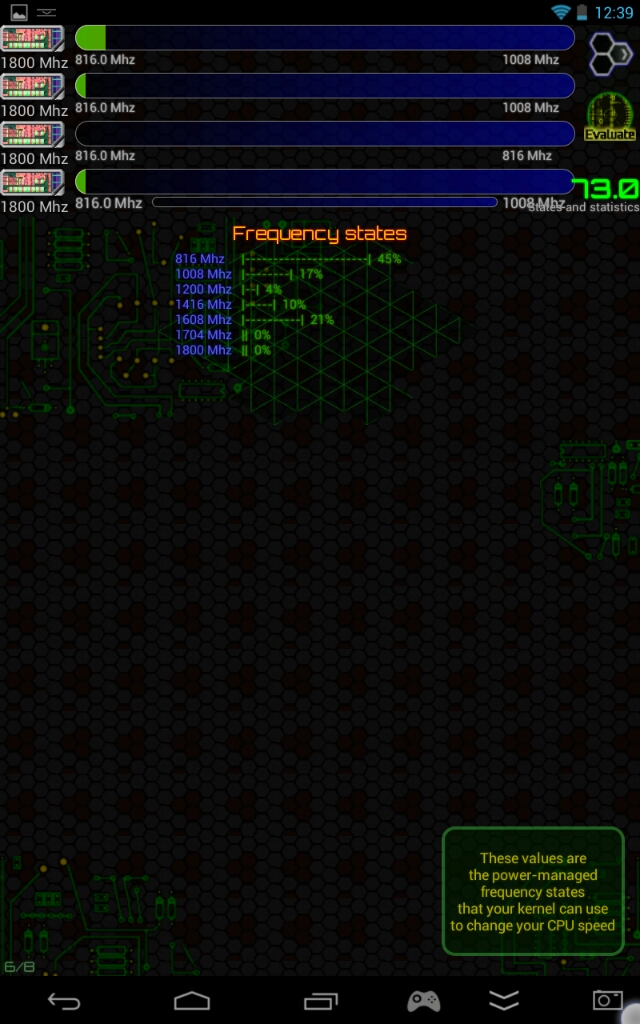
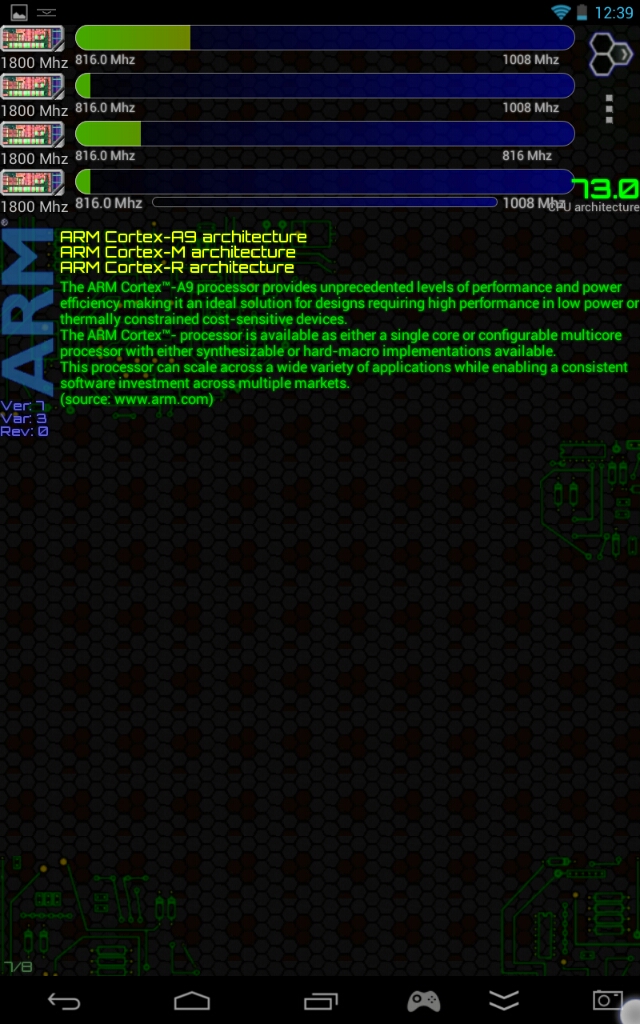
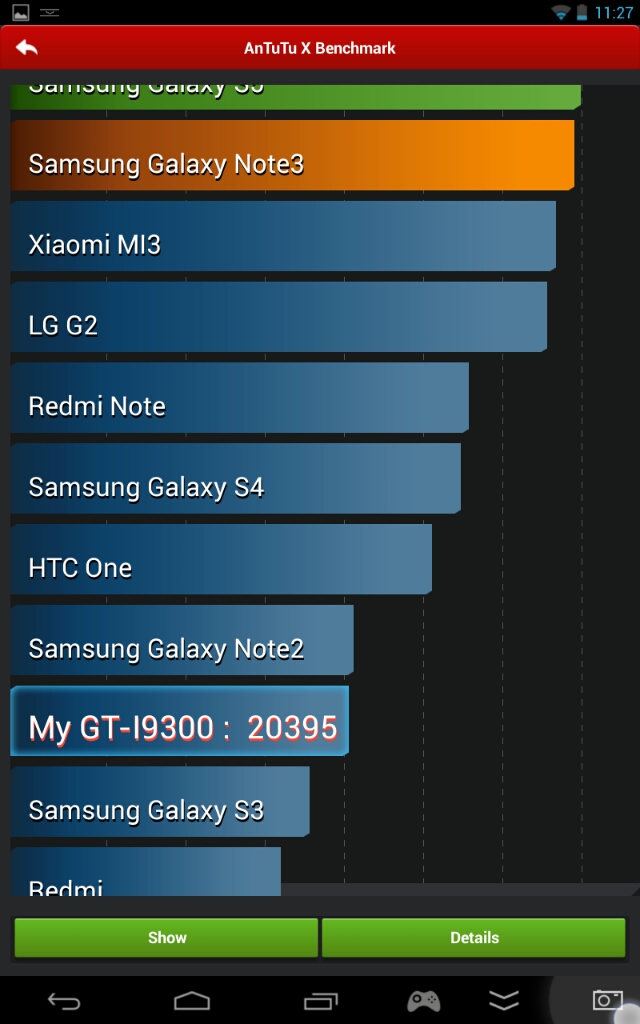
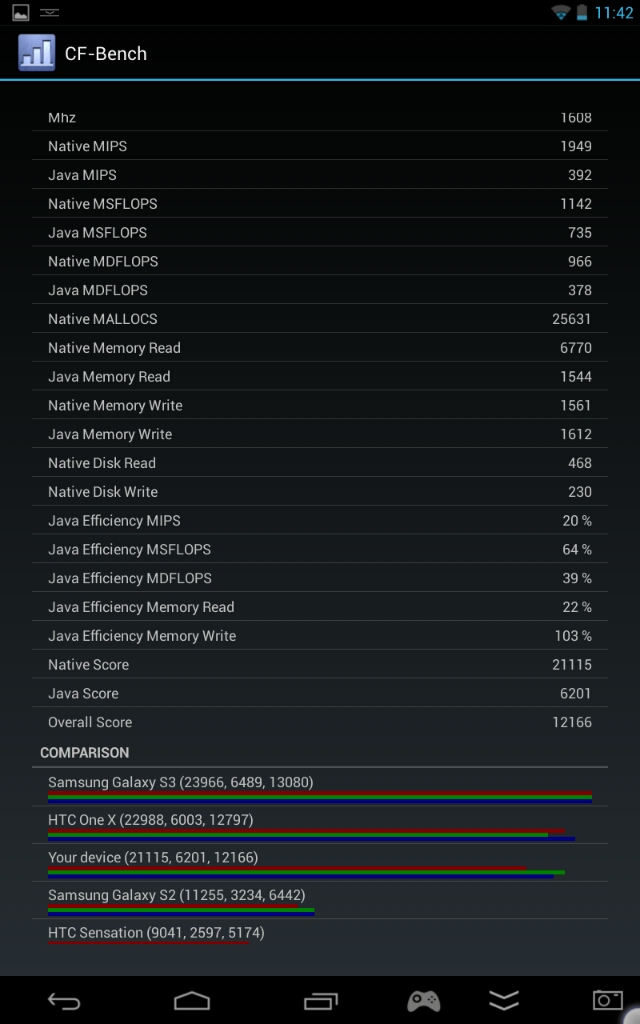
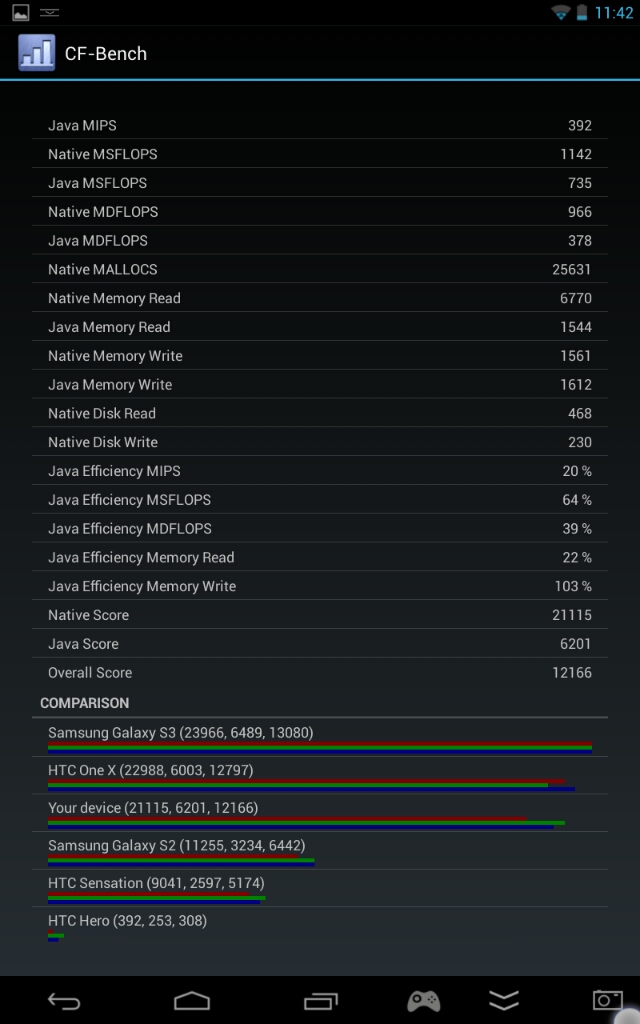
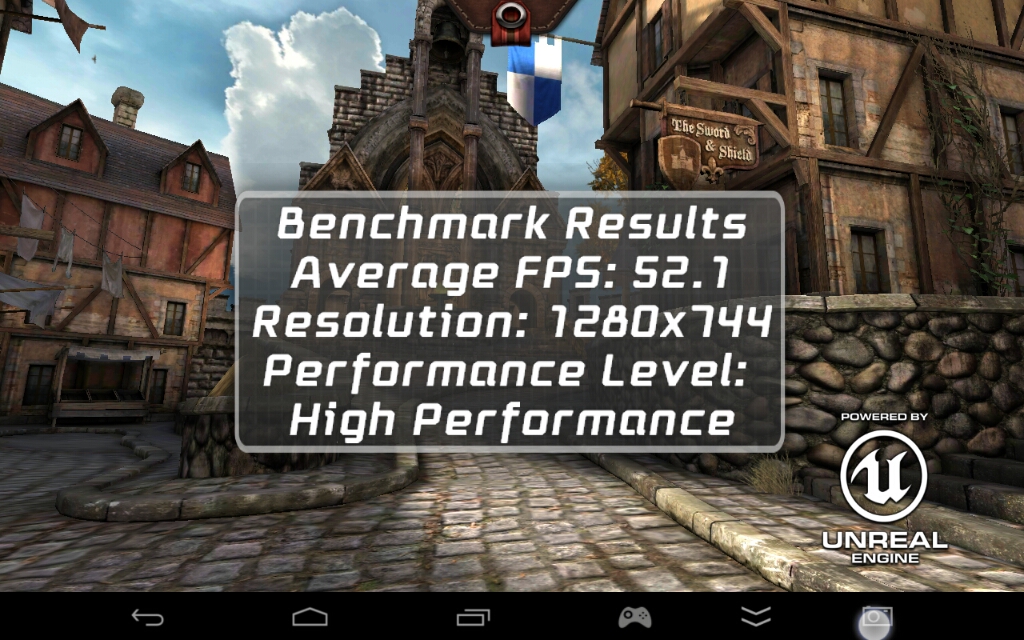
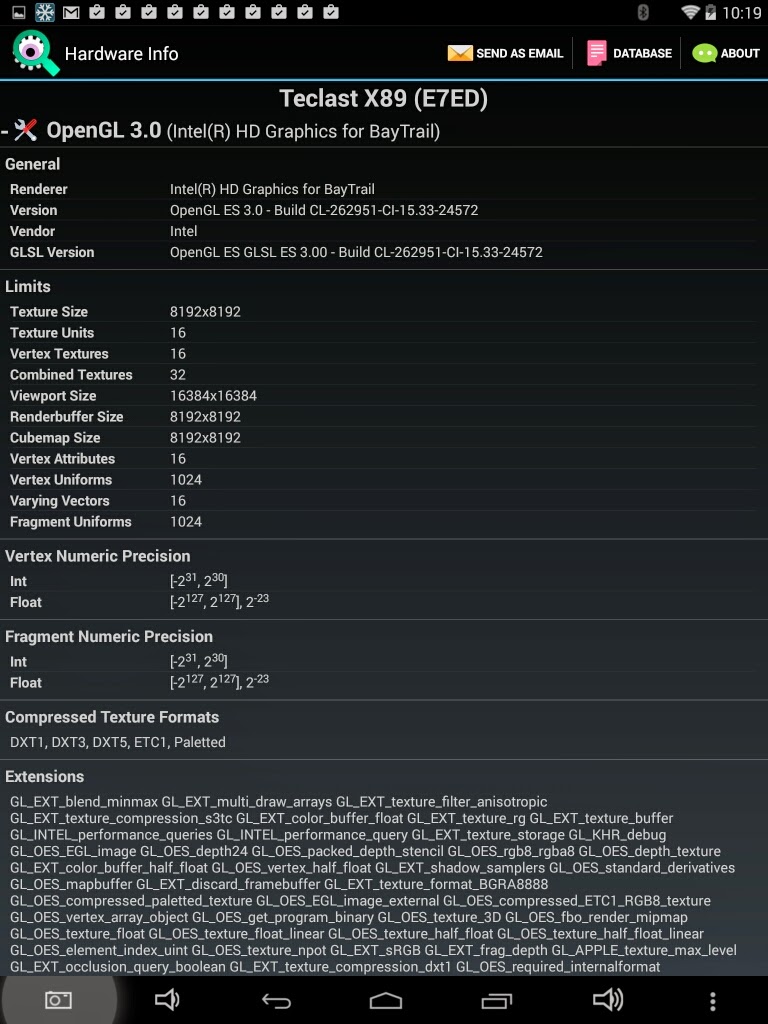
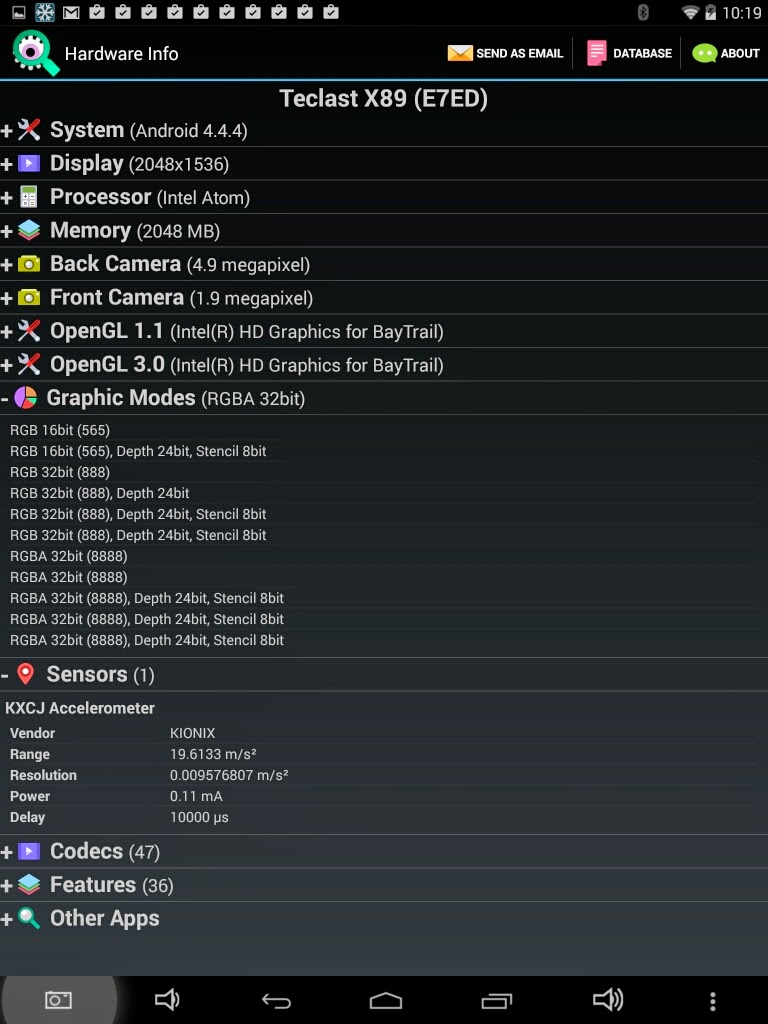
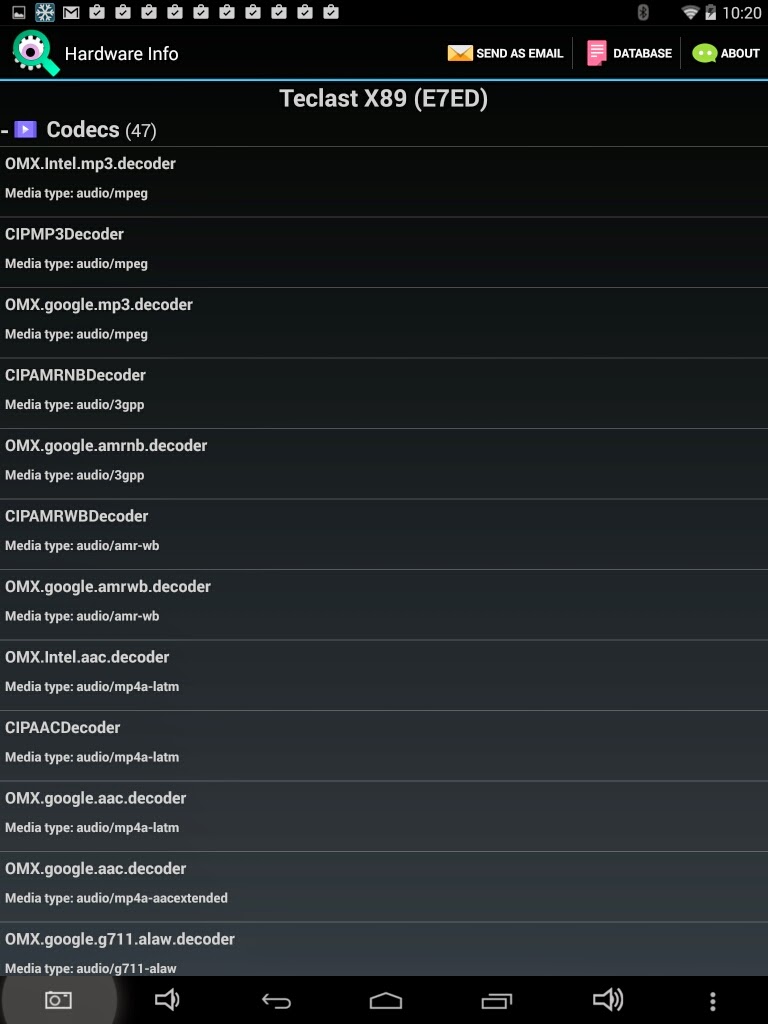
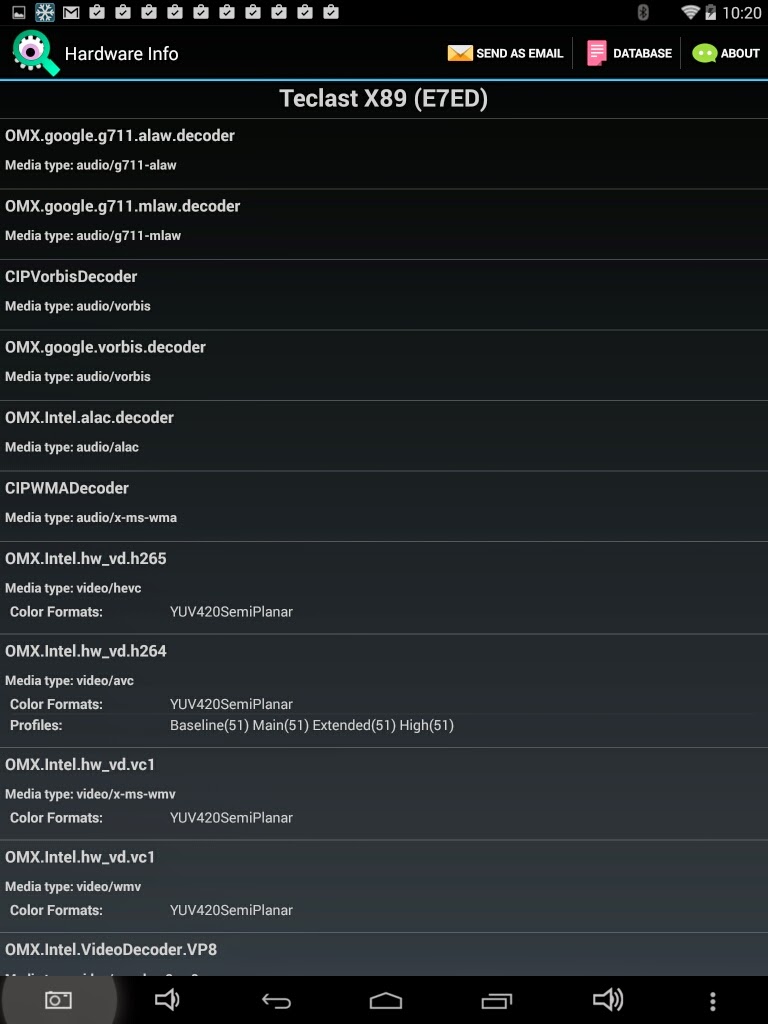
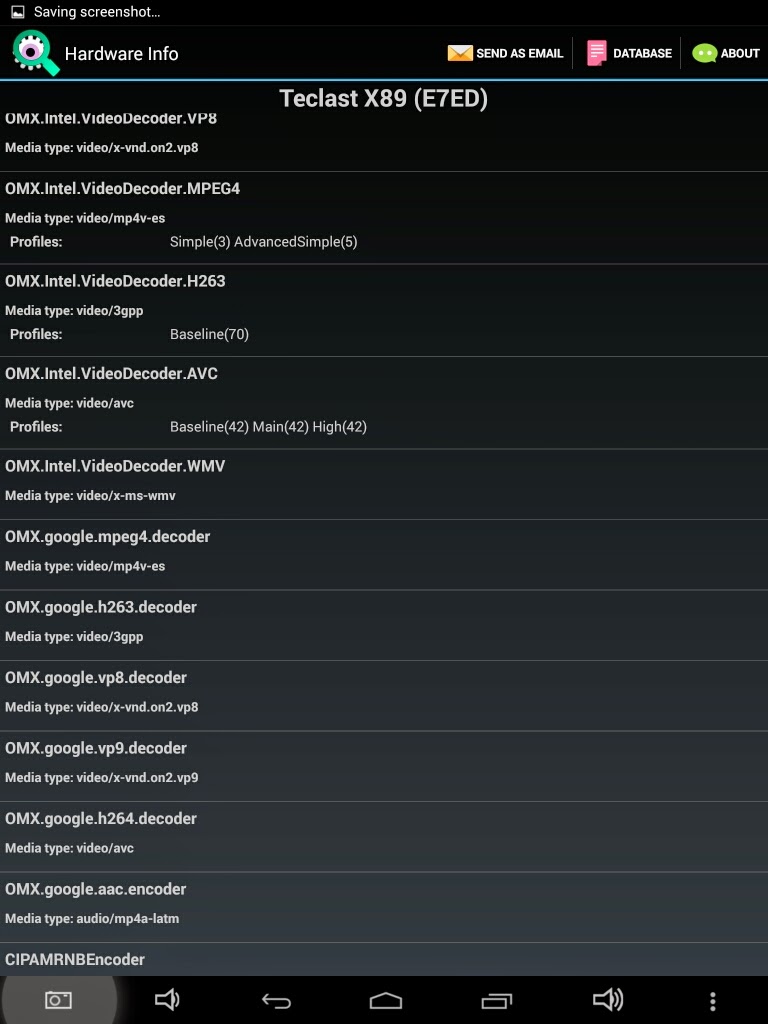
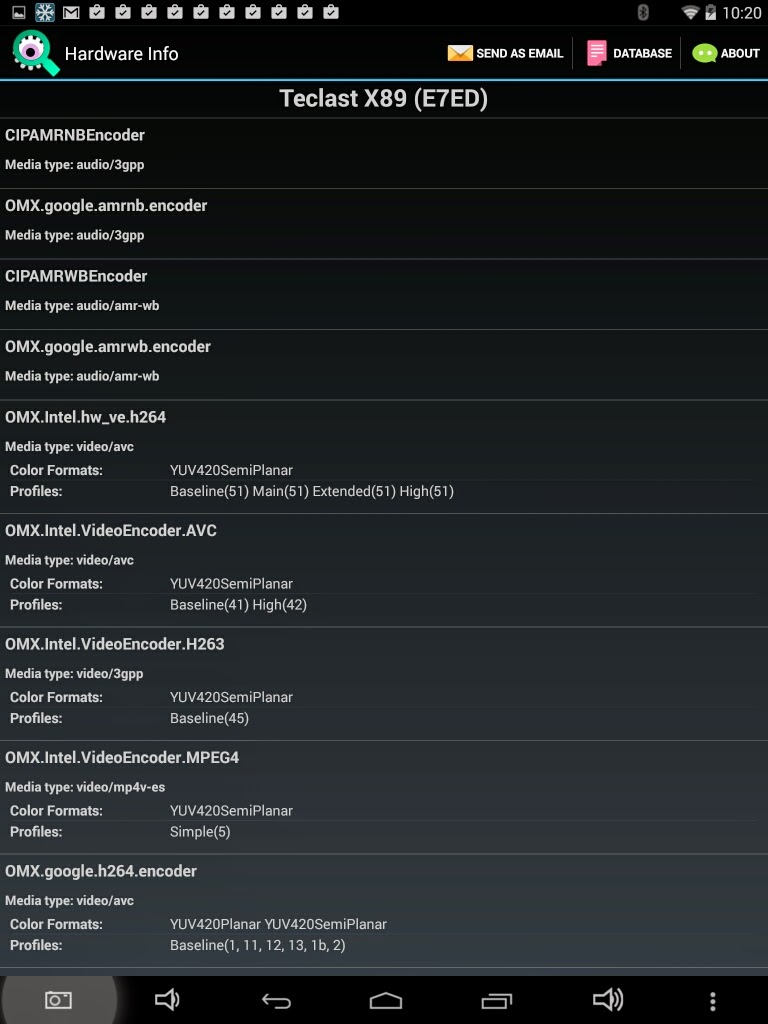
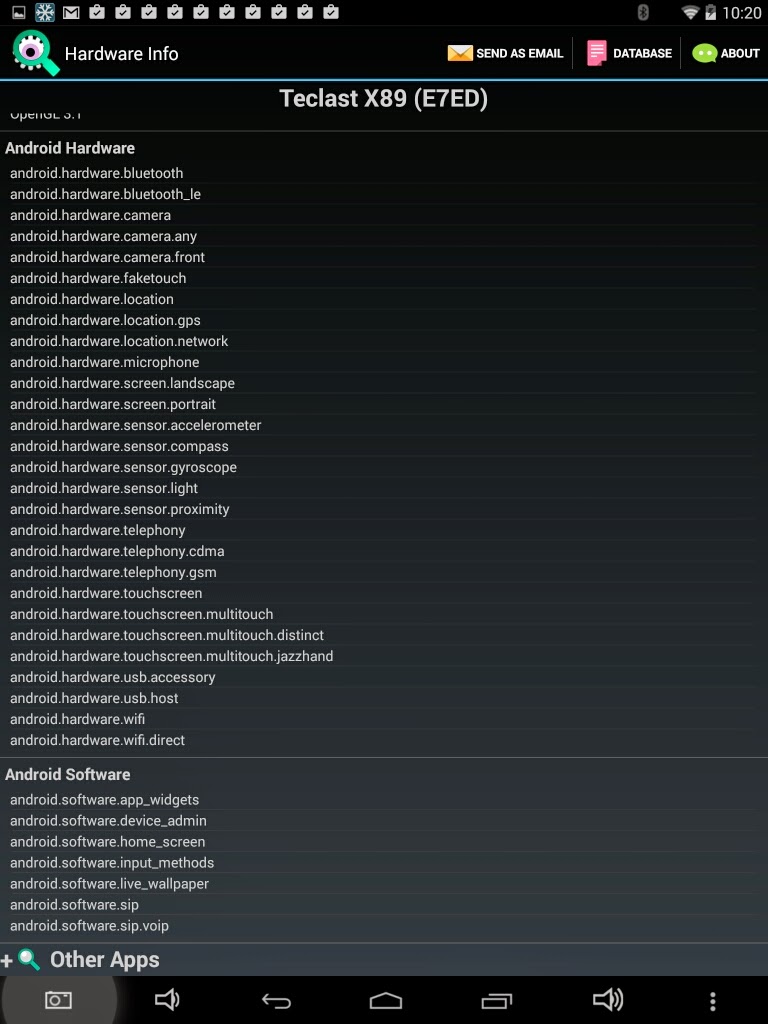
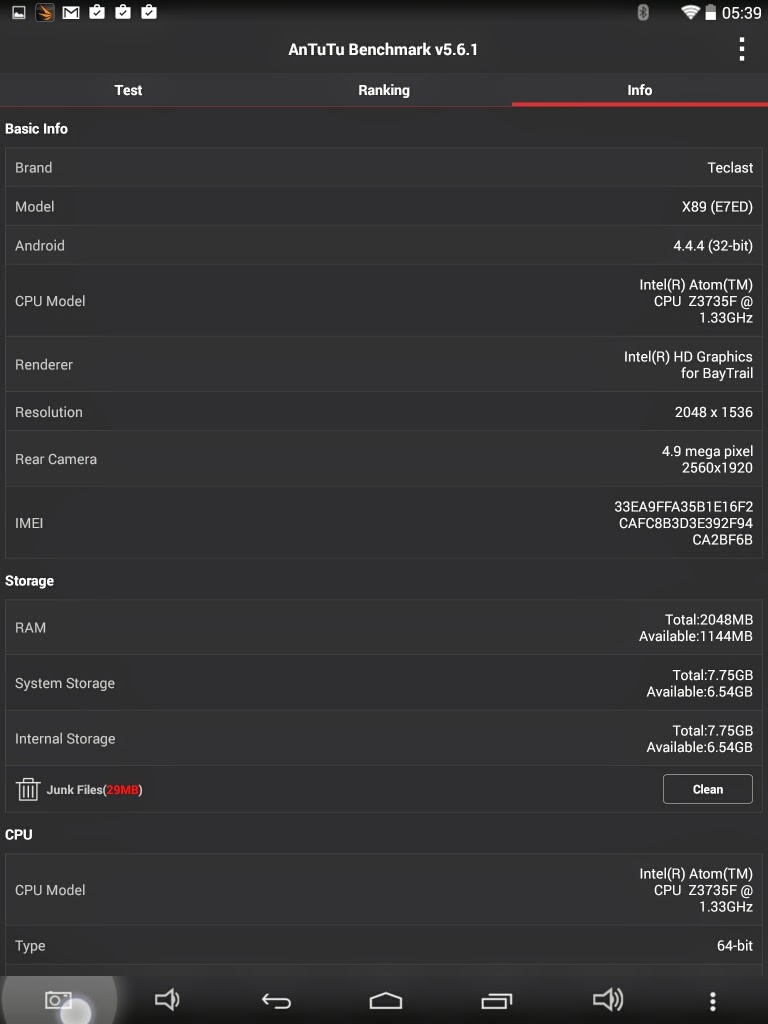
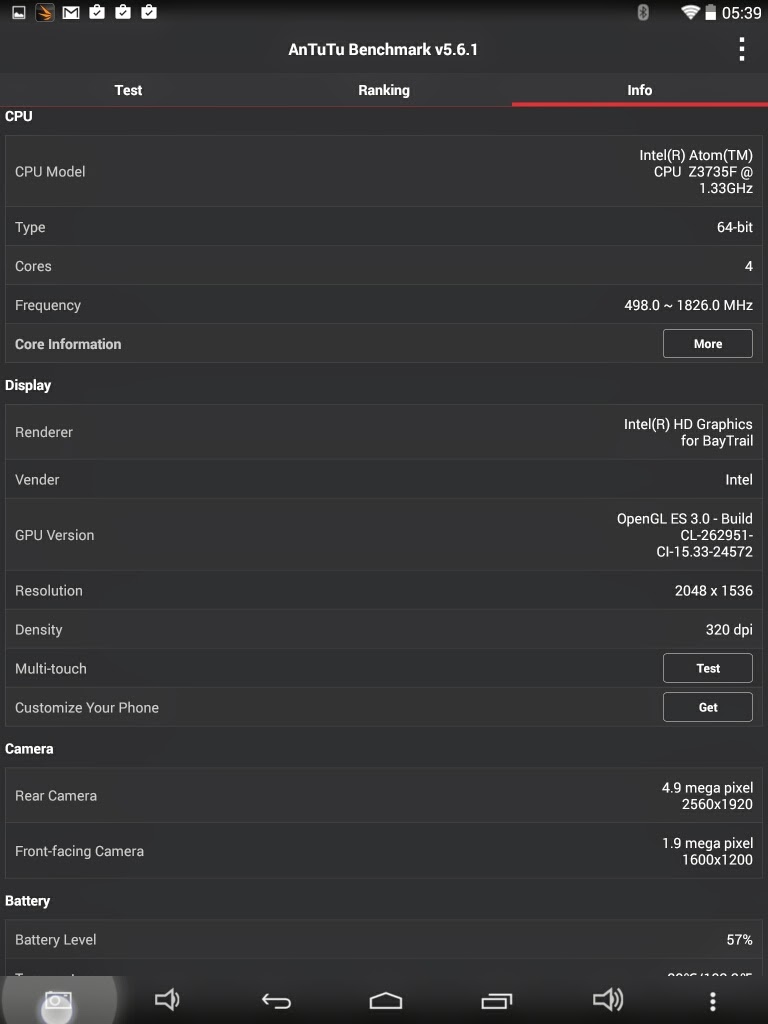
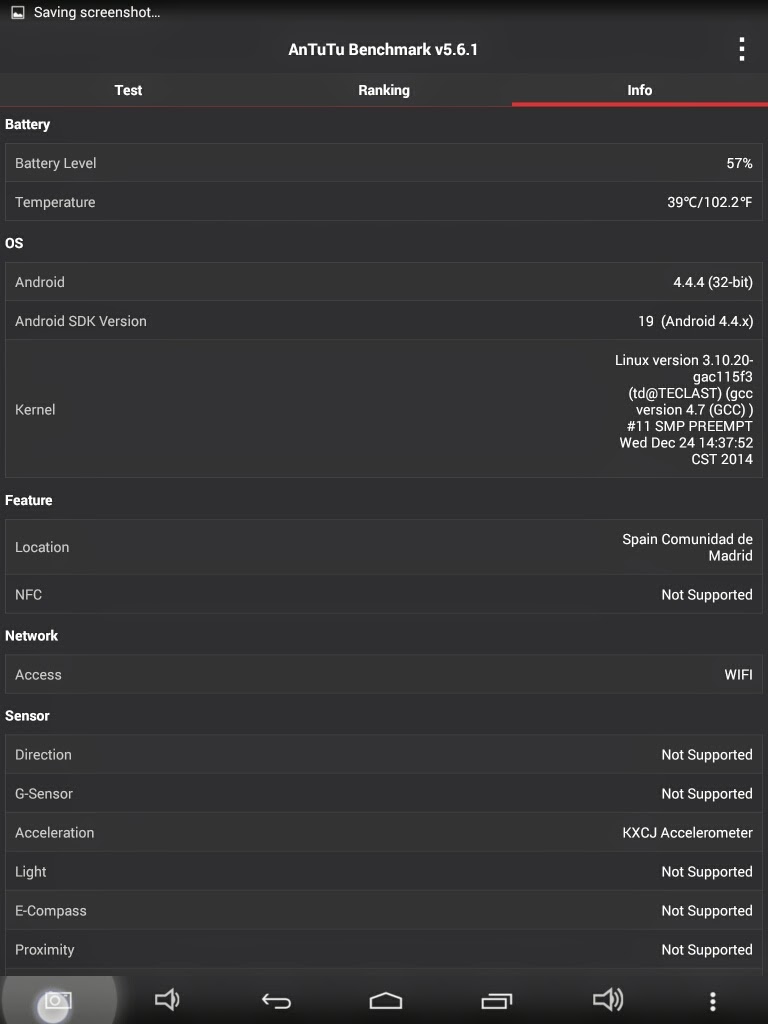
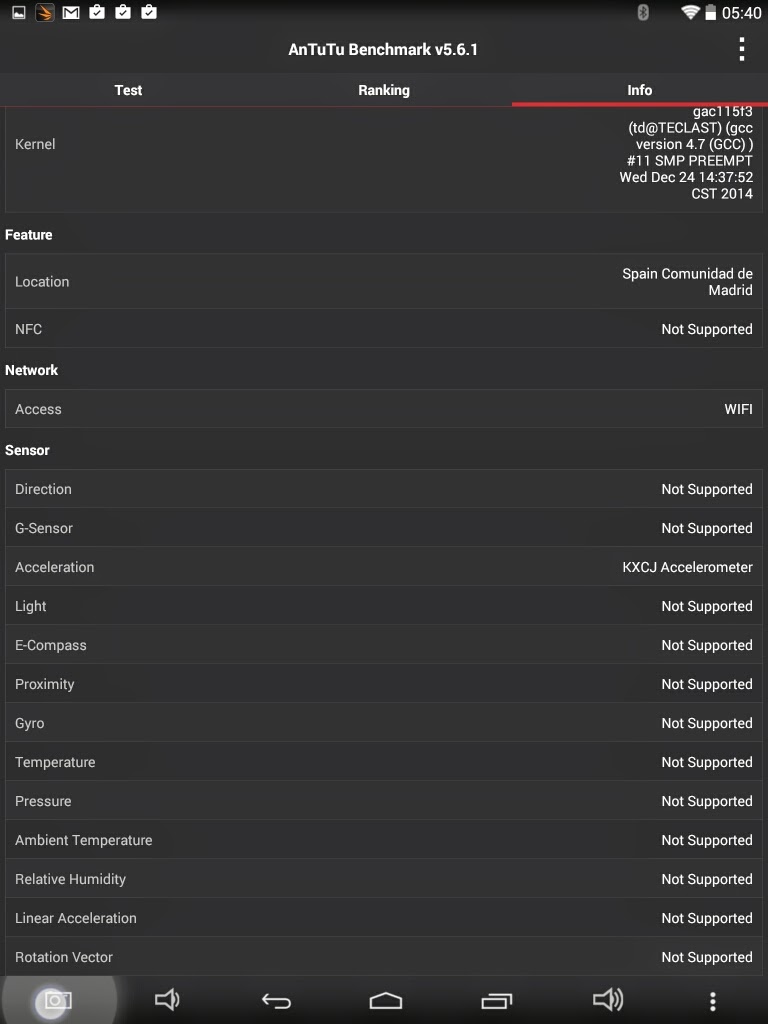
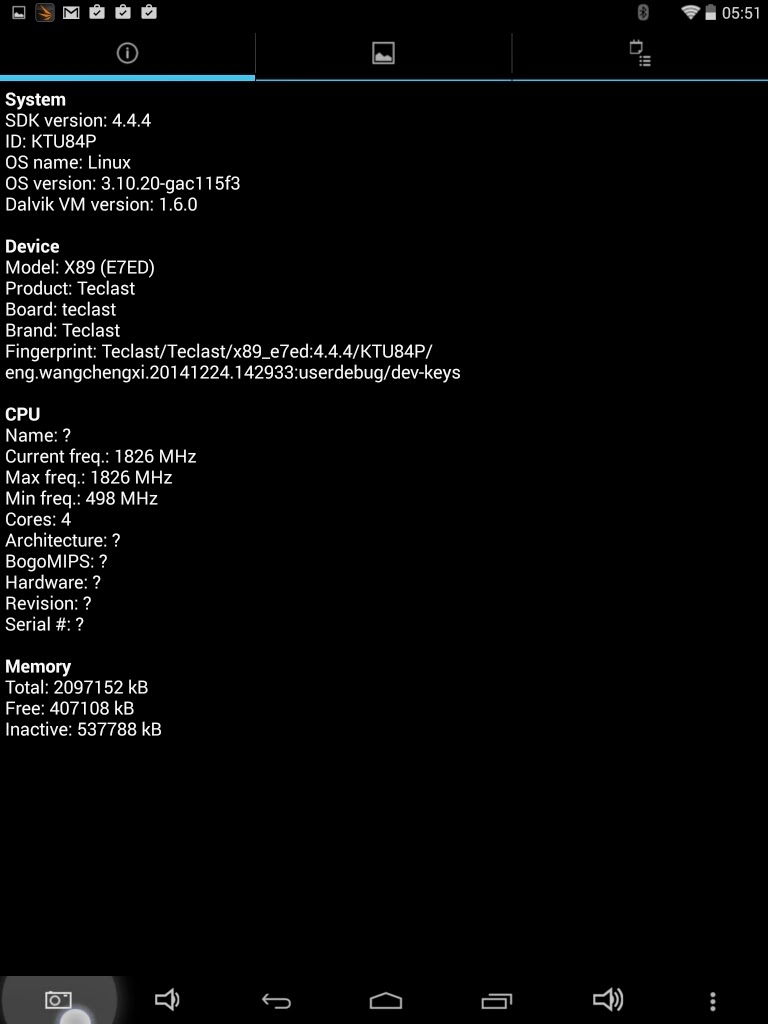
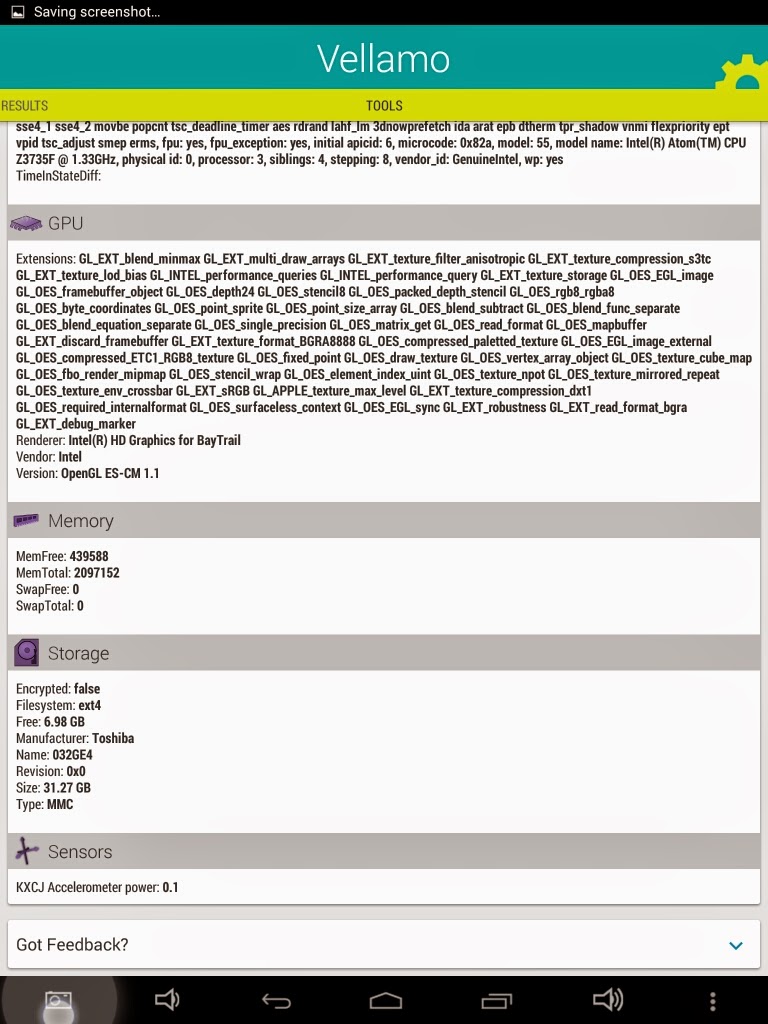
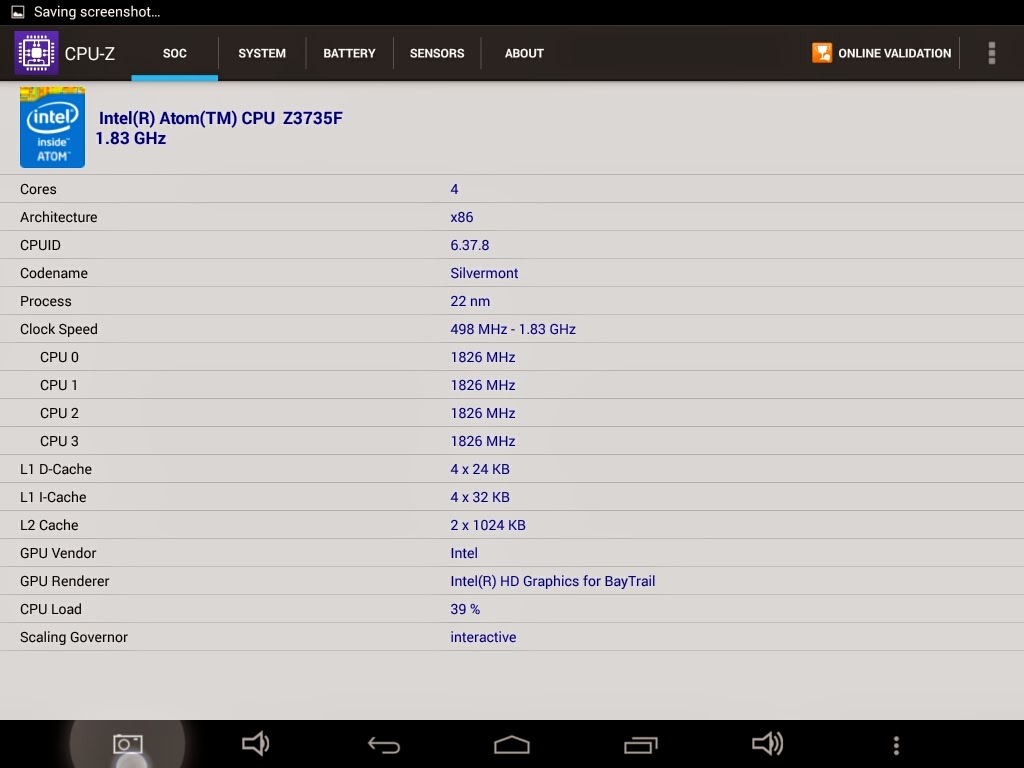
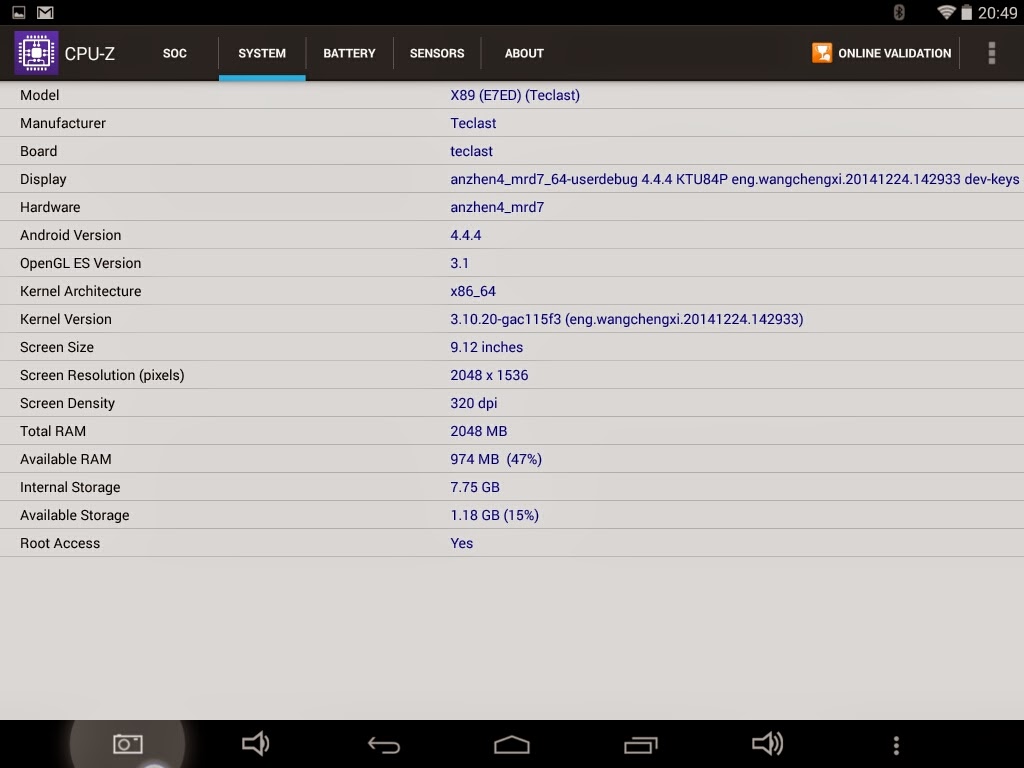
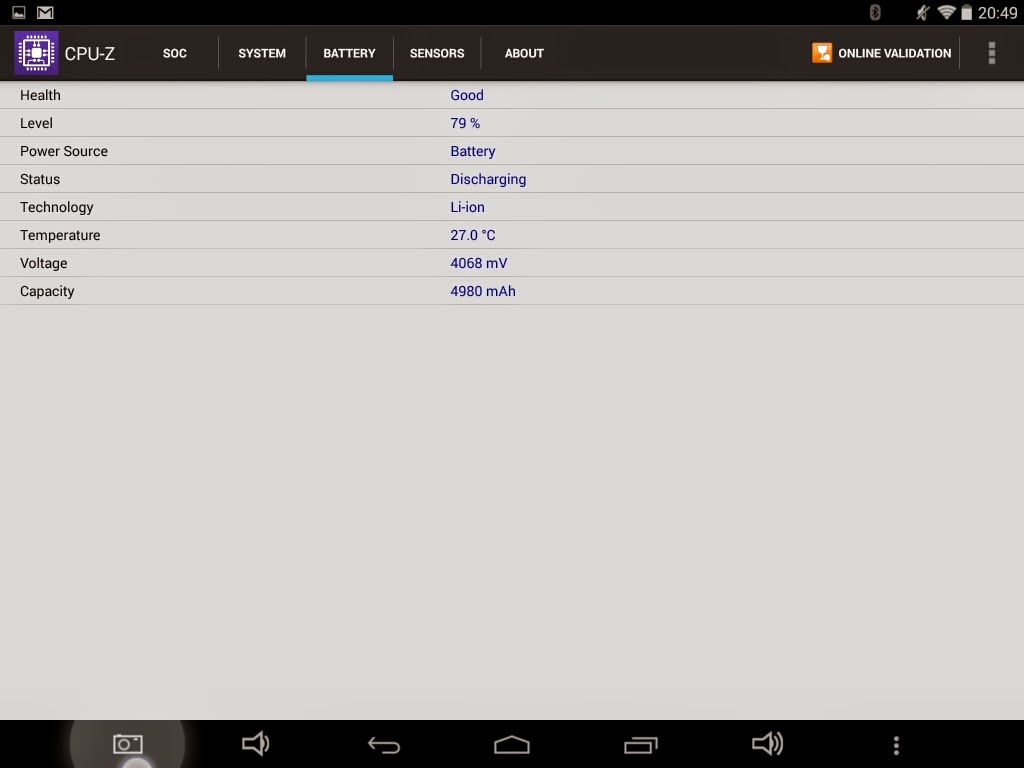
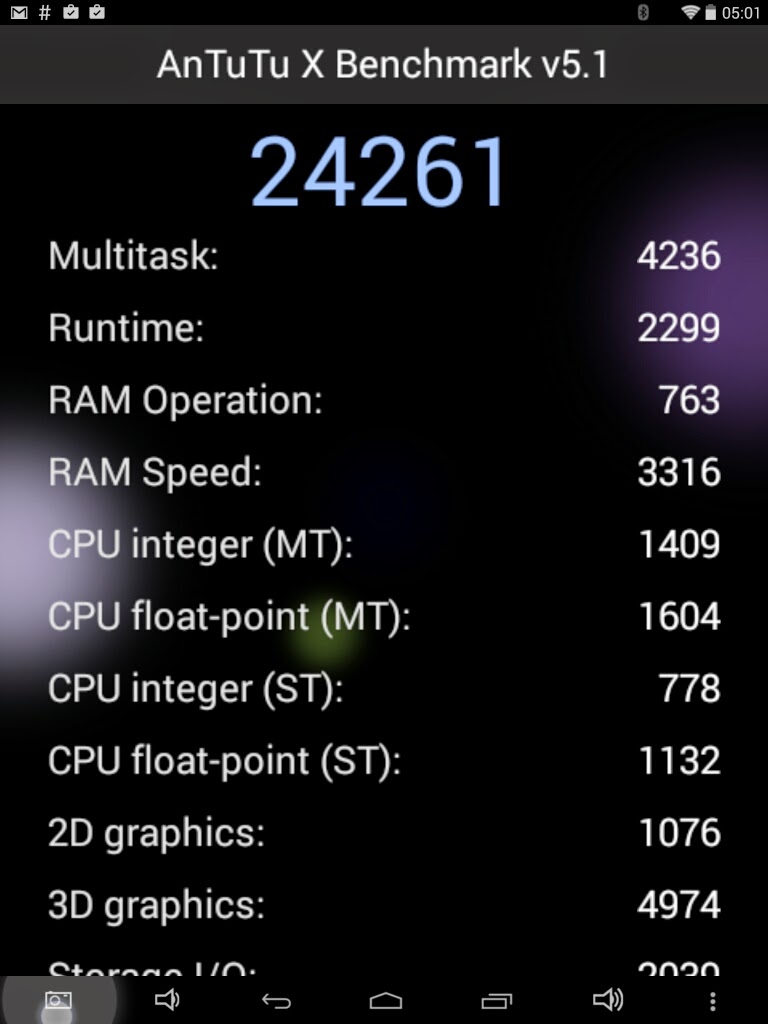
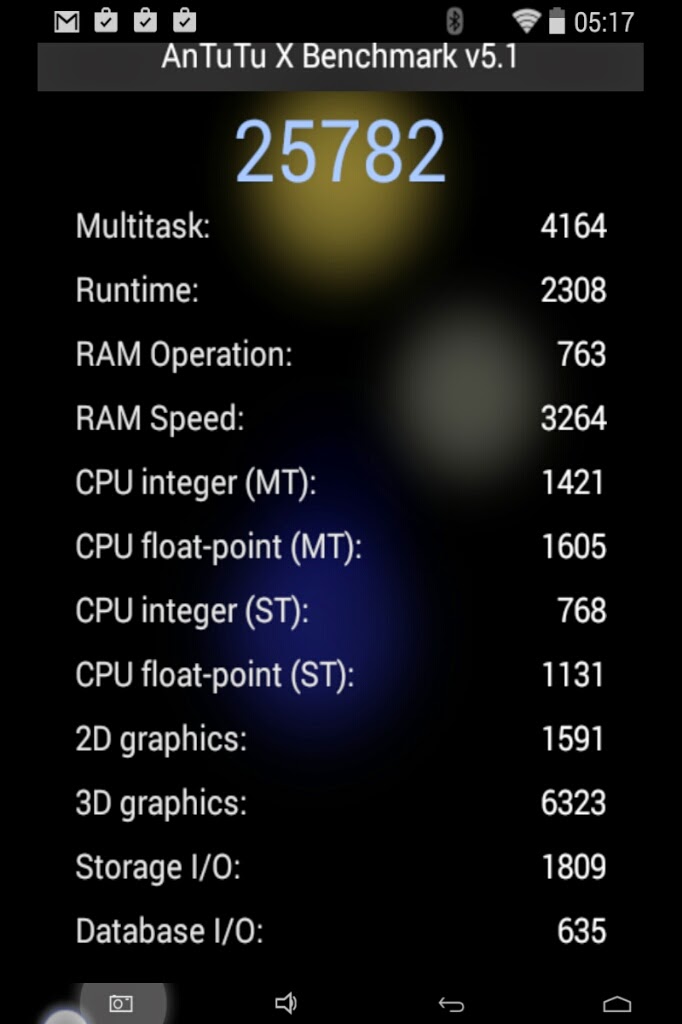
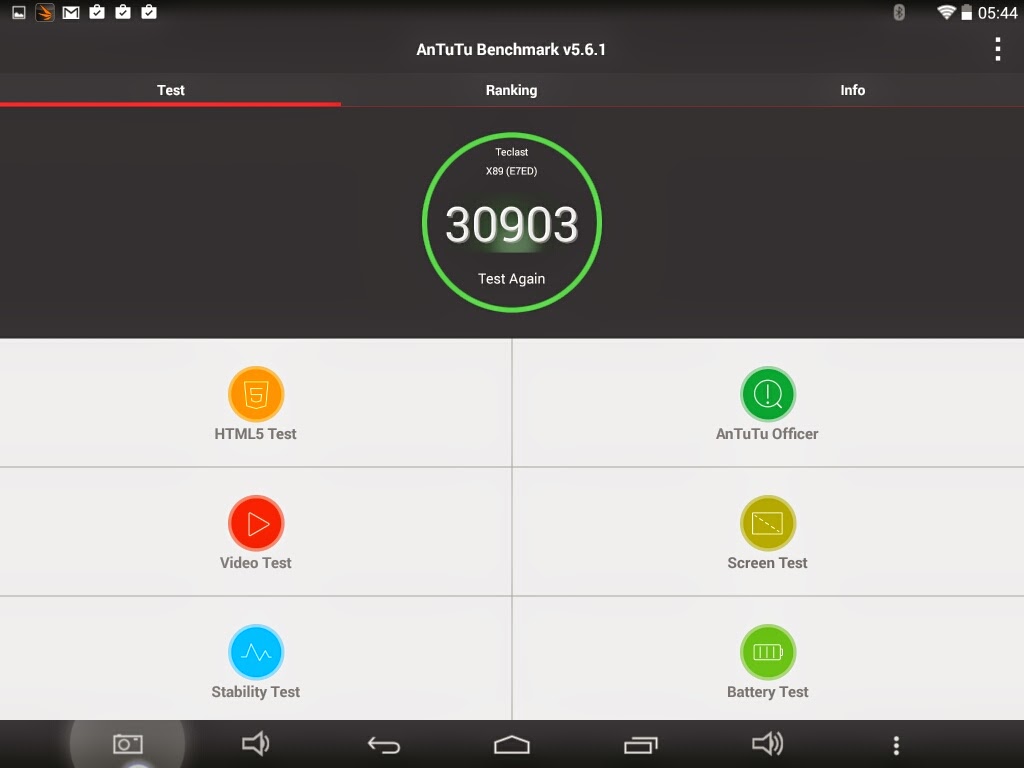
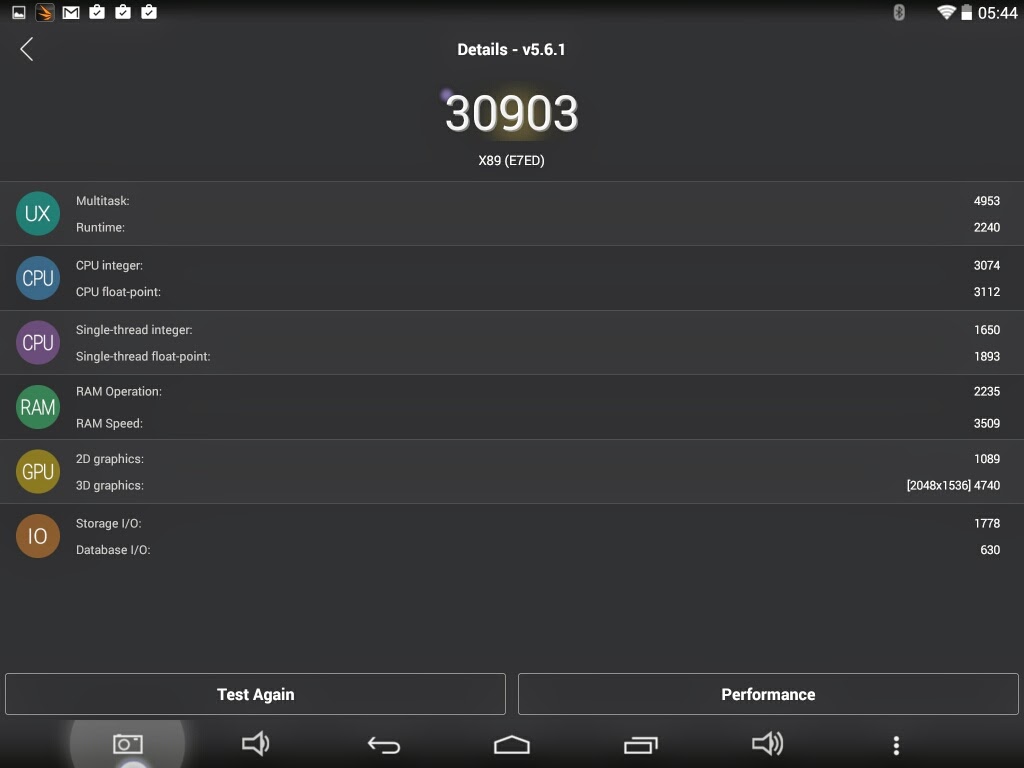
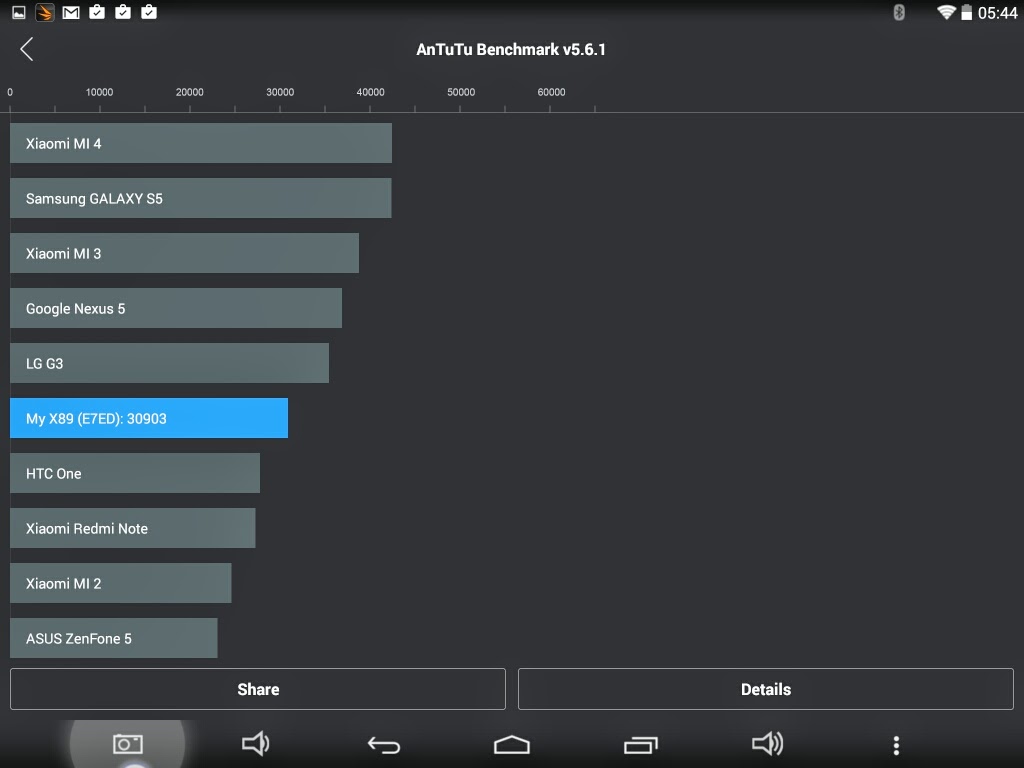
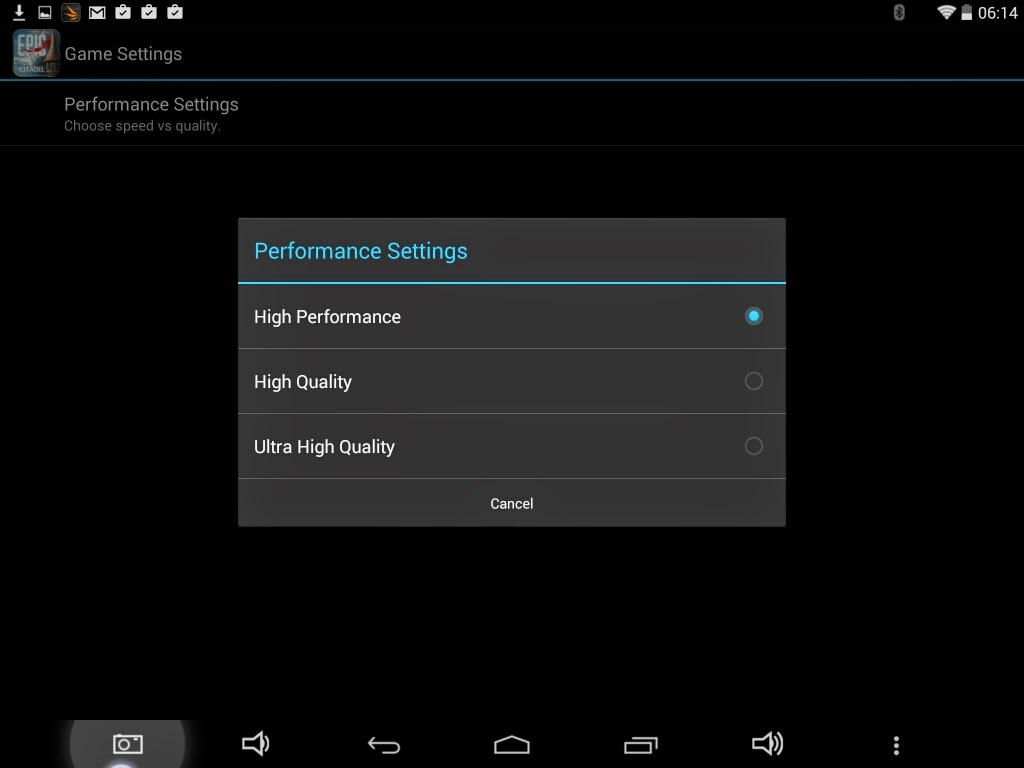
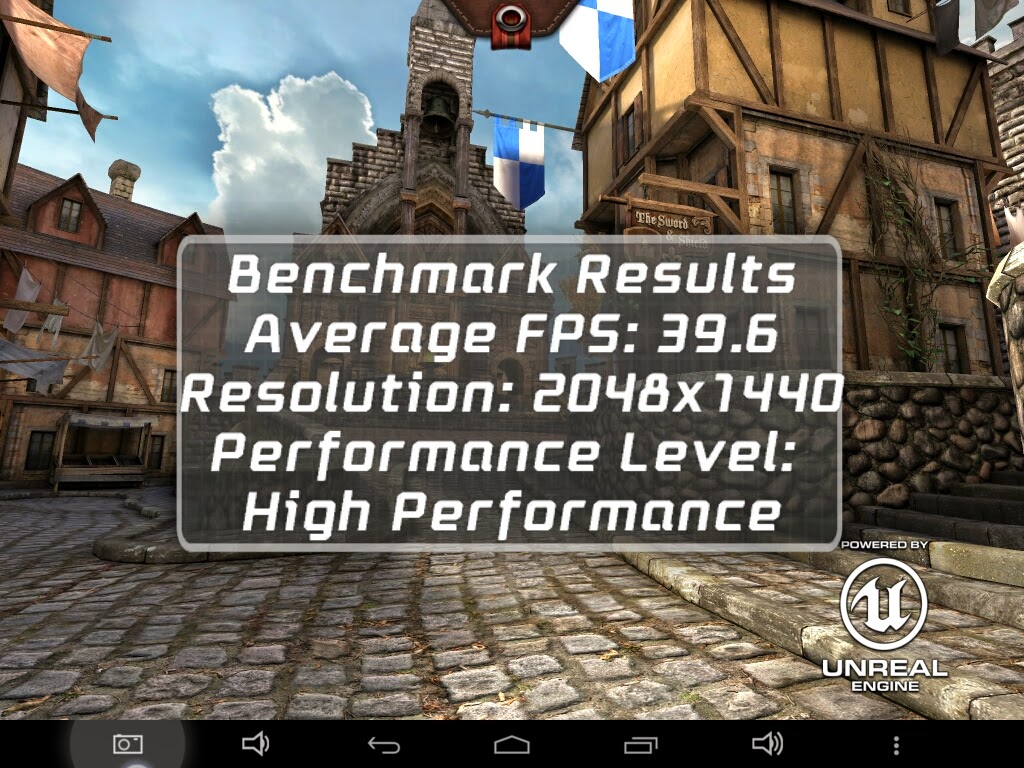
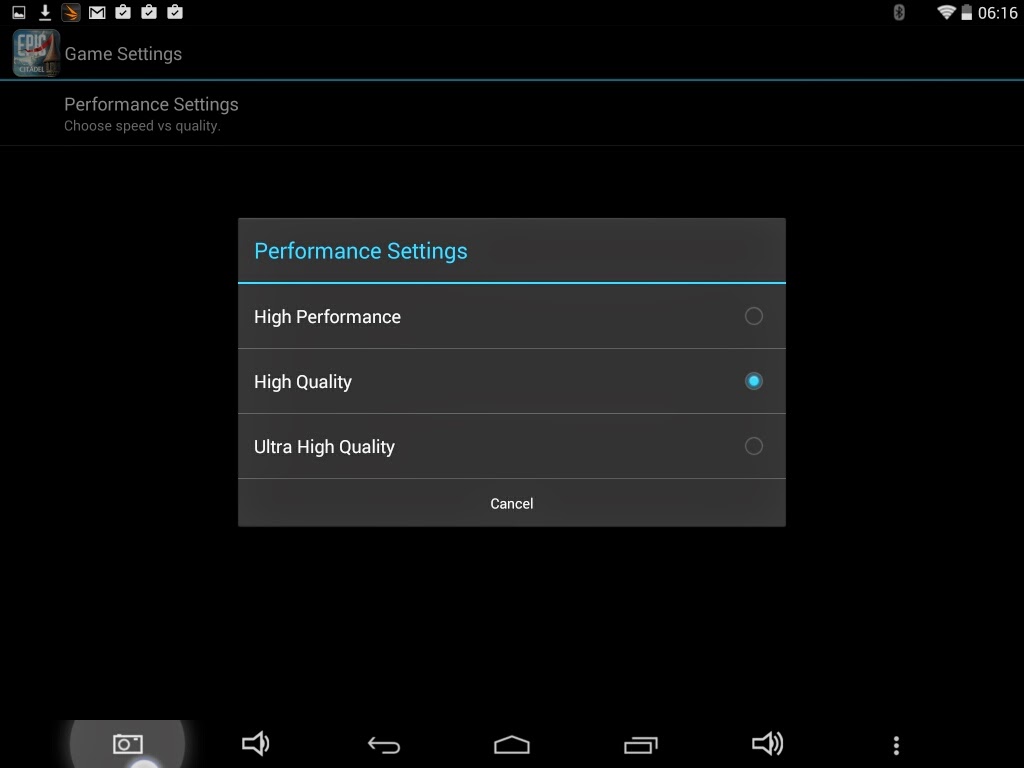
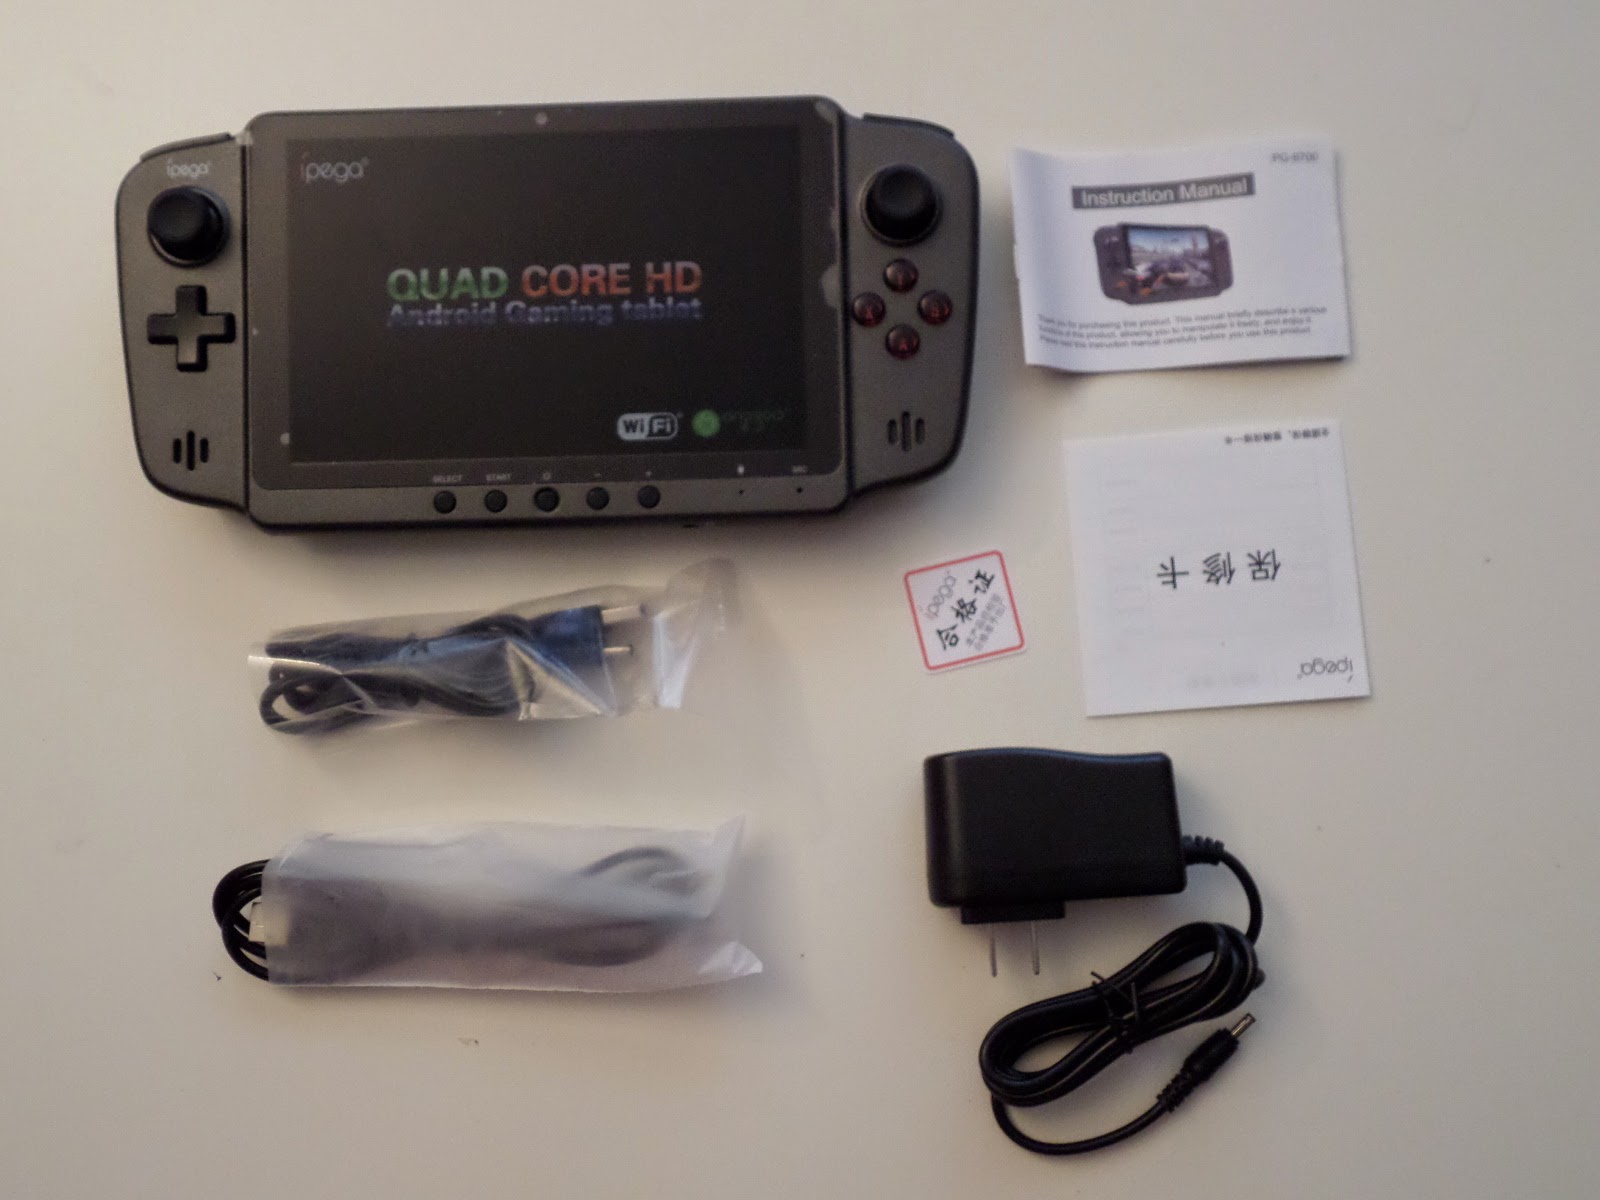
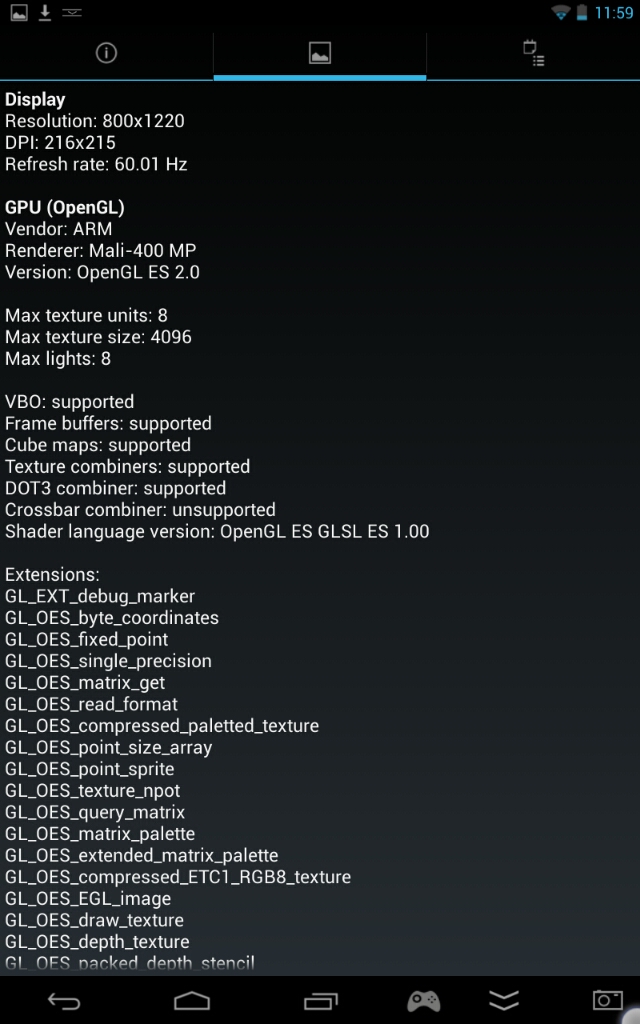
Product information


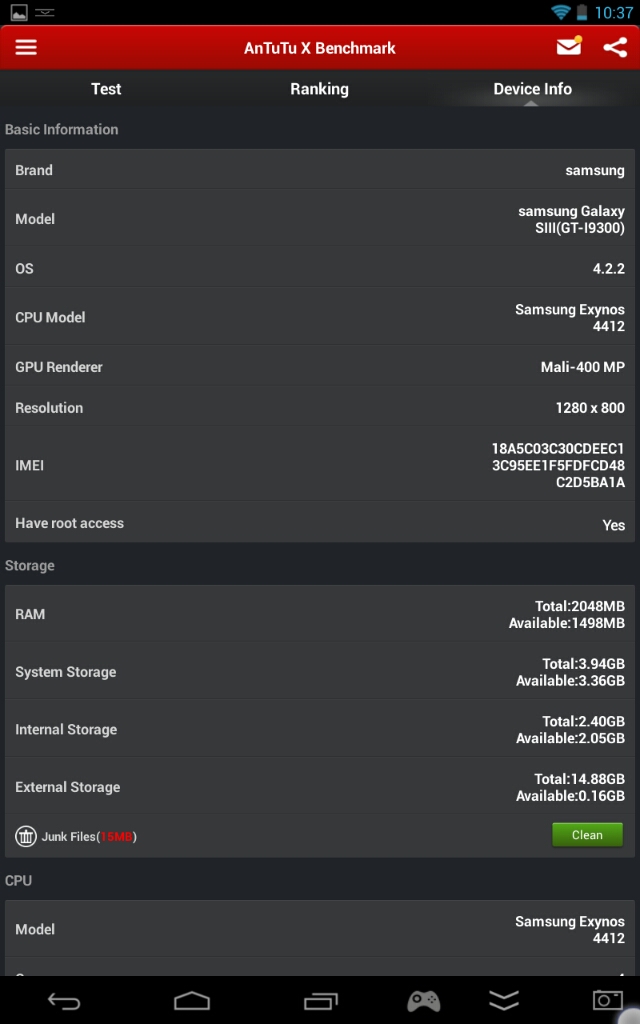
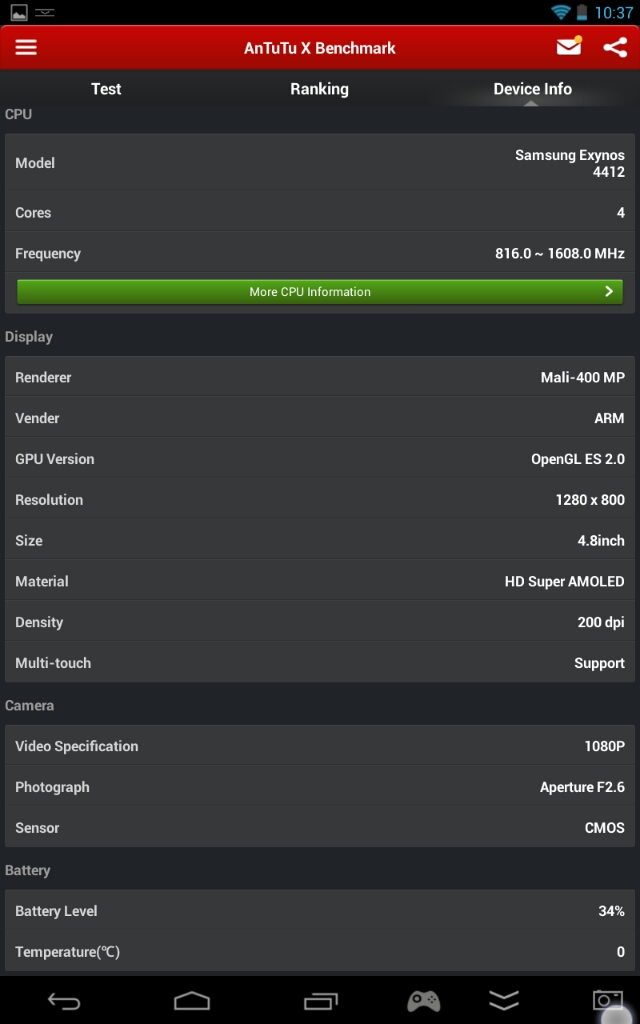
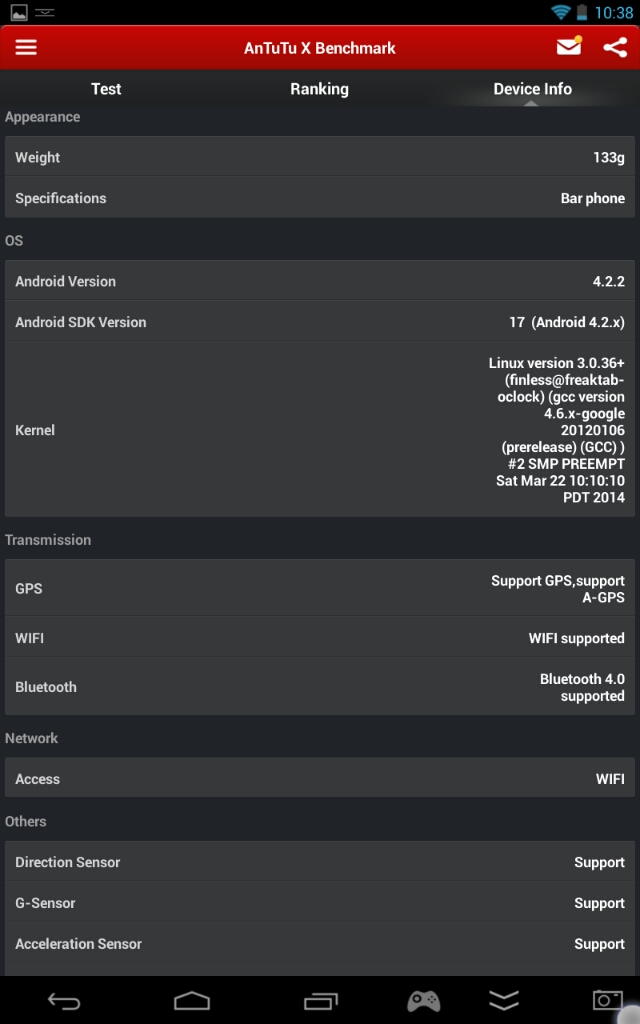
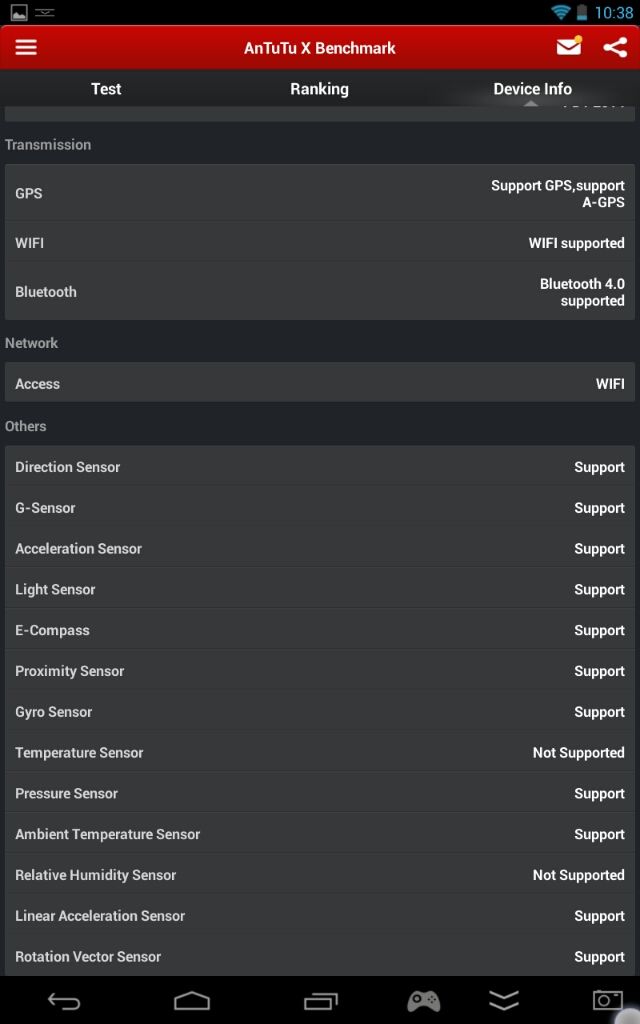


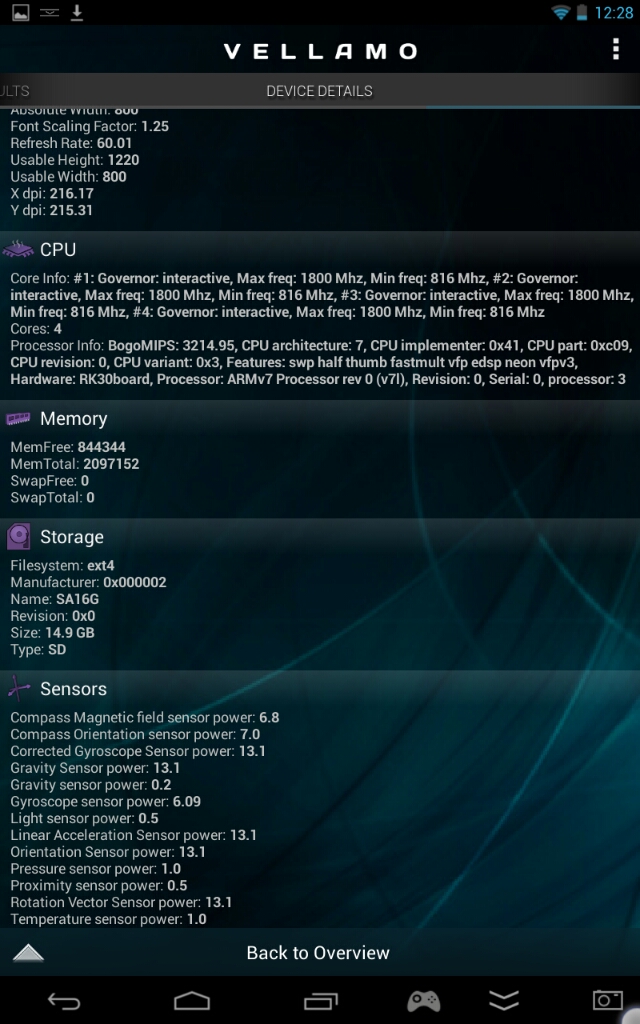
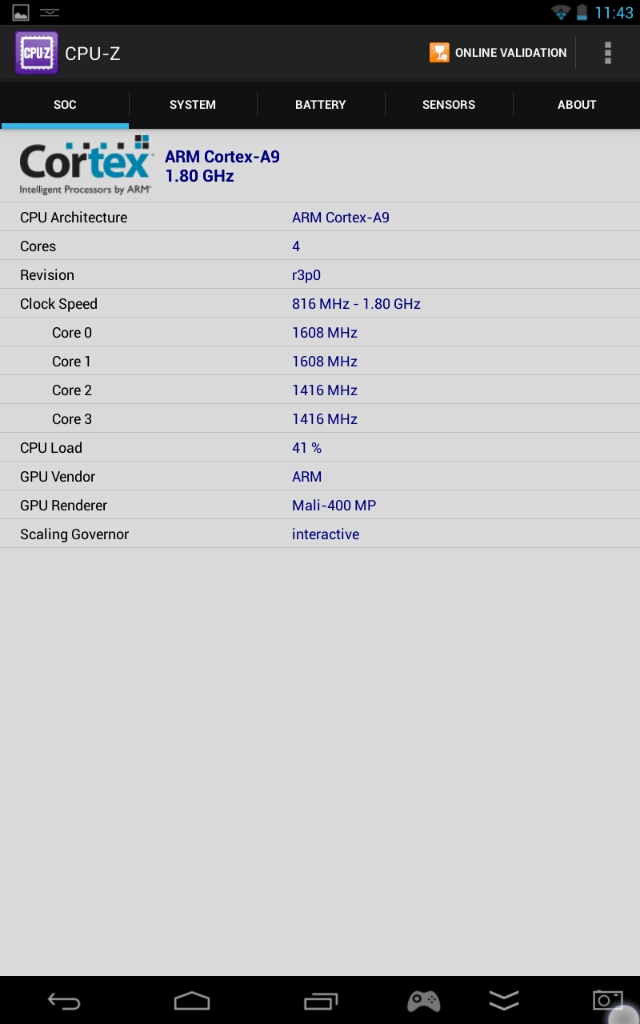
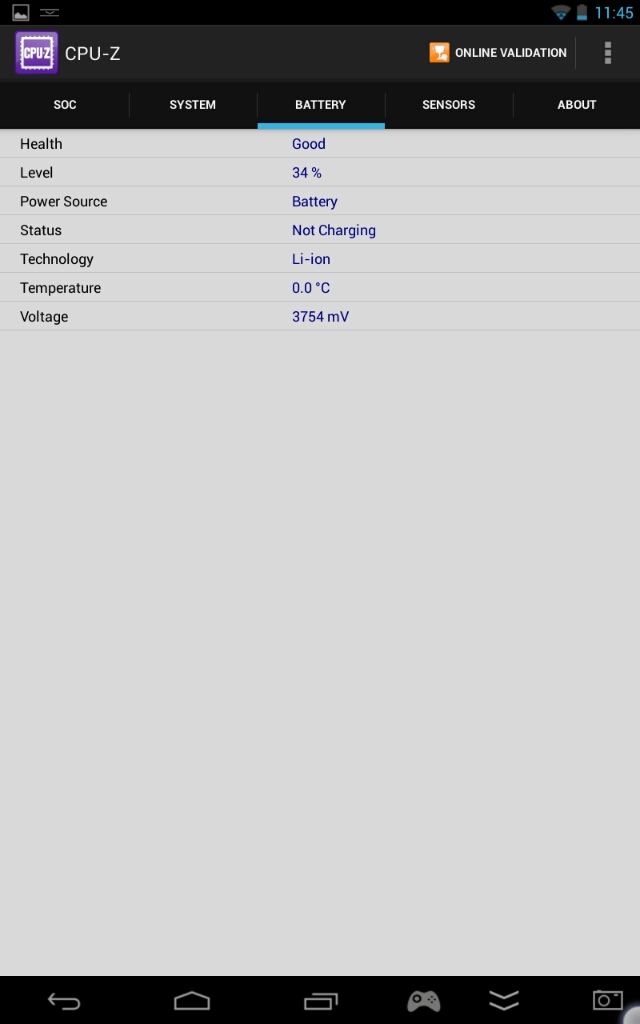
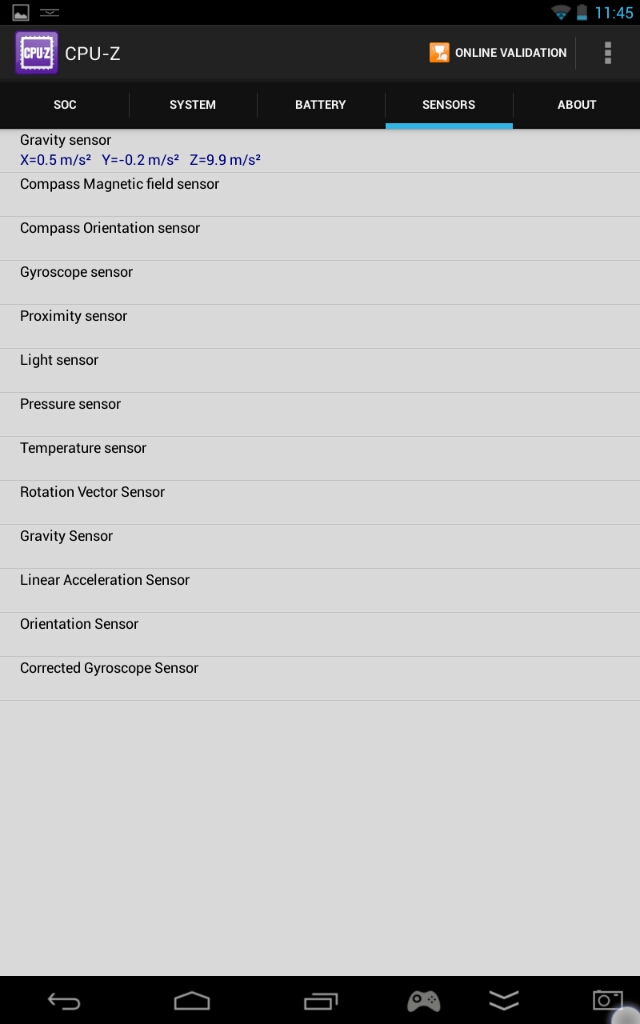
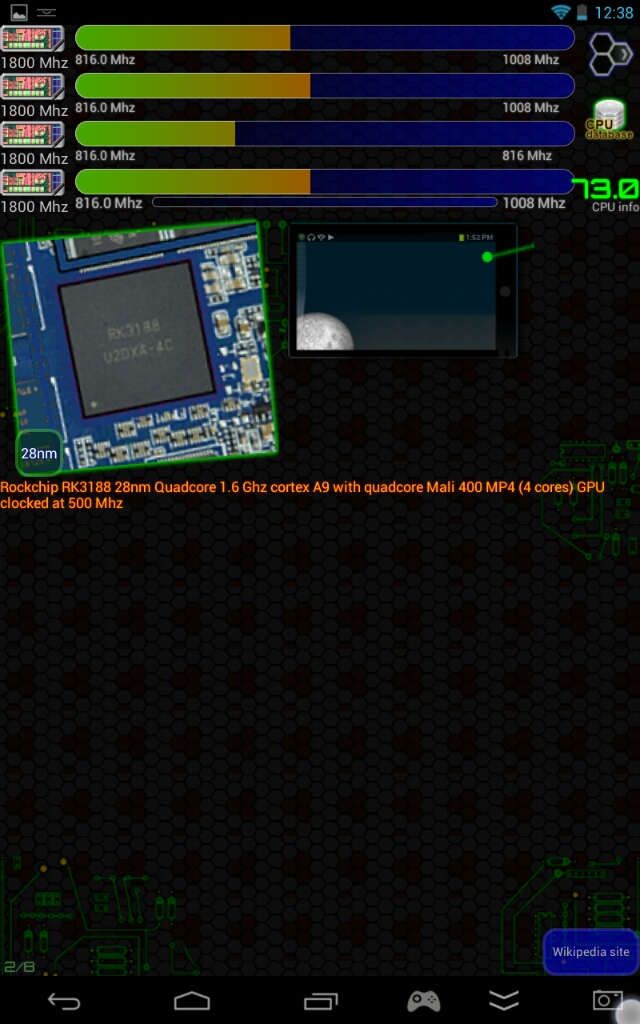
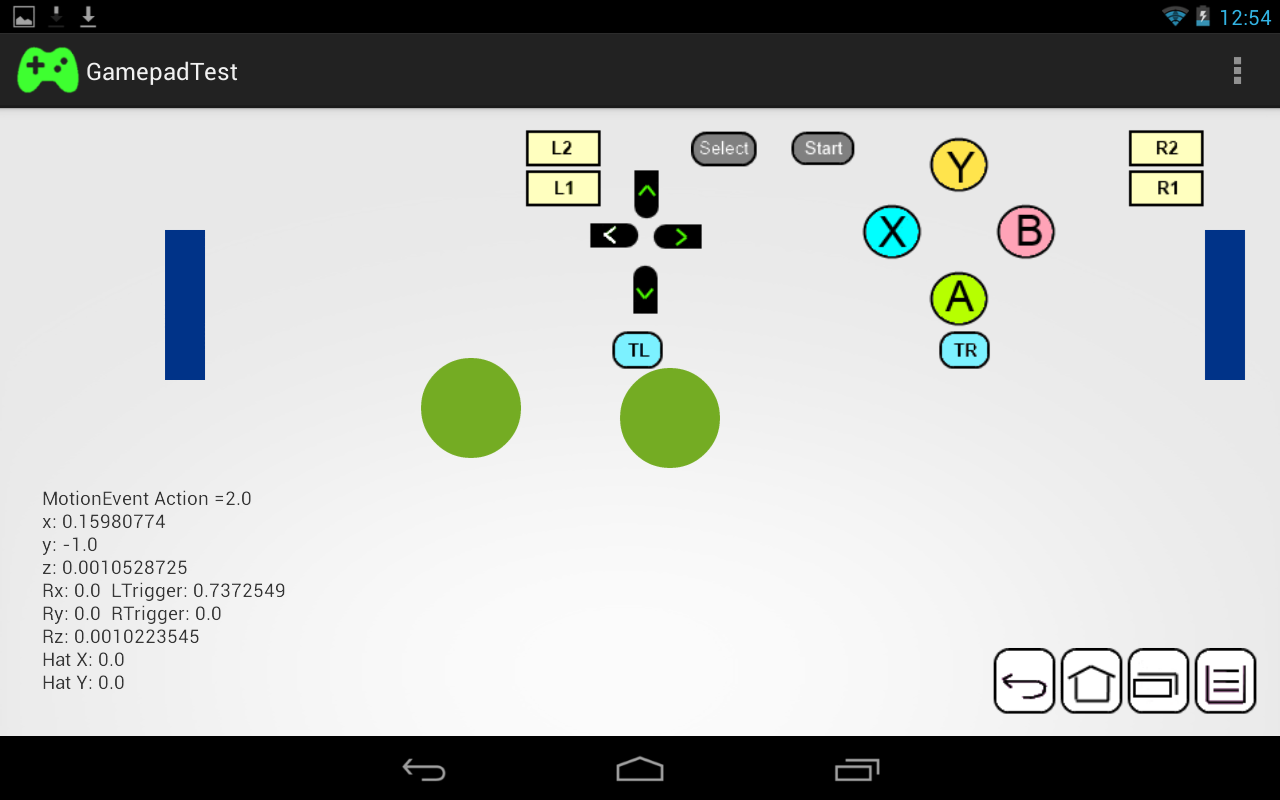
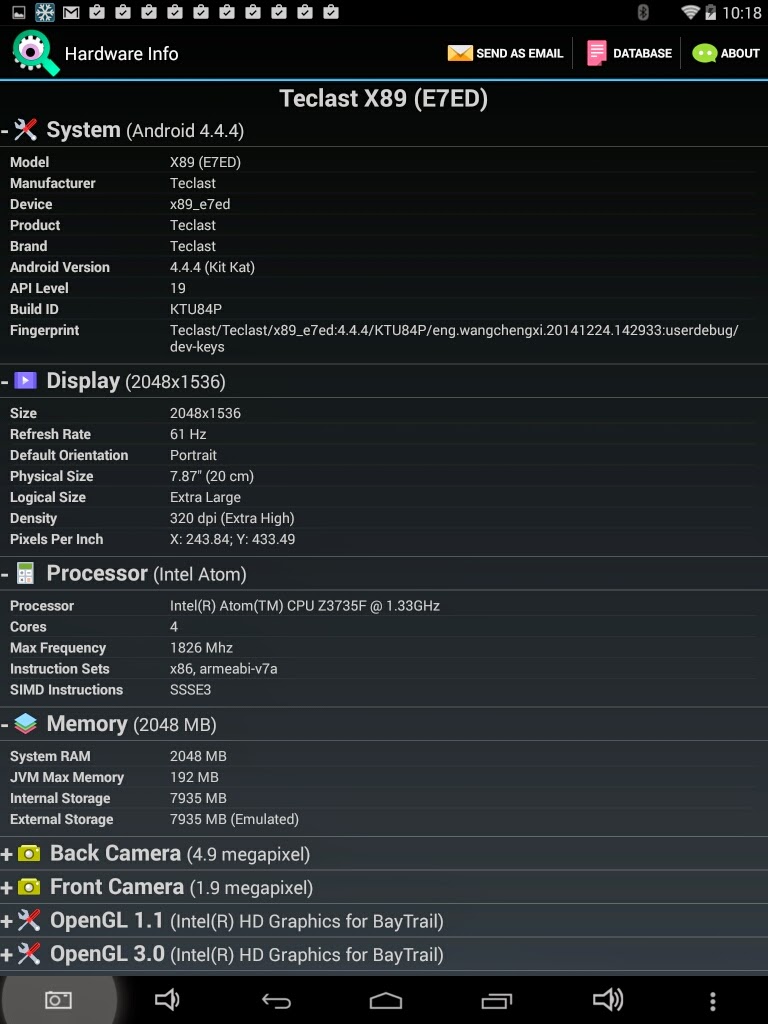
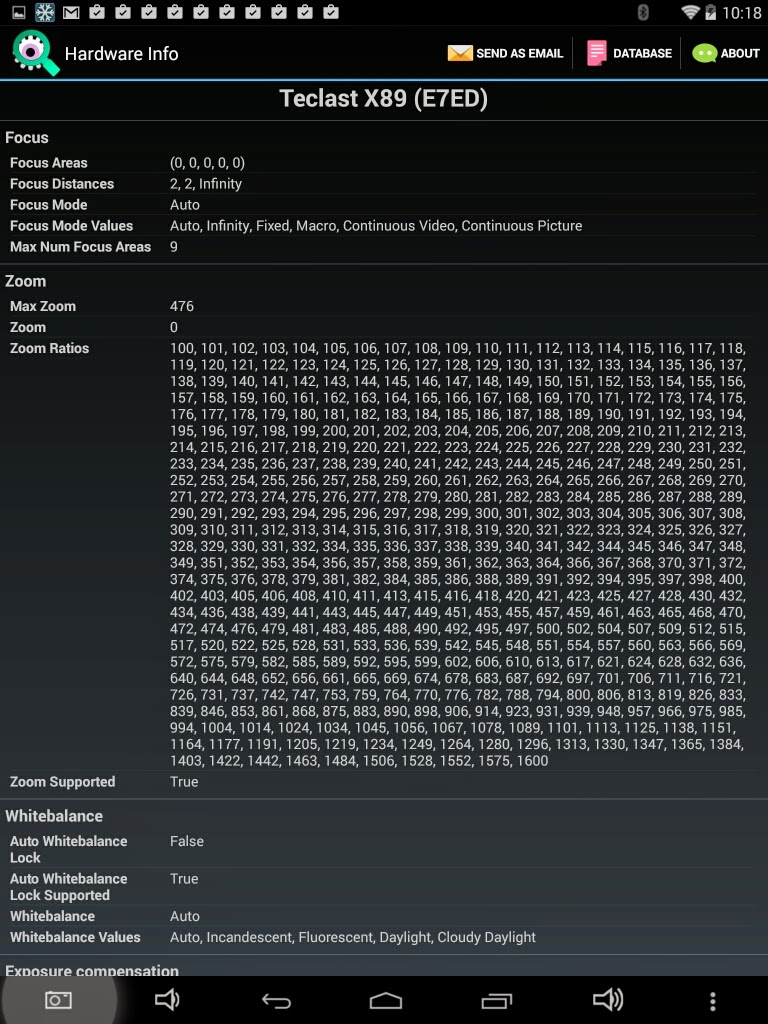
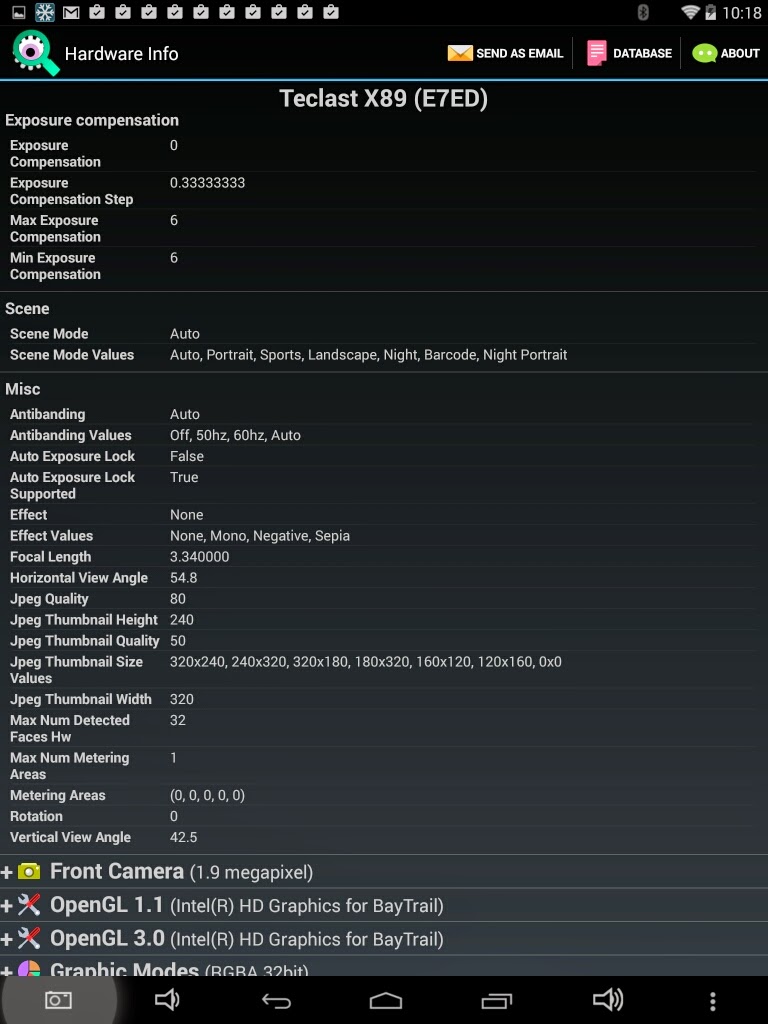
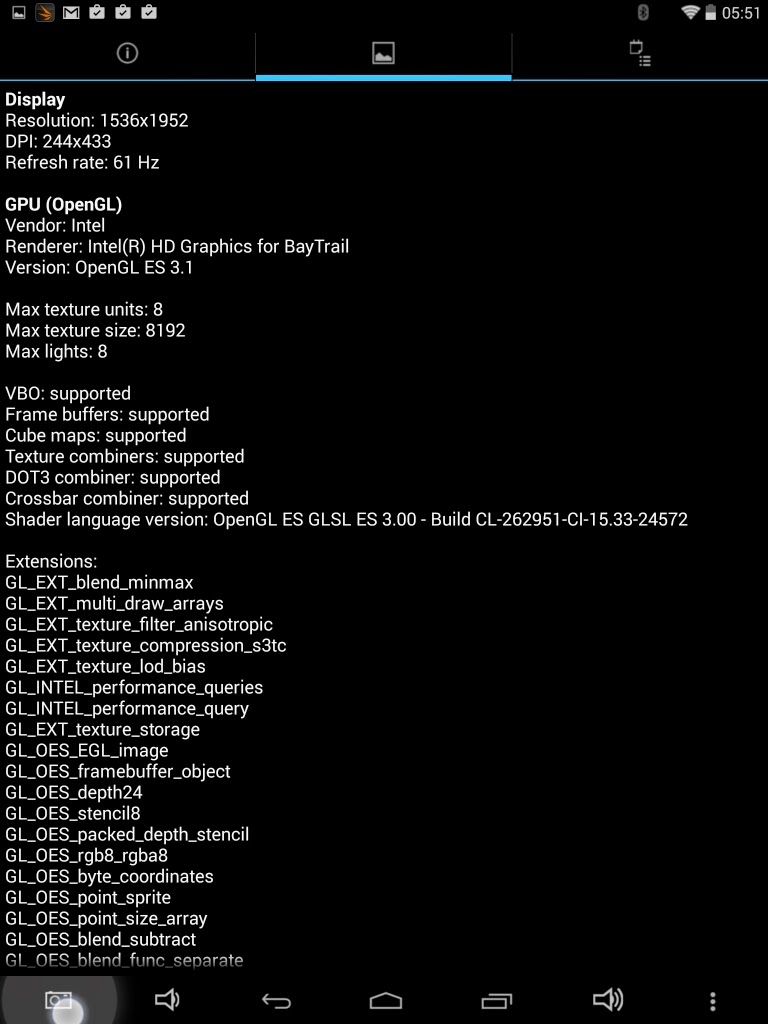
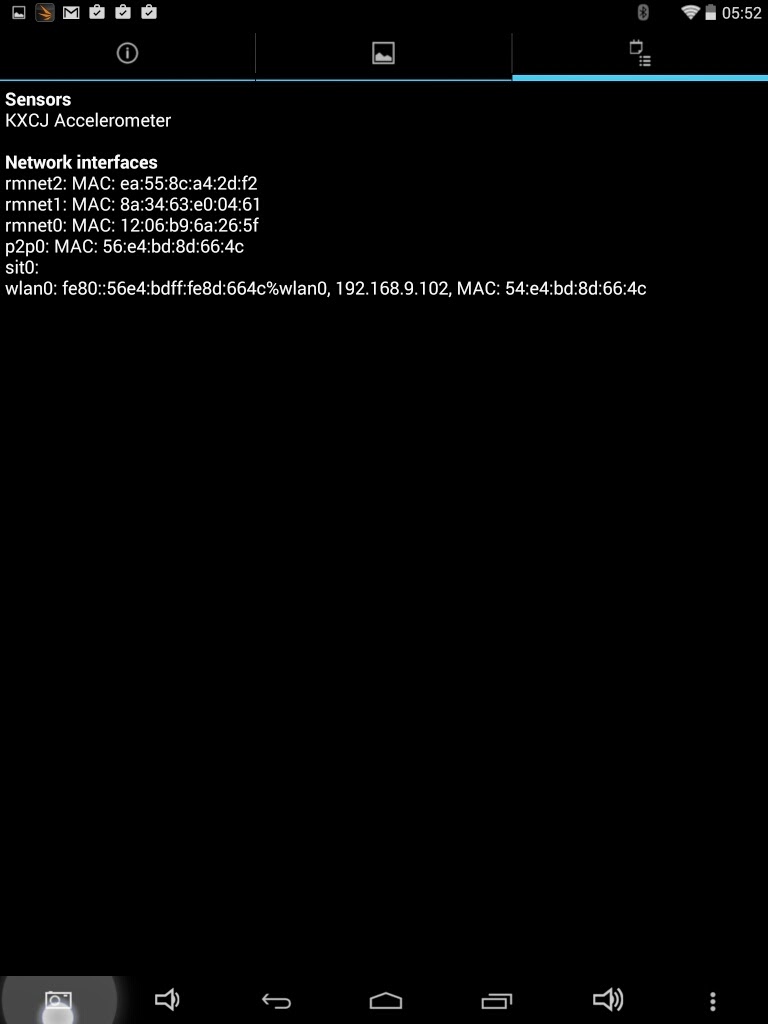
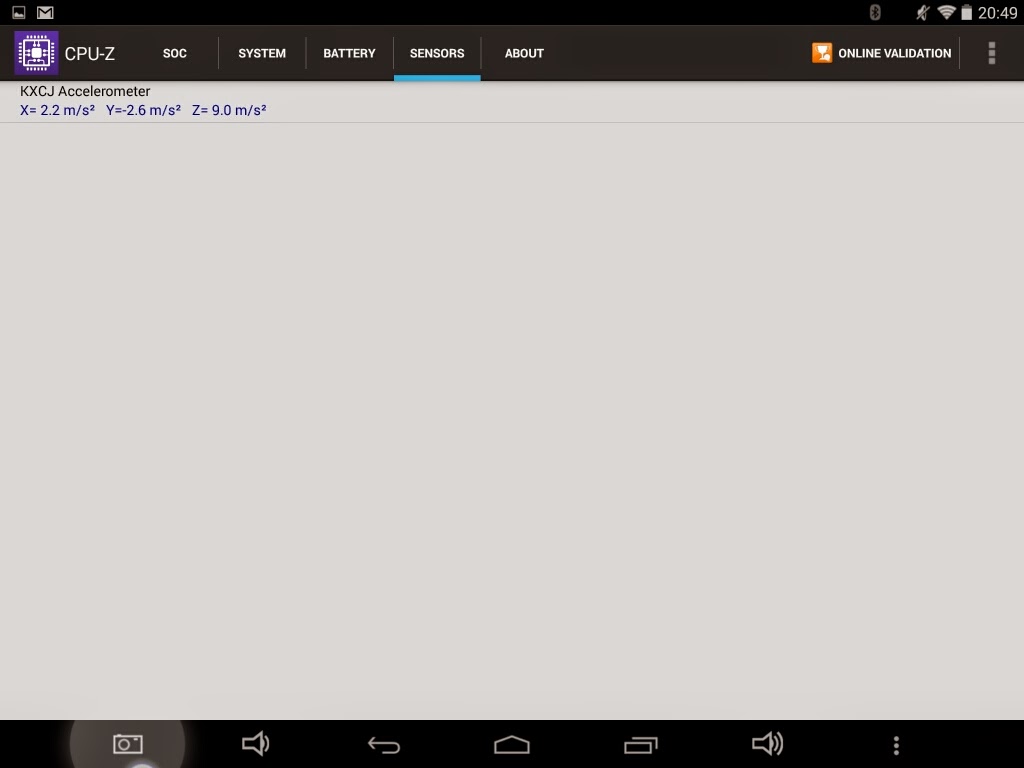
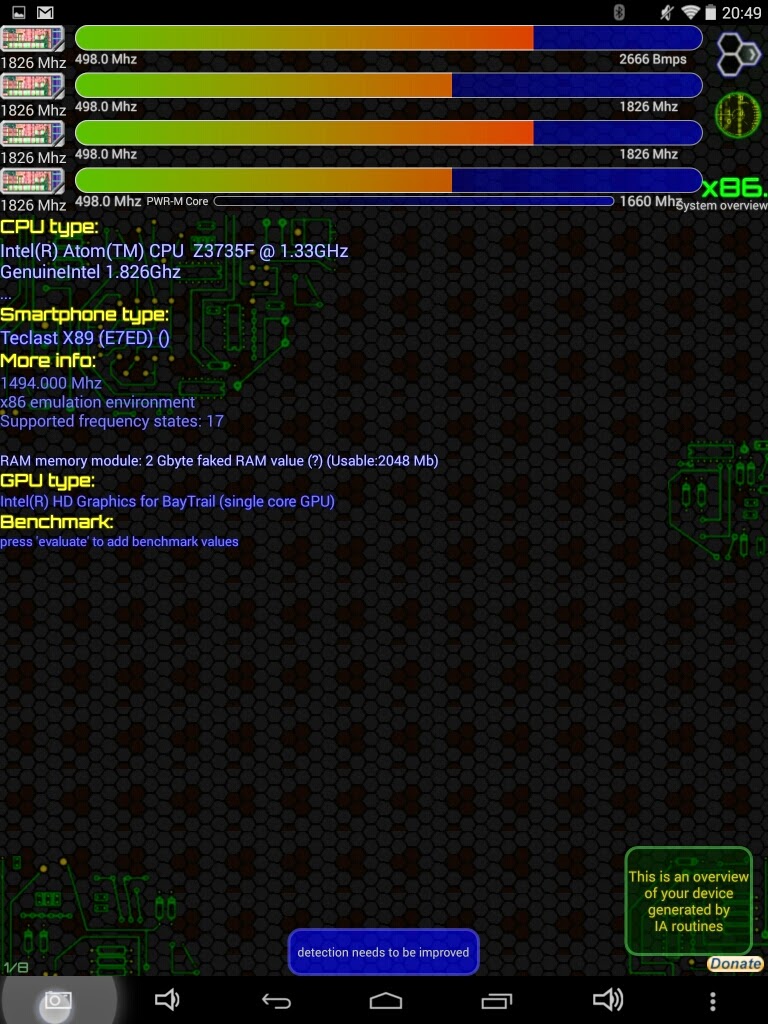
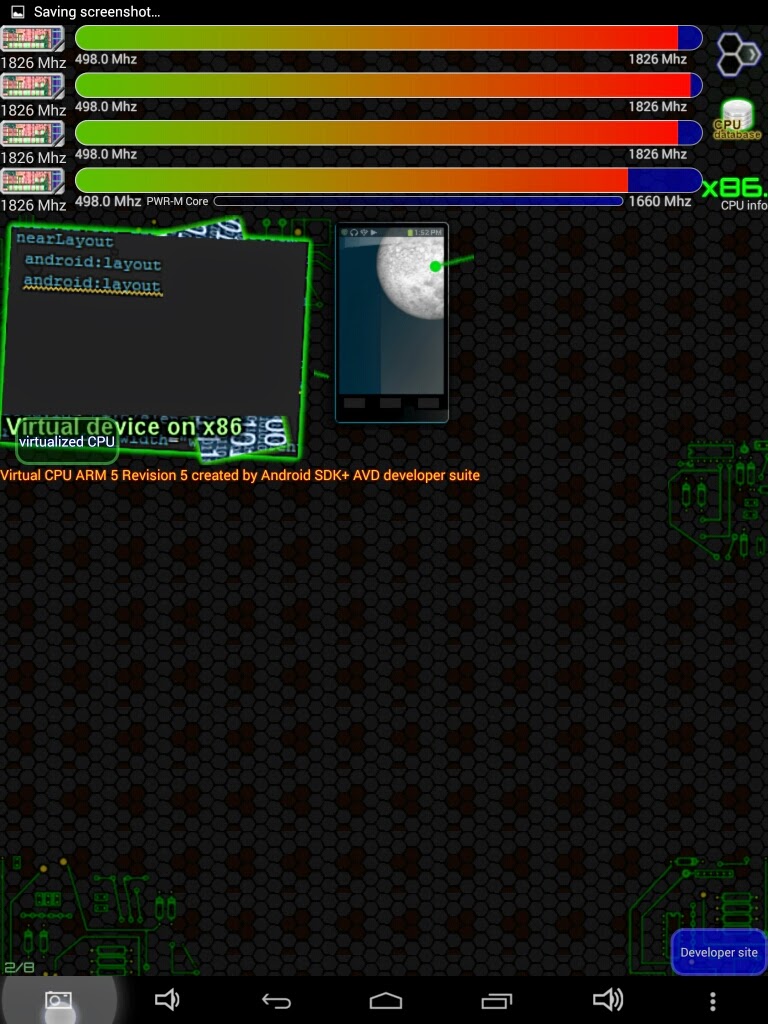
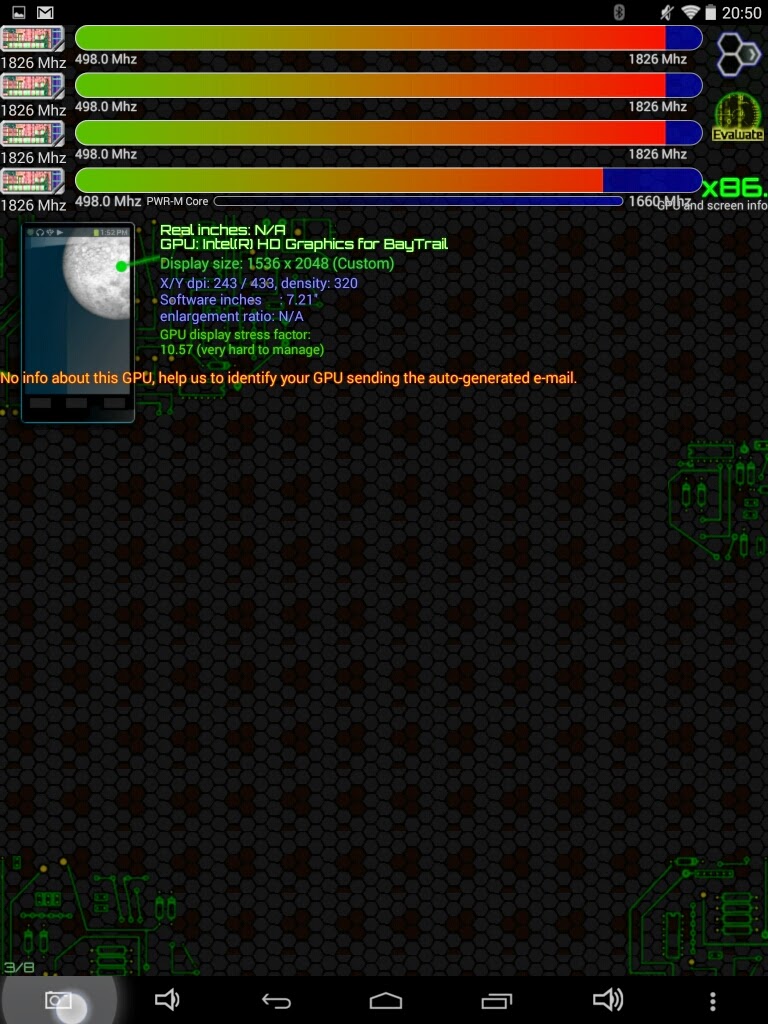
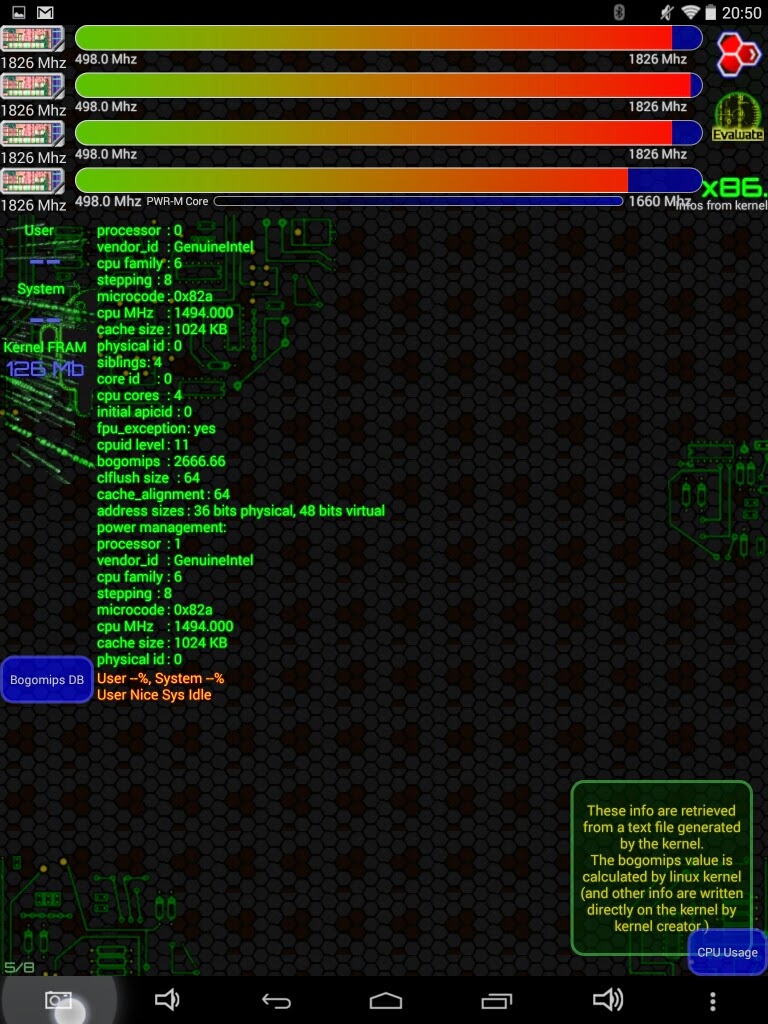
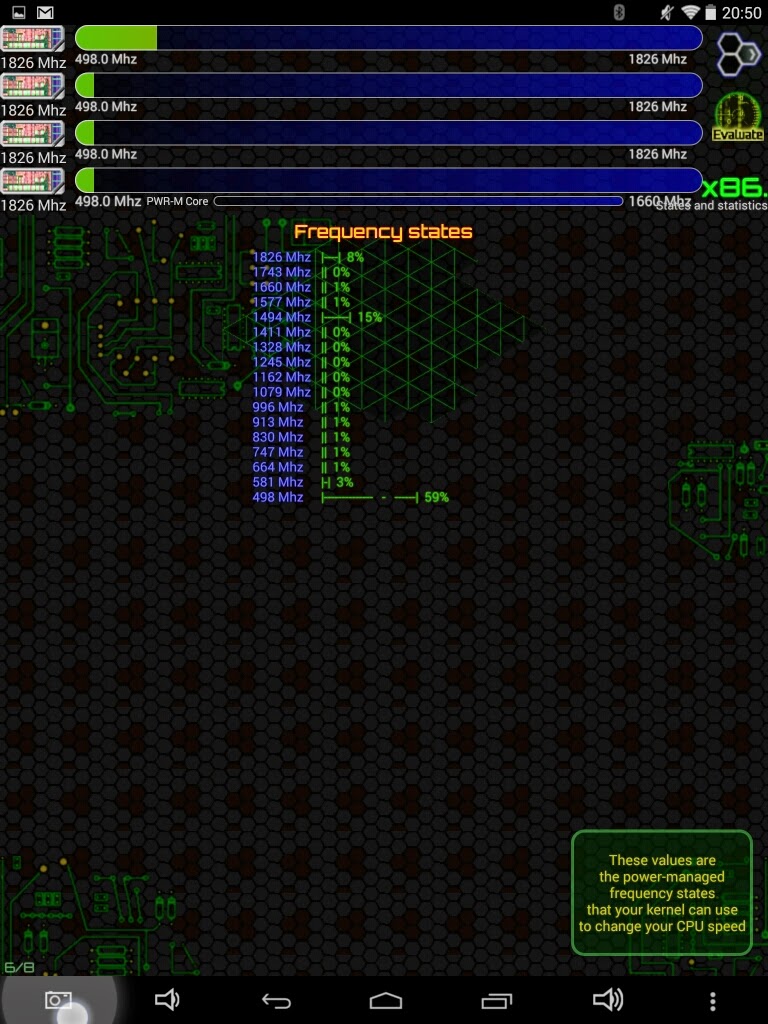
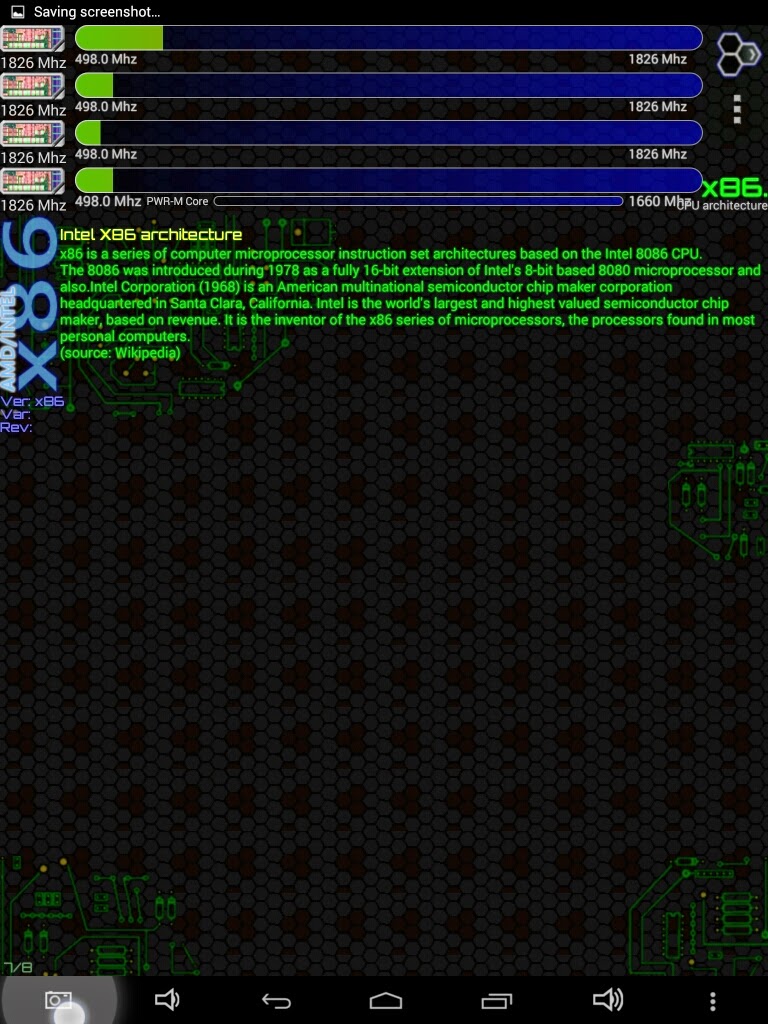
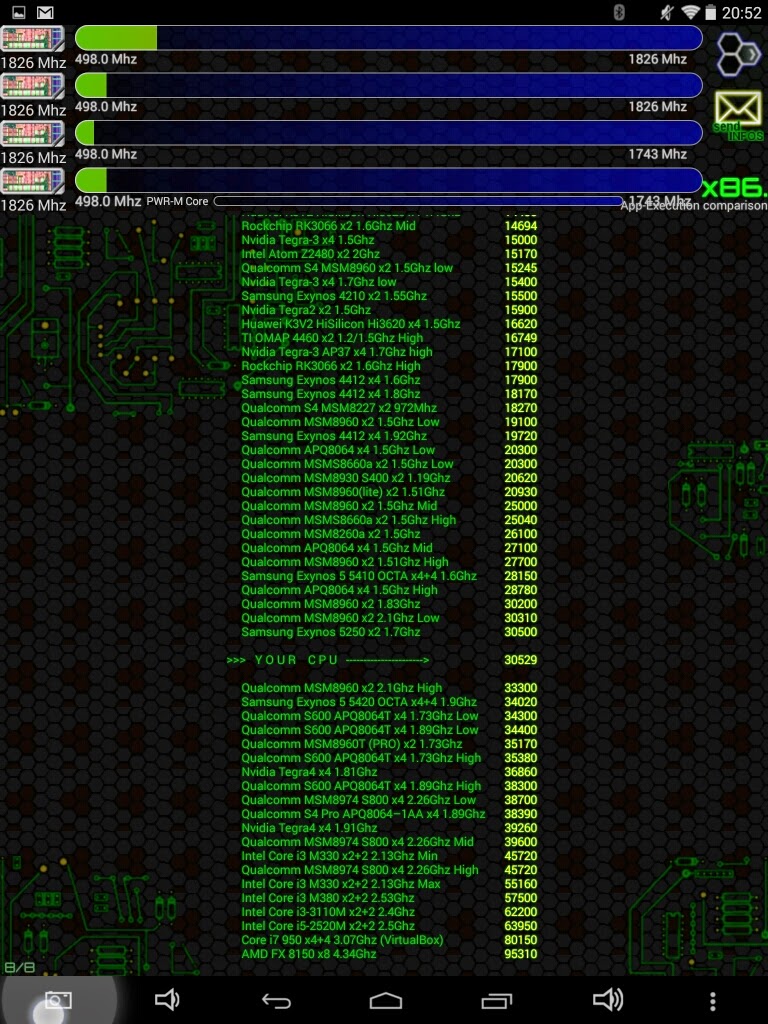
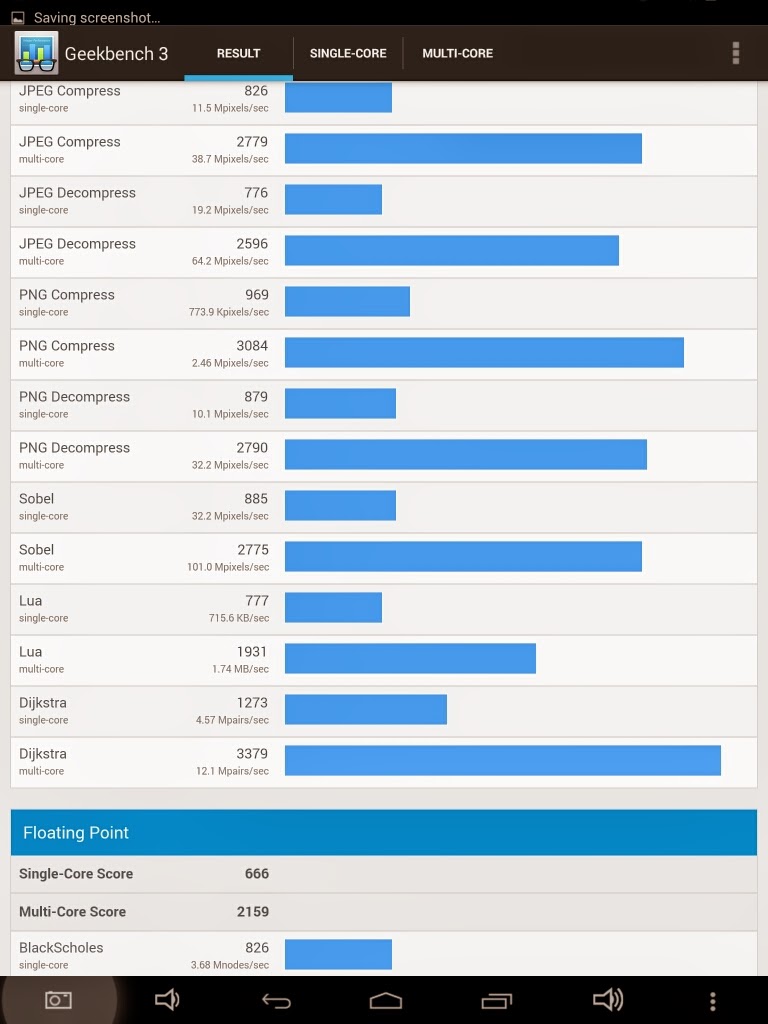
 CPU_Z
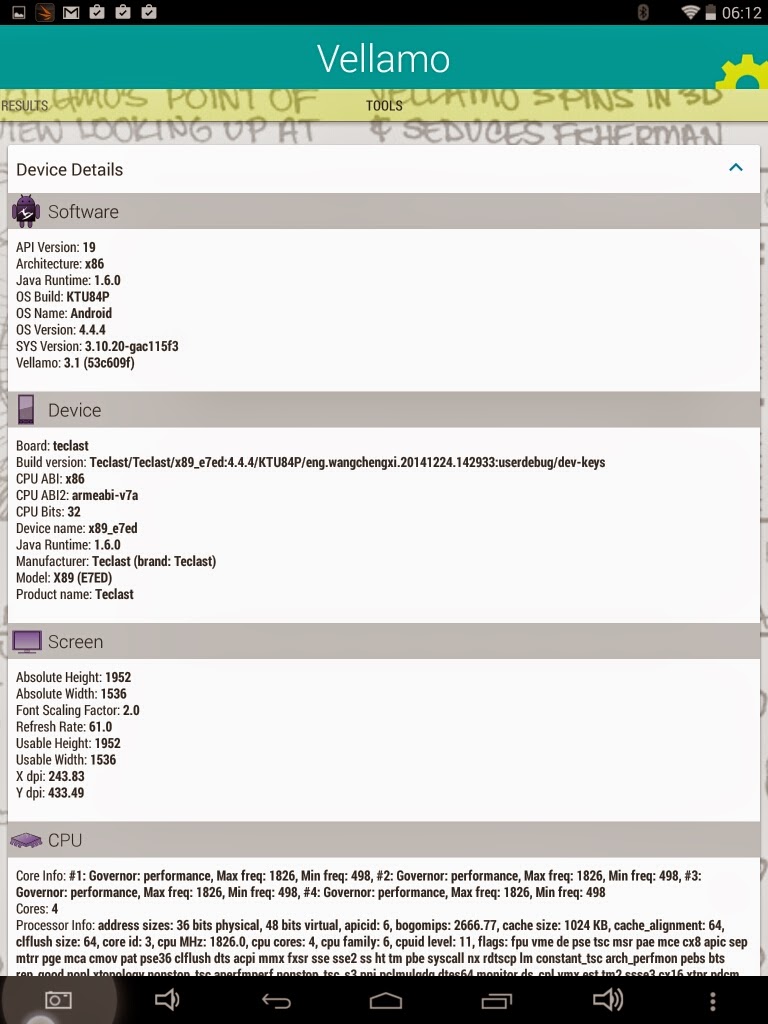
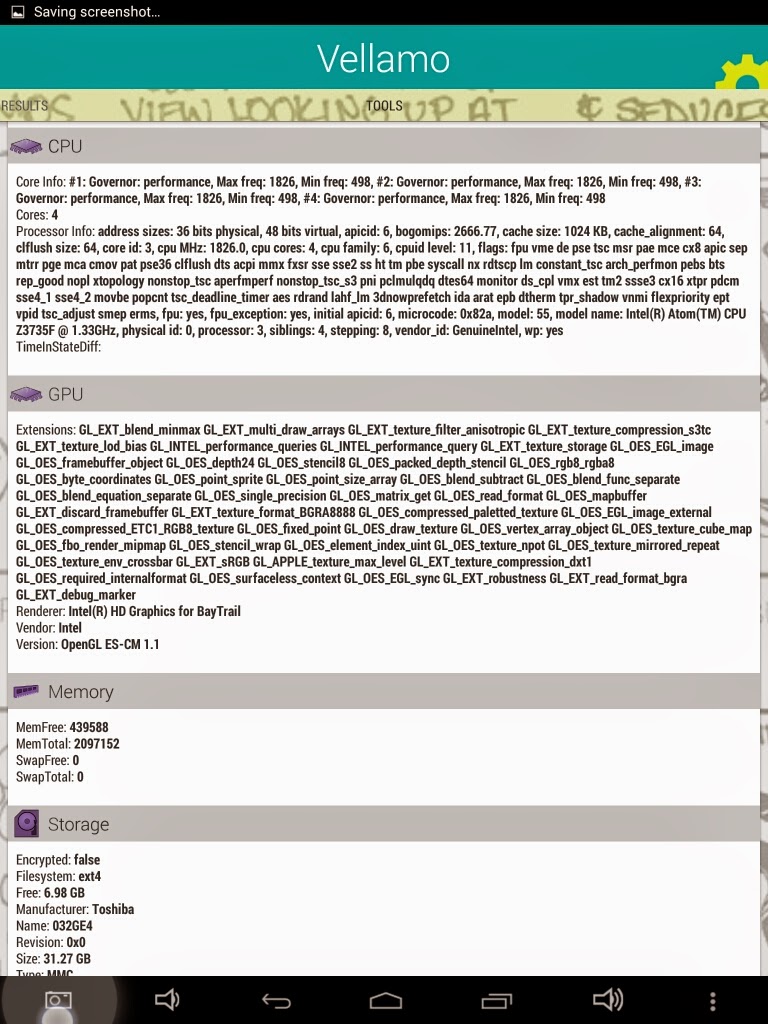
CPU_Z